Nine days debugging one function call, and other lessons from browser-engine integration
Introduction
When Stremio released their new GTK4-based shell using Chromium Embedded Framework (CEF) instead of Qt5/QtWebEngine, it provided the perfect test case for my Debian packaging journey, specially after QT5 has become an End Of Life software that won’t be supported soon.
It was the good usecase to test a big our freshly-packaged CEF library. What followed was a month of debugging that revealed the gap between «library compiles» and «library works.»
This article documents the technical challenges of integrating CEF with a real-world application for Debian packaging.
The Application Architecture
Stremio-gtk is a relatively simple application in concept:
Create a CEF browser window
Load https://app.strem.io/shell-v4.4
Provide IPC bridge for the web app to control native features
Handle video playback through MPV
In practice, each step revealed hidden complexity.
Challenge 1: Resource File Discovery
The Problem
CEF processes need to locate several resource files at startup:
This works for the browser process. Subprocesses crashed immediately.
Root Cause
CEF’s multi-process architecture spawns specialized subprocesses for rendering, GPU operations, and utility functions. These subprocesses call cef_execute_process() as their first action and exit without ever seeing the Settings structure.
The subprocess entry point:
fn main() {
    // For subprocesses, this returns immediately with exit code
    let exit_code = cef_execute_process(&args, None, None);
    if exit_code >= 0 {
        std::process::exit(exit_code);
    }

    // Only browser process reaches here
    let settings = Settings { ... };
    cef_initialize(&settings);
}
By the time Settings could be applied, subprocesses have already failed to find resources.
Solution
CEF searches for resources relative to libcef.so, not the application binary. Symlinks in the library directory solve the problem:
# In /usr/lib/x86_64-linux-gnu/:
icudtl.dat -> ../../share/cef/icudtl.dat
v8_context_snapshot.bin -> ../../share/cef/v8_context_snapshot.bin
For settings that subprocesses need, command-line switches must be added in the on_before_command_line_processing callback, which is called for all process types:
With resources loading correctly, the GPU subprocess now launched—and immediately crashed. CEF retried nine times before giving up:
[GPU] error_code=1002
GPU process isn't usable. Goodbye.
No stack traces, no meaningful logs. The GPU process died before producing diagnostics.
Investigation
Adding --enable-logging --v=1 revealed the GPU process was failing to initialize OpenGL contexts. The error suggested EGL/GLES library issues.
CEF’s GPU process expects ANGLE (Almost Native Graphics Layer Engine)—Google’s OpenGL ES implementation built on Vulkan and DirectX. It’s not interchangeable with Mesa’s EGL implementation despite similar APIs.
Solution
The CEF package must bundle its own ANGLE libraries:
Relative paths failed because the ICD loader doesn’t resolve paths relative to the JSON file.
Challenge 3: The Nine-Day IPC Debugging
The Symptom
CEF launched, pages loaded, UI rendered—but video playback fell back to HTML5 instead of the native MPV player. The web app was treating stremio-gtk as a browser rather than a native shell.
The Qt WebChannel Protocol
Stremio’s web application expects to communicate with its native shell through Qt’s WebChannel protocol. The original Qt5 shell creates a transport object:
Nine days of debugging IPC formats, serialization, and message types. The actual fix was one function call that the Qt5 shell made explicitly. The documentation existed—in QML code that had to be read line by line.
Challenge 4: Native Widget Rendering
The Problem
After IPC worked, a minor but visible issue remained: HTML <select> dropdowns didn’t work. Clicking them did nothing.
Root Cause
CEF’s offscreen rendering mode (used by stremio-gtk) renders everything to a buffer via OnPaint. Native OS widgets like dropdown menus require real window handles.
The hidden native <select> elements sync state for AngularJS compatibility.
The Final Patch Count
After all debugging, stremio-gtk required 24 patches:
Category
Count
Examples
Build system
4
Cargo vendor, system paths
CEF integration
6
Resource paths, ANGLE, zygote
IPC protocol
8
Transport object, JSON format, initShellComm
Runtime fixes
4
User agent, event signals
UI workarounds
2
Select replacement, focus handling
Testing Insights
What Unit Tests Miss
The CEF package passed all its tests. Stremio-gtk revealed:
Resource symlinks needed in unexpected locations
ANGLE is required, not optional
Subprocess initialization differs from main process
IPC protocol details matter for real applications
Integration Test Value
A demanding application like stremio-gtk (video, IPC, GPU, offscreen rendering) stress-tests features that simple «load webpage» tests never touch.
Upstream Bug Discovery
Several issues exist in upstream stremio-linux-shell. The Flatpak likely works by accident of bundling or timing. These fixes should flow back.
Conclusion
The stremio-gtk packaging revealed that CEF integration is more than linking against a library. The multi-process architecture, resource discovery, GPU requirements, and IPC protocols all require careful handling for distribution packaging.
The nine-day IPC debugging produced one line of actual code. The other 23 patches required understanding internals that aren’t documented anywhere except the source code of working implementations.
For packagers considering CEF applications: expect to bridge the gap between upstream assumptions and distribution requirements. Read the Qt5 implementation if one exists. Test early and test thoroughly.
Resolving ITP #915400 after seven years—the complete technical breakdown
Introduction
The Chromium Embedded Framework (CEF) has been sitting in Debian’s packaging queue since December 2018. Bug #915400 documented the need: obs-studio wanted browser sources, casparcg-server needed HTTP support, and various applications required a lighter alternative to Electron.
Previously I packaged Stremio (QT5 based) for Debian and Wolfi, but QT5 is EOL (end of life), so I went on and decided to package the next generation of Stremio (GTK based) but this package depends on chromium-embedded-framework that did not exist en Debian.
This article documents the technical approach that finally produced working Debian packages.
Why CEF Is Different
Most C/C++ projects follow a predictable pattern: download tarball, run configure, make, install. CEF breaks every assumption.
The Upstream Build Process
CEF’s official build uses automate-git.py, which:
Clones depot_tools from Google
Runs gclient sync to fetch ~1GB of Chromium sources
Downloads prebuilt toolchains from Google Cloud Storage
Optionally uses reclient for distributed compilation
Builds both Debug and Release configurations
Creates binary distribution packages
This process assumes internet access, Google infrastructure, and a ~90GB working directory.
Debian Requirements
Debian builds must be:
Network-isolated during compilation
Reproducible from source
Using system toolchains where possible
Compliant with the Filesystem Hierarchy Standard
The gap between these requirements and upstream assumptions drove most of the packaging complexity.
Architecture: The Dual-Source Approach
Problem: Chromium Integration
CEF doesn’t bundle Chromium in its tarball. It expects to download it during build. Including Chromium sources in the CEF orig tarball would:
Create a ~1.5GB source package
Duplicate Debian’s existing chromium sources
Create maintenance burden tracking two projects
Debian Chromium doesn’t provide a Source package that we can use as a dependency. To overcome that, we are going to create an experimental Debian package that will get the Debian Chromium Sources and will add it as a dependency in a subfolder. This approach will allow other Debian Developers to weigh in and see that this solution works and when the Debian Chromium Team eventually publishes the sources, we just need to add it as a regular dependency.
Solution: Build Dependency Model
The packaging treats Chromium as a build dependency rather than bundled source:
The debian/rules file extracts Chromium sources into chromium_src/ before the build begins. This happens in the clean target to ensure sources exist before any build steps.
Benefits
Reuse Debian Chromium work: When the chromium team patches a vulnerability, CEF can rebase
Smaller source package: Only CEF-specific sources in the orig tarball
Clear separation: CEF patches vs Chromium patches are distinct
Future: chromium-source Package
Bug #893448 proposes a chromium-source binary package that would provide extracted Chromium sources. When resolved, CEF could simply Build-Depends: chromium-source and the manual tarball extraction disappears.
The Patch Stack
CEF Patches (16 total)
Build System Decoupling
0001-skip-gclient-revert.patch
CEF’s gclient_hook.py reverts all files to git checkout HEAD state before building. This destroys any Debian patches applied during the build. The patch removes the revert logic.
0002-skip-chromium-checkout.patch
CEF expects to run git clone for Chromium. This patch skips the checkout and uses pre-extracted sources.
0003-use-system-clang.patch
CEF downloads LLVM toolchains from Google Cloud Storage. This patch configures the build to use Debian’s clang-19 package.
0004-create-reclient-stub.patch
Google’s reclient provides distributed compilation. Rather than removing all references, a stub script satisfies the build system without network access.
0005-add-rust-toolchain-stub.patch
Similar to reclient—a stub for the Rust toolchain downloader that delegates to system rustc.
Chromium’s build fetches resources at multiple points. Each download point needs a patch to either:
Use pre-packaged alternatives
Skip optional components
Error clearly rather than hang
C++23 / libc++ Compatibility (8 patches)
Debian sid uses libc++-19 with strict C++23 enforcement. The unique_ptr destructor now requires complete types:
// Old code (worked in C++17/20):
class RenderFrame;
std::unique_ptr<RenderFrame> frame_;  // OK: RenderFrame forward-declared

// C++23 libc++:
// Error: RenderFrame must be complete for ~unique_ptr
Patches add forward declarations and reorder includes in:
v8/src/heap/ – Garbage collector internals
media/gpu/ – Video acceleration
ui/gfx/ – Graphics primitives
components/viz/ – Compositor
Example fix in v8/src/heap/marking-state.h:
// Before patch:
class HeapObject;
std::unique_ptr<HeapObject> obj_;

// After patch (add include):
#include "src/objects/heap-object.h"
std::unique_ptr<HeapObject> obj_;
Compiler Updates (6 patches)
GCC 15 and Clang 19 deprecated various constructs:
fix-aggregate-optional-emplace.patch
std::optional::emplace with aggregate initialization changed behavior. Affected code in IPC serialization.
remove-deprecated-warning-flags.patch
Several -W flags no longer exist in clang-19.
fix-libclang-paths.patch
Clang’s internal header paths changed between versions.
Patches to prefer system libraries where ABI-compatible:
libxcb
fontconfig
minizip
zstd
harfbuzz (partial)
Some libraries cannot use system versions due to ABI differences (V8, Skia, ANGLE).
Build Configuration
GN Arguments
The build uses GN (Generate Ninja) with extensive configuration:
gn_args = [
    'is_official_build=true',
    'is_debug=false',
    'symbol_level=0',

    # Toolchain
    'clang_use_chrome_plugins=false',
    'use_lld=true',
    'use_custom_libcxx=false',  # System libc++

    # Disable Google services
    'use_official_google_api_keys=false',
    'enable_nacl=false',
    'enable_widevine=false',

    # Hardware acceleration
    'use_vaapi=true',
    'use_v4l2_codec=false',

    # System libraries
    'use_system_libffi=true',
    'use_system_zlib=false',  # ABI issues
    ...
]
The use_custom_libcxx Decision
CEF defaults to bundling its own libc++ (use_custom_libcxx=true). This avoids ABI compatibility issues but:
Duplicates system library
May conflict with applications using system libc++
Increases binary size
After extensive testing (builds 108-140), use_custom_libcxx=false works with the C++23 compatibility patches. This is the preferred configuration for Debian integration.
ANGLE: OpenGL ES implementation over Vulkan/DirectX. Not interchangeable with Mesa’s EGL—the API is similar but internals differ. Installed in /usr/lib/x86_64-linux-gnu/cef/ with RPATH configuration.
SwiftShader: Software Vulkan implementation for systems without GPU acceleration. The ICD JSON must use absolute paths:
CEF loads resources early in initialization—before most application callbacks. The library searches relative to libcef.so, not the application binary.
The Symlink Solution
# In /usr/lib/x86_64-linux-gnu/:
icudtl.dat -> ../../share/cef/icudtl.dat
v8_context_snapshot.bin -> ../../share/cef/v8_context_snapshot.bin
This allows subprocesses (renderer, GPU, utility) to find resources when spawned with cef_execute_process(), before any application configuration is applied.
Testing and Validation
Unit Tests
CEF includes ceftests but many tests require network access or graphical display. The packaging runs a subset of offline-capable tests.
Integration Testing
The definitive test is building a real application. stremio-gtk exercises:
Offscreen rendering
Multiple process types
IPC protocols
GPU acceleration
Resource loading
Issues discovered through stremio-gtk that passed unit tests:
Resource symlinks needed in library directory
ANGLE libraries required (not just preferred)
SwiftShader ICD paths must be absolute
Subprocess command-line switch handling
Maintenance Considerations
Chromium Updates
When Debian updates Chromium, CEF should track:
Obtain matching CEF branch for new Chromium version
Rebase debian/patches/chromium/ onto new sources
Test build and resolve new conflicts
Update version numbers throughout
Security Updates
CEF inherits Chromium’s attack surface. Security updates to Chromium should flow to CEF promptly. The dual-source architecture helps: updating chromium_*.orig.tar.xz and rebuilding catches most issues.
Upstream Coordination
CEF upstream is responsive to packaging concerns. Several patches developed for Debian have been submitted upstream or informed upstream decisions.
Conclusion
CEF packaging requires treating a browser engine as a library—with all the complexity that implies. The dual-source architecture, extensive patch stack, and careful path configuration produce packages that integrate with Debian’s ecosystem rather than fighting it.
The approach documented here should transfer to other distributions with similar policies. The patches are organized by purpose (build system, compatibility, paths) to aid porting.
Termux y Taiscale para usar Android como un servidor totalmente funcional
En el mundo de la seguridad informática y la administración de sistemas, a menudo nos encontramos con máquinas donde no podemos o no queremos instalar software que requiera privilegios de administrador. Ya sea por políticas corporativas, seguridad, o simplemente por mantener un sistema limpio, la necesidad de acceder a redes privadas sin comprometer el sistema host es real.
Hoy les comparto una solución elegante: usar un dispositivo Android como puente para acceder a toda tu red Tailscale, sin instalar absolutamente nada con privilegios root en tu máquina principal.
El servidor SSH de Termux escucha en el puerto 8022 por defecto.
3. Activar Hotspot y Conectar
Activar el hotspot/tethering en Android
Conectar tu máquina al hotspot
Encontrar la IP del gateway (que será Android):
# En macOS/Linux
route -n get default | grep gateway
4. Crear Túneles con socat
Una vez conectado por SSH a Termux:
# Conectar a Termux desde tu máquina
ssh -p 8022 u0_aXXX@IP_GATEWAY

# En Termux, crear túnel hacia servidor en Tailscale
socat TCP-LISTEN:2222,fork,reuseaddr TCP:100.x.x.x:22
Donde 100.x.x.x es la IP de Tailscale del servidor destino.
5. Conectar al Servidor Final
Desde tu máquina, ahora puedes conectar al servidor remoto a través del túnel:
ssh -p 2222 usuario@IP_GATEWAY
Casos de Uso
Esta configuración es perfecta para:
Máquinas corporativas donde no puedes instalar VPNs
Sistemas temporales donde no quieres dejar rastro
Debugging remoto cuando necesitas acceso rápido
Mantener un sistema limpio sin daemons adicionales
Optimizaciones y Automatización
Para uso frecuente, puedes:
Configurar claves SSH para acceso sin contraseña
Usar tmux en Termux para mantener sesiones persistentes
Crear scripts que automaticen la detección de IPs y creación de túneles
Configurar múltiples túneles para diferentes servidores simultáneamente
Consideraciones de Seguridad
Solo usar en redes donde confíes (tu propio hotspot)
Configurar SSH con autenticación por clave, nunca contraseña
El tráfico entre Android y los servidores viaja encriptado por Tailscale
El hotspot crea una red aislada entre tu dispositivo y Android
Conclusión
Esta solución demuestra que con un poco de creatividad, podemos sortear limitaciones técnicas sin comprometer la seguridad. Android se convierte en un poderoso gateway de red, Tailscale provee la conectividad segura, y tu máquina principal permanece limpia y sin modificaciones de sistema.
¿El resultado? Acceso completo a tu infraestructura privada usando solo herramientas estándar y un teléfono que probablemente ya llevas contigo.
¿Has implementado soluciones similares? ¿Qué otros usos creativos le darías a esta arquitectura? Comparte tus ideas en los comentarios.
Capítulo 3: Mi Travesía Personal como Aspirante a Debian Maintainer
Expandiendo las Capacidades de Desarrollo: Setup Híbrido con Proton Drive y Debian GNU/Linux
8 de noviembre, 2025
Las Limitaciones de Espacio con un ordenador portátil de 13 años
Como desarrollador con más de 20 años de experiencia en Unix/Linux, he enfrentado un desafío constante: las limitaciones de almacenamiento local versus la necesidad de mantener múltiples proyectos activos, especialmente cuando trabajo en empaquetado complejo como Chromium Embedded Framework (CEF) para Debian. Recientemente, desarrollé una solución elegante que combina Proton Drive con automatización Linux para crear un ecosistema de desarrollo verdaderamente híbrido.
El Problema: Limitaciones de Hardware Legacy
Mi setup principal incluye un MacBook Pro 11,1 ejecutando Debian, con apenas 100GB de almacenamiento SSD. Con solo 15GB libres después de instalar las herramientas de desarrollo esenciales, cada proyecto de empaquetado se convierte en un juego de tetris de espacio en disco. Los builds de CEF pueden generar varios gigabytes de datos, y mantener múltiples iteraciones para debugging se vuelve imposible.
Además, trabajo desde múltiples máquinas – la principal en casa y una laptop de viaje – lo que requiere sincronización manual constante de archivos de configuración, documentación técnica y progreso de desarrollo.
La Solución: Arquitectura Híbrida con Proton Drive
Componentes del Sistema
1. Almacenamiento Local (SSD 100GB)
Trabajo activo y builds en curso
Máxima velocidad para compilación
Cache temporal del sistema
2. Proton Drive (500GB)
Storage expandido cifrado end-to-end
Backup automático de trabajo
Sincronización entre máquinas
Archive de builds completados
3. Storage Externo (SanDisk + CalDigit)
Almacenamiento masivo para builds históricos
Repositorios de packages grandes
Backup de sistemas completos
Arquitectura de Directorios
# Estructura local
~/development/debian/           # Trabajo activo (local SSD)
~/ProtonDrive/                  # Mount automático (Proton Drive)
├── cef-builds-archive/         # Builds completados
├── documentation-backup/       # Docs técnicas
├── config-backup/             # Configuraciones del sistema
└── temp-builds/               # Storage temporal expandido

# Estructura en Proton Drive
protondrive:/sync/debian/       # Sync automático trabajo activo
protondrive:/mount/             # Storage expandido montado
Implementación Técnica
1. Configuración de RClone
RClone actúa como el puente entre el sistema local y Proton Drive, proporcionando tanto capacidades de sincronización como montaje de filesystem.
# Instalación desde repositorios Debian
sudo apt update
sudo apt install rclone

# Verificar instalación
rclone --version

# Configuración
rclone config
# Seleccionar: protondrive
# Introducir credenciales de Proton Mail
# Configurar 2FA si está habilitado
2. Servicio de Sincronización Automática
Creé un servicio systemd que sincroniza automáticamente el trabajo activo cada 4 horas:
El laptop con 15GB libres ahora puede manejar proyectos de múltiples gigabytes sin impacto en el rendimiento local. Los builds activos permanecen en SSD para velocidad máxima, mientras el archive automático libera espacio continuamente.
2. Continuidad Entre Máquinas
El workflow pull/push permite cambiar entre máquina principal y laptop de viaje sin pérdida de contexto. Cada sesión comienza con start-work.sh y termina con end-work.sh, garantizando sincronización perfecta.
3. Backup Automático Cifrado
Con timer cada 4 horas, nunca pierdo más de 4 horas de trabajo. El cifrado end-to-end de Proton significa que incluso datos sensibles de clients están protegidos.
4. Flexibilidad de Storage
Local: Máxima velocidad para trabajo activo
Mount: Acceso directo como filesystem para casos especiales
Sync: Backup automático sin intervención manual
Externo: Capacidad masiva para archive de largo plazo
Casos de Uso Específicos
Desarrollo CEF (Chromium Embedded Framework)
Los builds de CEF generan varios GB de artifacts. La configuración permite:
Build activo en SSD local (velocidad)
Archive automático de builds completados
Sincronización de documentación técnica entre iteraciones
Backup de scripts de build y patches personalizados
Trabajo Remoto y Viajes
Antes del sistema, trabajar desde la laptop de viaje significaba:
Sincronización manual propensa a errores
Pérdida de contexto entre máquinas
Limitaciones de almacenamiento aún más severas
Ahora es completamente transparente: start-work.sh en cualquier máquina restaura el contexto exacto de la última sesión.
Monitoreo y Mantenimiento
Verificación de Servicios
# Ver estado de servicios
systemctl --user status proton-sync.service
systemctl --user status proton-mount.service

# Ver próximas ejecuciones del timer
systemctl --user list-timers proton-sync.timer

# Logs detallados
journalctl --user -u proton-sync.service --since today
Scripts de Diagnóstico
#!/bin/bash
# check-proton-setup.sh
echo "=== Estado del Sistema Proton Drive ==="

# Verificar mount
if mountpoint -q ~/ProtonDrive; then
    echo "✅ Storage expandido montado correctamente"
    df -h ~/ProtonDrive
else
    echo "❌ Mount no disponible"
fi

# Verificar timer de sync
if systemctl --user is-active proton-sync.timer >/dev/null; then
    echo "✅ Timer de sync activo"
    systemctl --user list-timers proton-sync.timer
else
    echo "❌ Timer no activo"
fi

# Verificar conectividad
if rclone ls protondrive:/sync/ >/dev/null 2>&1; then
    echo "✅ Conectividad con Proton Drive OK"
else
    echo "❌ Problema de conectividad"
fi
Consideraciones de Rendimiento
Red y Latencia
Upload: ~30-80 Mbps después de overhead de encriptación
Download: Near line speed con cache local activo
Latencia: Imperceptible para acceso a archivos cacheados
Optimizaciones Implementadas
VFS cache full: 20GB cache local para acceso rápido
Transfers limitados: 2 transferencias concurrentes para estabilidad
Exclusiones inteligentes: Archivos temporales y logs excluidos del sync
Ignore existing: Evita conflictos en sincronización bidireccional
Impacto en Productividad
Métricas de Mejora
Storage efectivo: De 15GB a 515GB disponibles
Tiempo de setup entre máquinas: De 30+ minutos a <2 minutos
Pérdida máxima de trabajo: De días potenciales a máximo 4 horas
Flexibilidad de proyecto: Múltiples builds CEF simultáneos posibles
Casos de Recuperación
Durante el desarrollo, experimenté una desconexión inesperada que habría resultado en pérdida significativa de trabajo. El sistema automático había sincronizado el progreso 2 horas antes, permitiendo recuperación completa en minutos.
Lecciones Aprendidas
1. Automatización vs Control
El balance entre timer automático (cada 4h) y scripts manuales (pull/push) proporciona tanto protección continua como control granular cuando es necesario.
2. Exclusiones son Críticas
La configuración inicial incluía logs de build (35MB cada uno), saturando la red. Las exclusiones inteligentes mejoraron el rendimiento dramáticamente.
3. Systemd User Services
Los servicios de usuario proporcionan automatización robusta sin requerir privilegios root, ideal para entornos de desarrollo personal.
Conclusión
Esta configuración híbrida resuelve múltiples limitaciones simultáneamente: espacio de almacenamiento, continuidad entre máquinas, backup automático y escalabilidad de proyectos. Para desarrolladores trabajando con proyectos complejos como empaquetado Debian o builds de software extensos, representa una solución elegante que combina lo mejor de storage local rápido con la flexibilidad y seguridad del cloud storage cifrado.
Ventajas Clave del Sistema
Zero downtime por pérdida de trabajo
Escalabilidad transparente de almacenamiento
Continuidad perfecta entre múltiples máquinas
Backup automático cifrado sin intervención manual
Flexibilidad de storage adaptada a diferentes necesidades
Próximos Pasos
Este setup forma la base para expansiones futuras:
Integración con CI/CD para builds automáticos
Monitoreo avanzado con métricas de uso
Sincronización selectiva por proyectos
Archive automático basado en políticas de tiempo
Para desarrolladores que enfrentan limitaciones similares de hardware legacy pero necesitan mantener productividad en proyectos modernos complejos, esta arquitectura híbrida proporciona una solución práctica y escalable.
El código completo de configuración y scripts están disponibles en mi repositorio de dotfiles, y continuaré documentando mejoras y optimizaciones a medida que evolucione el sistema.
How a simple documentation contribution evolved into a full-scale packaging solution with automated CI/CD, multi-distribution support, and deep technical problem-solving
Author: Juan Manuel Méndez Rey Date: October 30, 2025 Reading Time: 25 minutes Technical Level: Advanced
The Beginning: A Documentation Gap
Several years ago, while working with Stremio on Debian systems, I encountered the familiar frustration of Linux users everywhere: a great application with poor installation documentation. The official Stremio releases worked fine on some distributions, but Debian users were left to figure out dependencies, compilation steps, and integration challenges on their own.
That’s when I contributed the original DEBIAN.md file to the Stremio shell repository. It was a straightforward build guide—install these dependencies, run these commands, copy these files. Simple, but functional.
Years passed. Dependencies changed. Qt versions evolved. The simple build instructions became increasingly unreliable on modern Debian systems, and the GitHub issues piled up with frustrated users unable to compile Stremio.
The Problem Grows
By 2025, the situation had become untenable:
Dependency conflicts: The upstream .deb package required libmpv1, but modern Debian ships libmpv2
Missing QML modules: Critical Qt5 components weren’t documented as dependencies
Compilation complexity: Users needed to install 15+ build dependencies to compile from source
No proper integration: Desktop files, icons, and system integration required manual work
The upstream .deb package is outdated, it is providing the 4.4.168 version.
The list continues…
The GitHub issues were a testament to user frustration—dozens of reports about compilation failures, missing dependencies, and broken installations.
The Debian Way: Proper Packaging
Rather than continue patching documentation, I remembered a discussion with my friend, Arturo, about properly packaging Stremio for Debian, he created a RFP (Request for Package) for Stremio in 2020. Years passed and I went into my usual day to day work. This past month I decided I had to fulfill my old dream of becoming an official Debian contributor, so I decided to solve this properly through the Debian packaging system. In late 2025, I filed an Intent To Package (ITP) with Debian:
stremio-server package (non-free) – Proprietary streaming server v4.20.12
Technical Deep Dive: System Library Migration
The most challenging aspect was replacing ALL bundled git submodules with Debian system libraries. This wasn’t just about dependencies—it required fixing fundamental runtime issues.
Problem: System libsingleapplication-dev v3.3.4 caused segmentation faults when used with QQmlApplicationEngine.
Investigation:
# Test with system library:
sudo apt install libsingleapplication-dev
# Build and run: Segmentation fault

# Test without SingleApplication:
# Remove from CMakeLists.txt: Works perfectly
Root Cause: System library sets up threading context incompatible with Qt5 QML engine initialization. The library uses internal threading mechanisms that conflict with QQmlApplicationEngine’s event loop.
Solution: Custom CompatibleSingleApp implementation. This is also to replace one of the bundled submodules that recently modified its MIT license into a dubious license that could be incompatible for Debian DFSG guidelines. See https://github.com/itay-grudev/SingleApplication/issues/210
Challenge 3: QProcess Environment Variables for Node.js Server 🔥 CRITICAL
Problem: Streaming server failed to start with cryptic error:
server-crash 0 null
TypeError [ERR_INVALID_ARG_TYPE]: The "path" argument must be of type string. Received undefined
    at Object.join (node:path:1292:7)
Investigation:
# Manual server test works:
$ /usr/bin/node /usr/share/stremio/server.js
EngineFS server started at http://127.0.0.1:11470

# But QProcess launch fails:
timeout 15s stremio
# Error: server-crash 0 null
Root Cause: QProcess does not inherit environment variables by default. Node.js server.js requires:
HOME – for configuration directory (~/.stremio-server)
USER – for process identification
PWD – for relative path resolution
Solution: Explicit environment setup in stremioprocess.cpp:
void Process::start(QStringList args) {
    // Set up environment variables for Node.js server
    QProcessEnvironment env = QProcessEnvironment::systemEnvironment();

    // Ensure essential environment variables are set for server.js
    if (!env.contains("HOME")) {
        env.insert("HOME", QStandardPaths::writableLocation(QStandardPaths::HomeLocation));
    }
    if (!env.contains("USER")) {
        env.insert("USER", qgetenv("USER"));
    }
    if (!env.contains("PWD")) {
        env.insert("PWD", QDir::currentPath());
    }

    this->setProcessEnvironment(env);

    // Now start the process
    QProcess::start(this->program(), args);
}
Verification:
# After fix:
$ timeout 15s build/stremio 2>&1 | grep -A 5 "hls executables"
hls executables located -> { ffmpeg: '/usr/bin/ffmpeg', ffsplit: null }
Using app path -> /home/user/.stremio-server
Enabling casting...
Discovery of new external device "mpv" - MPV
EngineFS server started at http://127.0.0.1:11470
Impact: Complete resolution of streaming functionality. Users can now stream media via BitTorrent, use casting, and access all server features.
QT_SELECT=5 qmake
QT_SELECT=5 make
# Result: 278KB optimized binary
Both systems produce working binaries with 100% system libraries.
Debian Packaging: The Proper Way
Package Structure
stremio (4.4.169+dfsg-1):
debian/
├── changelog                    # Version history with ITP closure
├── control                      # Dependencies and package metadata
├── copyright                    # GPL-3.0+ licensing details
├── rules                        # Build instructions (dh-based)
├── patches/                     # Quilt patches for system integration
│   ├── 0001-Fix-server.js-path-for-FHS-compliance.patch
│   ├── 0002-disable-server-download.patch
│   ├── 0004-minimal-qthelper-integration.patch
│   ├── 0005-cmake-system-libraries-v4.4.169.patch
│   ├── 0007-add-qtwebengine-initialize-fix.patch
│   ├── 0008-add-compatible-singleapp-implementation.patch
│   ├── 0009-remove-system-singleapplication-add-compatible.patch
│   ├── 0010-fix-qmake-install-paths.patch
│   └── 0011-fix-qprocess-environment-for-server-launch.patch
├── stremio.desktop              # Desktop integration
├── stremio.install              # File installation rules
├── watch                        # Upstream version monitoring
└── source/
    └── format                   # 3.0 (quilt) format
Key debian/control sections:
Source: stremio
Section: video
Priority: optional
Maintainer: Juan Manuel Méndez Rey <vejeta@gmail.com>
Build-Depends:
    debhelper-compat (= 13),
    cmake,
    qtbase5-dev,
    qt5-qmake,
    qt5-qmake-bin,
    qtdeclarative5-dev,
    qtwebengine5-dev,
    qttools5-dev,
    qml-module-qtwebchannel,
    qml-module-qt-labs-platform,
    qml-module-qtwebengine,
    qml-module-qtquick-dialogs,
    qml-module-qtquick-controls,
    qml-module-qt-labs-settings,
    qml-module-qt-labs-folderlistmodel,
    libmpv-dev,
    libssl-dev,
    nodejs,
    npm,
    pkg-kde-tools
Standards-Version: 4.6.2
Homepage: https://www.stremio.com/
Vcs-Git: https://salsa.debian.org/mendezr/stremio.git
Vcs-Browser: https://salsa.debian.org/mendezr/stremio

Package: stremio
Architecture: amd64
Depends: ${shlibs:Depends}, ${misc:Depends},
         nodejs,
         mpv,
         librsvg2-2,
         qml-module-qtwebengine,
         qml-module-qtwebchannel,
         qml-module-qt-labs-platform,
         qml-module-qtquick-controls,
         qml-module-qtquick-dialogs,
         qml-module-qt-labs-settings,
         qml-module-qt-labs-folderlistmodel,
         qtbase5-dev-tools
Description: Modern media center for streaming video content
 Stremio is a video streaming application that aggregates content from
 various sources. It features a modern Qt5/QML interface with support
 for add-ons, local playback via MPV, and integration with streaming
 services.
 .
 This package provides the desktop client with GPL-licensed components.
Follows industry practice: VS Code, Docker Desktop, Firefox ESR
debian/copyright documents source:
Format: https://www.debian.org/doc/packaging-manuals/copyright-format/1.0/
Upstream-Name: stremio-server
Source: https://dl.strem.io/server/v4.20.12/desktop/server.js
Comment: Pre-downloaded server.js included in source package to comply
 with Debian Policy prohibiting network access during builds.
Beyond Debian: The Wolfi Contribution
While working on Debian packaging, I also contributed Stremio packages to Wolfi Linux, the security-focused distribution used by Chainguard. This involved:
Melange build files: Cloud-native package format
Security hardening: ASLR, stack protection, RELRO
OSI license compliance: GPL components only (no proprietary server, the same server.js we separated in a non-free package for Debian)
Reproducible builds: Hermetic build environment
Melange configuration example:
package:
  name: stremio
  version: 4.4.169
  epoch: 0
  description: Modern media center for video streaming
  license: GPL-3.0-or-later

environment:
  contents:
    packages:
      - qt5-qtbase-dev
      - qt5-qtdeclarative-dev
      - qt5-qtwebengine-dev
      - mpv-dev
      - openssl-dev

pipeline:
  - uses: cmake/configure
  - uses: cmake/build
  - uses: cmake/install

subpackages:
  - name: stremio-doc
    description: Documentation for stremio
I used this parallel effort as an exercise to learn how different distributions do proper packaging across different distribution ecosystems.
Pull Request: https://github.com/wolfi-dev/os/pull/69098 GitHub Gists with examples of usage: https://gist.github.com/vejeta/859f100ef74b87eadf7f7541ead2a2b1
The Distribution Challenge: GitHub-Powered APT Repository
Official Debian inclusion takes time—months or years of review, testing, and refinement. Meanwhile, users needed a solution now. Traditional approaches like hosting packages on a personal server would create bandwidth and maintenance problems.
The solution: Modern APT repository hosting using GitHub infrastructure.
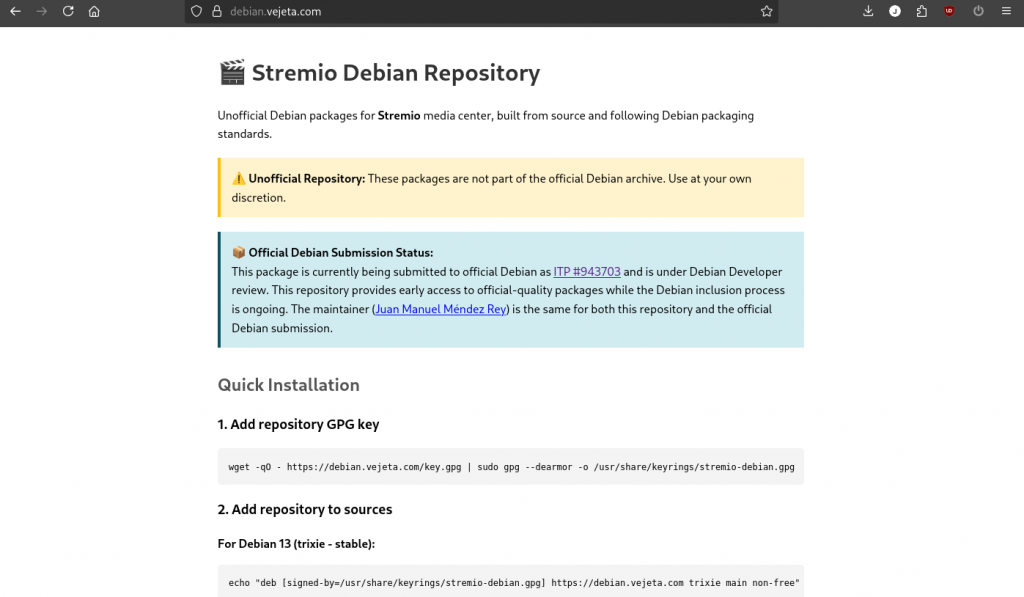
Result: APT repository served at https://debian.vejeta.com/ with:
✅ Global CDN (CloudFlare)
✅ HTTPS encryption
✅ Unlimited bandwidth
✅ Zero hosting costs
✅ 99.9%+ uptime
Critical Lessons Learned: Patch Development Best Practices
During this project, I made significant efficiency mistakes in patch development. Here’s what I learned:
The Inefficiency Problem
What I did (5+ iterations of patch rework):
Modified source files directly in working repository
Generated patches from modified state
Patches failed on clean upstream
Repeated entire process multiple times
Impact: ~70% wasted time in patch development
The Correct Approach
Efficient patch development workflow:
# Step 1: Clean upstream baseline
git clone --branch v4.4.169 https://github.com/Stremio/stremio-shell.git /tmp/patch-test
cd /tmp/patch-test

# Step 2: Analyze dependencies BEFORE making changes
echo "=== Mapping file dependencies ==="
grep -r "#include" *.cpp *.h | grep -v "Qt\|std"
grep -r "class.*:" *.h
grep -r "Q_OBJECT" *.h

# Step 3: Make ONE fix at a time
vim main.cpp  # Add QtWebEngine::initialize()
git diff > /tmp/0007-qtwebengine-fix.patch

# Step 4: Test patch application
git checkout .
patch -p1 < /tmp/0007-qtwebengine-fix.patch
mkdir build && cd build && cmake .. && make

# Step 5: If successful, continue to next fix
# If failed, refine current patch before moving on
Pre-Patch Analysis Template
Before creating patches, ALWAYS complete this analysis:
## Files to Modify
- [ ] main.cpp - QtWebEngine initialization
- [ ] mainapplication.h - class definitions
- [ ] CMakeLists.txt - build system
- [ ] compatible_singleapp.h/cpp - new custom implementation

## Dependency Chain
1. main.cpp includes → mainapplication.h
2. mainapplication.h includes → singleapplication.h (to be replaced)
3. CMakeLists.txt references → SingleApplication (to be removed)
4. Qt MOC processes → Q_OBJECT classes (check for conflicts)

## Build Test Plan
1. [ ] Clean cmake build
2. [ ] Dependency verification (ldd)
3. [ ] Runtime functionality test
4. [ ] Package build test (dpkg-buildpackage)
Validation Before «Ready» Declaration
NEVER declare patches ready without:
# MANDATORY validation workflow
mkdir /tmp/patch-validation
cd /tmp/patch-validation
git clone --branch v4.4.169 <upstream-url> .

# Apply ALL patches
export QUILT_PATCHES=debian/patches
quilt push -a || { echo "FAIL: Patch application"; exit 1; }

# Complete build test
mkdir build && cd build
cmake .. && make || { echo "FAIL: Build"; exit 1; }

# Package build test
cd .. && dpkg-buildpackage -us -uc || { echo "FAIL: Package"; exit 1; }

# Dependency check
ldd build/stremio | grep -E "(libQt5|libmpv|libcrypto)"

# ONLY NOW declare "patches ready"
echo "✅ Validated and ready for production"
This workflow prevents the «ready → fails → rework» cycle that wastes development time.
Production Validation: Comprehensive Testing
Isolated Environment Validation
Test setup:
# Create pristine environment
mkdir /tmp/stremio-patch-validation
cd /tmp/stremio-patch-validation
git clone --branch v4.4.169 https://github.com/Stremio/stremio-shell.git .
cp -r /path/to/debian .

# Apply all patches
export QUILT_PATCHES=debian/patches
quilt push -a
# Result: All 6 patches applied successfully

# Test CMake build
mkdir build && cd build
cmake .. -DQT_DEFAULT_MAJOR_VERSION=5
make -j$(nproc)
# Result: 293KB binary with 100% system libraries

# Test release.makefile
cd .. && QT_DEFAULT_MAJOR_VERSION=5 make -f release.makefile
# Result: Complete success including icon generation

# Verify dependencies
ldd build/stremio | head -5
# Output:
#   libQt5WebEngine.so.5 => /lib/x86_64-linux-gnu/libQt5WebEngine.so.5
#   libQt5DBus.so.5 => /lib/x86_64-linux-gnu/libQt5DBus.so.5
#   libcrypto.so.3 => /lib/x86_64-linux-gnu/libcrypto.so.3
#   libmpv.so.2 => /lib/x86_64-linux-gnu/libmpv.so.2
Verification results:
✅ Binary builds successfully (293KB)
✅ GUI loads and displays
✅ Single-instance behavior works
✅ Streaming server starts (port 11470 responds)
✅ System library integration complete
✅ No crashes or threading issues
Runtime Validation
Complete functionality test:
# Launch application
./build/stremio 2>&1 | tee /tmp/stremio-runtime.log

# Verify server startup (first 15 seconds)
timeout 15s ./build/stremio 2>&1 | grep -E "(server|streaming|port)"
# Output:
#   hls executables located -> { ffmpeg: '/usr/bin/ffmpeg', ffsplit: null }
#   Using app path -> /home/user/.stremio-server
#   Enabling casting...
#   EngineFS server started at http://127.0.0.1:11470

# Test server endpoint
curl -s http://127.0.0.1:11470 && echo "✓ Server responding"

# Test single-instance behavior
./build/stremio &
PID1=$!
sleep 2
./build/stremio   # Should detect first instance and exit
wait $PID1
User Experience: Installation Simplified
I wanted other Debian users to have the chance to install these packages built with the highest standards as soon as possible while the package is still being reviewed by Debian Developers. My solution was to create a repository and through GitHub Actions, pull the sources of the packages from salsa.debian.org, build them automatically, make a release and provide a Debian repository built with GitHub Pages, so Debian users will have 99% of availability to fetch them.
The end result is a one-command installation for users:
Note: Ubuntu support is experimental with automated builds but limited manual testing. Community feedback welcome.
Closing the Loop: Updating Documentation
With a working solution deployed, I returned to where it all started—the documentation. I submitted a comprehensive pull request to update the original DEBIAN.md file I had contributed years earlier.
The PR adds:
✅ APT repository installation (new recommended method)
✅ Complete dependency lists
✅ Modern security practices (proper GPG key management)
✅ Multi-distribution support (Debian + derivatives)
✅ Maintained build instructions (preserved for developers)
Community Impact
Within hours of submitting the PR, I commented on 10+ existing GitHub issues where users had reported installation problems. The response was immediate and positive—users could finally install Stremio without compilation headaches.
Technical Achievements Summary
Packaging Excellence
✅ Zero bundled dependencies: 100% Debian system libraries
✅ FHS compliance: Proper /usr installation paths
✅ License separation: GPL client (main) + proprietary server (non-free)
✅ Policy compliance: Lintian-clean packaging
✅ Independent versioning: Client v4.4.169 + Server v4.20.12
Technical Solutions
✅ QtWebEngine initialization fix: Single line prevents all QML crashes
[x] Source packages created following Debian Policy
[x] Lintian-clean packaging
[x] 100% system libraries
[x] FHS compliance
[x] Copyright file with complete licensing
[x] Watch files for upstream monitoring
[x] git-buildpackage workflow
[x] Packages hosted on Salsa
[x] ITP bug filed
[x] Preliminary Debian Developer review
[ ] Sponsorship obtained
[ ] Upload to Debian NEW queue
Timeline: Submission planned for Q1 2025
Professional Applications
This work directly supports my goal of becoming an official Debian Package Maintainer. This could also serve as a guide for others to get experience with:
Packaging expertise: Modern Debian packaging workflows with complex applications
DevOps proficiency: CI/CD pipeline design and GitHub Actions automation
Problem-solving skills: Deep debugging (QtWebEngine, threading, environment issues)
Community engagement: Solving real user problems at scale
Infrastructure design: Scalable, cost-effective distribution systems
Documentation: Comprehensive technical writing for diverse audiences
Future Evolution
The architecture proved so successful that I’m considering replicating it for other packaging projects. The pattern of using GitHub infrastructure for APT repository hosting could benefit many projects struggling with distribution challenges.
Potential applications:
Personal package repository for experimental Debian packages
Other media applications requiring complex Qt5/WebEngine setups
This journey reinforced several fundamental principles:
1. Documentation is Infrastructure
Good documentation isn’t just text—it’s the foundation that enables user adoption and community growth. The original DEBIAN.md file evolved into a complete packaging and distribution solution.
2. Packaging is Product Design
How users install and maintain software is part of the user experience. Poor packaging creates friction; good packaging eliminates it. The difference between:
By leveraging GitHub’s infrastructure (Actions, Pages, Releases), a single developer can provide enterprise-grade distribution infrastructure with zero operational overhead. This democratizes software distribution.
4. Standards Enable Ecosystems
Following Debian packaging standards meant the same packages work across multiple distributions (Debian, Ubuntu, Kali) and can integrate with the official Debian archive.
5. Deep Technical Understanding Pays Off
The critical fixes (QtWebEngine initialization, threading compatibility, environment variables) required deep understanding of:
Qt5 initialization order
QML engine threading model
QProcess environment inheritance
Node.js runtime requirements
Surface-level knowledge wouldn’t have solved these problems.
6. Proper Testing Prevents Rework
The patch development lessons learned (70% time wasted on rework) demonstrate that upfront validation investment prevents significant downstream waste. Test against clean upstream early and often.
7. Independent Versioning Respects Reality
Using independent version numbers for stremio (4.4.169) and stremio-server (4.20.12) follows industry practice and accurately represents upstream development. Convenience versioning creates confusion.
Acknowledgments
Stremio Team: For creating an excellent media center application
Debian Community: For packaging standards and infrastructure (Salsa)
GitHub: For free hosting, CI/CD, and unlimited bandwidth
Qt Project: For excellent cross-platform framework
Debian Developers (Arturo): For preliminary review and guidance on ITP #943703
What started as a simple documentation contribution evolved into a comprehensive packaging and distribution solution. By combining traditional Debian packaging principles with modern CI/CD infrastructure, it’s possible to deliver professional-grade software distribution that scales globally.
The journey from «how do I install this?» to «apt install stremio» represents more than technical progress—it’s about removing friction between great software and the people who want to use it.
Sometimes the best solutions come full circle. Years after contributing installation documentation, I’ve returned to ensure that documentation describes a process that actually works reliably for everyone.
The technical challenges (QtWebEngine initialization, threading compatibility, environment variables) required deep problem-solving and systematic debugging. The infrastructure challenges (multi-distribution builds, APT repository hosting, CI/CD automation) required modern DevOps practices and cloud-native thinking.
But ultimately, this project is about enabling users. Every technical decision, every patch, every workflow optimization serves the goal of making Stremio accessible to Debian and Ubuntu users through a simple, reliable installation process.
Part of ongoing contribution to become a Debian Package Maintainer
If you found this article helpful, please consider:
# Install package
sudo dpkg -i ../stremio_*.deb

# Fix dependencies if needed
sudo apt install -f

# Test binary
stremio --version
which stremio

# Check dependencies
ldd /usr/bin/stremio | grep -E "(libQt5|libmpv|libcrypto)"

# Run application
stremio
Repository Management
# Add GPG key
wget -qO - https://debian.vejeta.com/key.gpg | \
    sudo gpg --dearmor -o /usr/share/keyrings/stremio-debian.gpg

# Add repository (choose your distribution)
echo "deb [signed-by=/usr/share/keyrings/stremio-debian.gpg] https://debian.vejeta.com trixie main non-free" | \
    sudo tee /etc/apt/sources.list.d/stremio.list

# Update and install
sudo apt update
sudo apt install stremio stremio-server

# Verify installation
dpkg -L stremio
systemctl --user status stremio-server  # If systemd service installed
Debugging Runtime Issues
# Run with debug output
QT_DEBUG_PLUGINS=1 stremio

# Run in headless mode (for testing)
QT_QPA_PLATFORM=offscreen stremio

# Disable WebEngine sandbox (for containers)
QTWEBENGINE_DISABLE_SANDBOX=1 stremio

# Check server process
ps aux | grep server.js
lsof -i :11470

# Manual server test
/usr/bin/node /usr/share/stremio/server.js

# Test with gdb
gdb --args stremio
(gdb) run
(gdb) bt  # If crash occurs
Una solución paso a paso basada en experiencia real con mi Xiaomi Redmi Note 13 Pro + Debian GNU/Linux
El Problema Original
Necesitábamos internet para reinstalar un driver WiFi, pero:
USB tethering estaba deshabilitado en el teléfono
Sin acceso Ethernet
Driver WiFi no funcionaba
Solución: Bluetooth Tethering
Paso 1: Preparar el sistema Linux
bash
# Instalar herramientas Bluetooth
sudo apt install bluetooth bluez-tools net-tools

# Iniciar y habilitar el servicio
sudo systemctl start bluetooth
sudo systemctl enable bluetooth
Paso 2: Configurar el teléfono Redmi
Descubrimientos clave:
Activar datos móviles – El tethering Bluetooth requiere datos activos
Ir a: Ajustes > Conexión y uso compartido > Anclaje a red y zona Wi-Fi
Activar «Anclaje a red Bluetooth» – ANTES de emparejar
Cambiar nombre del dispositivo a algo identificable ayuda
Paso 3: Emparejamiento desde Linux
bash
# Iniciar bluetoothctl
bluetoothctl

# Dentro de bluetoothctl:
power on
agent on
scan on
# Esperar a ver el dispositivo...

devices
# Buscar tu teléfono en la lista

pair [MAC_ADDRESS]
trust [MAC_ADDRESS]
connect [MAC_ADDRESS]
Paso 4: El truco crucial – bt-network
Problema común: Bluetooth se conecta pero no crea interfaz de red.
bash
# Mientras está conectado en bluetoothctl, en otra terminal:
sudo bt-network -c [MAC_ADDRESS] nap

# Verificar interfaz
ip link show
# Deberías ver bnep0 o similar

# Configurar DHCP
sudo dhclient bnep0
Paso 5: Verificar conexión
bash
ip addr show bnep0
ping -c 3 8.8.8.8
Problemas Comunes y Soluciones
1. «Network service is connected, and then disconnected»
Causa: Anclaje Bluetooth no activado en el teléfono
Solución: Activar antes de conectar
2. No se crea interfaz bnep0
Causa: Falta servicio PAN
Solución: Usar bt-network o pand
3. No se puede identificar el dispositivo
Truco: Apagar/encender Bluetooth del teléfono durante scan on
Identificar por MAC: Ver en ajustes del teléfono
4. Conexión muy lenta
Normal: Bluetooth 2.1-3.0 ~ 3 Mbps
Solución: Paciencia para updates pequeños
Comandos Útiles para Diagnóstico
bash
# Ver estado Bluetooth
sudo systemctl status bluetooth
rfkill list all

# Ver dispositivos emparejados
bluetoothctl devices

# Ver información de conexión
bluetoothctl info [MAC]

# Forzar reconexión
sudo systemctl restart bluetooth
Flujo de Trabajo Optimizado
Teléfono: Activar datos + anclaje Bluetooth
Linux: bluetoothctl → pair → trust → connect
Linux: bt-network -c [MAC] nap
Linux: dhclient bnep0
Verificar: ping 8.8.8.8
Conclusión
El Bluetooth tethering es una herramienta de rescate que es como oro en paño cuando fallan otros métodos de conexión. La clave está en:
Pre-configurar el teléfono correctamente
Usar bt-network en lugar de confiar solo en bluetoothctl
Tener paciencia con la velocidad limitada
Esta solución nos permitió descargar paquetes críticos y resolver el problema real del driver WiFi, demostrando que incluso conexiones lentas pueden ser suficientes para tareas administrativas esenciales.
Un MacBook Pro de 11 años puede seguir siendo útil en 2025, pero requiere cuidados específicos y decisiones técnicas informadas. Esta es la historia de cómo convertí 140€ en varios años más de vida útil, con lecciones técnicas importantes sobre las diferencias entre generaciones de hardware Apple.
El problema: batería hinchada y decisión crítica
Mi MacBook Pro 11,1 (Late 2013) tenía la bateria inutil desde hace años, pero el problema real se hizo evidente al decidir abrirlo para inspección: batería visiblemente hinchada.
La batería había expandido lo suficiente para deformar el chasis interno, un problema común en MacBooks de esta generación después de años de uso. Este descubrimiento cambió completamente el diagnóstico de «batería gastada» a «riesgo de seguridad que requiere acción inmediata».
Decisión crítica: Detener el uso inmediatamente hasta resolver el problema. Una batería hinchada no es solo un inconveniente, es un riesgo de seguridad real que puede dañar componentes internos o crear situaciones peligrosas.
Análisis económico: ¿renovar o reemplazar?
Alternativas consideradas:
ThinkPad E14 nuevo: ~350€
Renovación MacBook 2013: ~140€
Mantener como equipo fijo: 0€ (pero limitado)
Factores decisivos:
Uso previsto: equipo secundario para desarrollo ocasional
Portabilidad necesaria: sí, para trabajar en diferentes ubicaciones
Presupuesto disponible: preferencia por inversión mínima efectiva
La renovación ofreció la mejor relación costo-beneficio para mis necesidades específicas.
Baterías genéricas de AliExpress: ~40€ (calidad dudosa, historiales de hinchazón temprana)
Servicio técnico oficial: >200€ (precio prohibitivo para equipo de 11 años)
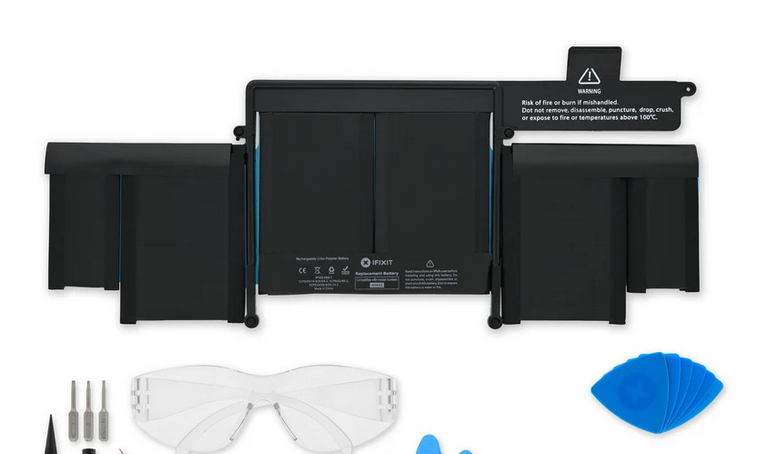
Instalación: Siguiendo la guía iFixit paso a paso, incluyendo limpieza interna completa con aire comprimido y alcohol isopropílico para remover años de acumulación de polvo.
Resultado: Batería con 104.2% de capacidad (6669 mAh vs 6400 mAh de diseño), superando las especificaciones originales gracias a mejoras en la tecnología de celdas Li-ion.
Cargador de repuesto
Problema del cargador original: Conector T-pin excesivamente caliente tras años de uso, indicando posible degradación de contactos internos.
Solución: Cargador compatible Ywcking (20€) como reemplazo principal, manteniendo el original como respaldo de emergencia.
Optimizaciones de sistema críticas
Gestión de memoria: zram como salvavidas
Con solo 8GB de RAM física, implementé zram para expansión de memoria virtual comprimida:
Auto Tab Discard: Suspensión automática de pestañas inactivas
Gestión energética inteligente
Limitaciones críticas del MacBook Pro 2013
Realidad técnica: A diferencia de laptops más modernos, el MacBook Pro 11,1 bajo Linux NO soporta control automático de umbrales de carga de batería:
# Verificación en mi sistema
sudo tlp-stat -b
# Resultado: "Supported features: none available"
# charge_control_start_threshold = (not available)
# charge_control_end_threshold = (not available)
Esta limitación requiere estrategias manuales de protección.
Sistema de monitorización automática
Desarrollé scripts de protección que compensan las limitaciones del hardware:
#!/bin/bash
# Script de monitorización cada 5 minutos vía cron
# Alertas por temperatura >42°C
# Warnings por tiempo prolongado al 100%
# Modo nocturno estricto 22:00-08:00
# Configuraciones que SÍ funcionan en MacBook Pro 2013
TLP_ENABLE=1
CPU_SCALING_GOVERNOR_ON_AC=ondemand
CPU_SCALING_GOVERNOR_ON_BAT=powersave
CPU_BOOST_ON_BAT=0
PLATFORM_PROFILE_ON_BAT=low-power
WIFI_PWR_ON_BAT=on
Estrategias diferenciadas por hardware
MacBook Pro 2013: Rutina manual estricta
Limitaciones técnicas:
Sin gestión automática de batería
Tecnología de carga de 2013
Mayor susceptibilidad a degradación térmica
Rutina diaria implementada:
Rango óptimo: 20-85% (manual)
Desconexión nocturna obligatoria
Monitorización cada 5 minutos via cron
Hibernación inteligente configurada
Rutina mensual para calibración:
Desactivar protección automática
Descarga controlada hasta 5% (NO 0%)
Carga completa al 100%
Reactivar protección
Diferenciación importante: Mac M1
ADVERTENCIA CRÍTICA: Las estrategias para MacBook 2013 NO se aplican a Mac M1.
Mac M1 + Folding@Home:
Optimización automática de batería nativa
Conectado 24/7 durante Folding es aceptable
Rutina mensual 30% (NO semanal, NO 0%)
Gestión térmica superior
Hibernación a disco: configuración avanzada
Diagnóstico inicial
# Estado original del sistema
cat /sys/power/state
# Output: "freeze mem" (hibernación no disponible)

# Configuración kernel
grep CONFIG_HIBERNATION /boot/config-$(uname -r)
# Output: CONFIG_HIBERNATION=y (soporte disponible)
# Estado verificado
Manufacturer: ifixit
Model: bq20z451 (Texas Instruments - premium)
Cycle Count: 4 (prácticamente nueva)
Capacity: 104.2% (superior a original)
Charge Full: 6669 mAh (vs 6400 mAh diseño)
Lecciones técnicas importantes
Inversión inteligente vs reemplazo
Total invertido: 140€ (batería 120€ + cargador 20€) Alternativa evitada: 350€ ThinkPad nuevo Ahorro neto: 210€ Vida útil proyectada: 3-5 años adicionales
Diferencias generacionales críticas
Error común: Aplicar estrategias modernas a hardware legacy. Las capacidades de gestión energética han evolucionado significativamente entre 2013 y 2020+.
Realidad técnica: Hardware de 2013 requiere supervisión manual donde hardware moderno tiene automatización.
Importancia de la monitorización
Sin capacidades automáticas de protección, la implementación de sistemas de alertas y scripts de monitorización se vuelve esencial para prevenir degradación acelerada.
Conclusión: viabilidad a largo plazo
Un MacBook Pro de 2013 puede seguir siendo funcional en 2025 con:
Protección automatizada: Scripts de monitorización
Rutinas disciplinadas: Carga manual inteligente
Hibernación configurada: Protección total del trabajo
Casos de uso viables:
Desarrollo ligero y scripting
Navegación web optimizada
Tareas de productividad básica
Equipo secundario/respaldo
No recomendado para:
Edición de video pesada
Gaming moderno
Compilación de proyectos grandes
Uso como equipo principal
La clave está en entender las limitaciones del hardware y trabajar dentro de ellas, no contra ellas. Con las optimizaciones correctas y expectativas realistas, la inversión de 140€ puede proporcionar varios años más de utilidad de un equipo que de otro modo sería descartado.
Mi MacBook Pro Retina 13″ de 2013 llevaba años funcionando solo con corriente. La batería había dejado de cargar hace tiempo, pero como lo usaba principalmente en casa, no me preocupé demasiado.
Llegué a plantearme seriamente sustituirlo por una tablet Android con «6GB + 28GB expandidos» (spoiler: esa RAM expandida es básicamente almacenamiento lento disfrazado de memoria). Pero antes de tomar esa decisión, decidí investigar si mi viejo Mac tenía solución.
Descubriendo el peligro oculto
Cuando finalmente conseguí el destornillador Pentalobe P5 adecuado y abrí la carcasa inferior, me encontré con una sorpresa desagradable: uno de los módulos de la batería estaba hinchado.
Esto es peligroso. Las baterías de litio hinchadas pueden:
Romper componentes internos (especialmente el trackpad, que está justo encima)
Liberar gases tóxicos
En casos extremos, incendiarse o explotar
Si tu portátil tiene una batería vieja y notas que el trackpad está elevado, la carcasa no cierra perfectamente o hay separaciones visibles, revísalo inmediatamente.
Manejo seguro de baterías hinchadas:
NO la perfores, dobles o presiones
Retírala del dispositivo inmediatamente
Colócala en superficie no inflamable (metal, cerámica)
Mantenla lejos de materiales inflamables
Llévala a un punto limpio o tienda de electrónica cuanto antes
NUNCA la tires a la basura normal
La solución: inversión inteligente vs reemplazo
Tenía dos opciones claras:
Opción A: Comprar un portátil usado (ThinkPad T480 con 16GB RAM) → ~300-350€
Opción B: Reparar el Mac → Batería + cargador → ~140€
¿Por qué reparar?
Contexto importante: tengo un Slimbook Pro (2019) con 32GB RAM como equipo principal. El MacBook es mi portátil secundario para:
Desarrollo ligero en cafeterías
Movilidad sin preocuparme por golpes
Situaciones donde necesito algo compacto y resistente
Para este uso ocasional, 8GB optimizados son suficientes. No necesitaba gastar el doble en otro equipo cuando el problema era solucionable.
El proceso de reparación
1. Batería nueva de iFixit (120€)
Pedí el kit completo que incluye:
Batería A1493 (compatible con MacBook Pro 13″ Retina Late 2013 – modelo A1502)
Todas las herramientas necesarias (Pentalobe P5, Torx T5, spudger, pinzas)
Kit de adhesivos
Removedor de pegamento viejo
Ventaja de iFixit: No tienes que comprar nada más. Otros vendedores solo dan la batería y luego descubres que necesitas herramientas especiales.
2. Limpieza interna
Aprovechando que tenía el Mac abierto, limpié el polvo acumulado:
Materiales:
Aire comprimido en lata
Brocha suave
Paño de microfibra
Alcohol isopropílico 90%+
Zonas críticas:
Ventiladores (sujetando las aspas para evitar que giren)
Disipador de calor
Conectores y puertos
NO uses:
Aspiradora (carga estática)
Agua
Trapo húmedo normal
3. Cargador de repuesto (20€)
Mi cable MagSafe 2 original de 2013 estaba reparado con cinta aislante desde hacía años. Aunque funcionaba, con una batería nueva de 120€ no quería arriesgarme a dañarla con un cargador deteriorado.
Después de investigar, compré un SCOVEE 60W T-Tip en Amazon (19,99€):
Compatible con A1502
4.8/5 estrellas con 81 reseñas
Certificaciones CE/FCC/RoHS
Reseñas positivas sobre temperatura («no se calienta»)
No es una marca premium como Green Cell, pero para uso ocasional y con las buenas valoraciones, era una opción sensata. El cable original queda como backup de emergencia.
Optimizaciones de software: TLP para gestión de energía
Además de la batería nueva, instalé TLP para optimizar automáticamente el consumo de energía.
TLP optimiza el consumo de batería automáticamente sin configuración manual.
# Instalación
sudo apt install tlp tlp-rdw

# Activar
sudo systemctl enable tlp
sudo systemctl start tlp

# Ver estado de batería
sudo tlp-stat -b
Lo mejor de TLP: funciona completamente en segundo plano. Una vez instalado, se olvida.
Calibración de la batería: crítico pero sencillo
Las baterías nuevas deben calibrarse para que el indicador de porcentaje sea preciso. Sin calibración, el sistema no sabe la capacidad real y puede apagarse al 50% o seguir funcionando «al 1%» durante horas.
Proceso correcto según iFixit/Apple:
Para portátiles:
Carga inicial:
Cargar hasta 100%
Mantener conectado 2 horas más (crítico para balanceo de celdas)
Puede estar apagado o encendido
Descarga completa:
Desconectar y usar normalmente
Cuando aparezca advertencia de batería baja → guardar trabajo
Dejar que se apague solo (no apagarlo manualmente)
Esto establece el «ancla» inferior de calibración
Espera:
Dejar 5 horas apagado y desconectado
Esto asegura que el sistema de gestión registre correctamente la descarga
Carga final:
Cargar de forma ininterrumpida hasta 100%
✅ Batería calibrada
¿Por qué dejar que se apague solo y no parar al 5-10%?
El sistema de gestión mantiene una reserva de seguridad invisible. Cuando muestra «0%», todavía hay carga química real para proteger la batería de daños. Solo dejando que el sistema se apague por sí mismo se establece correctamente el punto de «descarga completa» que el controlador necesita.
Resultados
Estado de la batería después de la instalación:
sudo tlp-stat -b
manufacturer = ifixit
model_name = bq20z451
cycle_count = 1
charge_full_design = 6400 mAh
charge_full = 6661 mAh
Capacity = 104.1%
¡La batería tiene 104.1% de capacidad! iFixit envió una batería mejor que las especificaciones originales.
Mejoras del sistema:
Antes:
❌ Sin portabilidad (batería muerta)
❌ Cable de carga deteriorado
❌ Batería hinchada (peligro)
Después:
✅ Autonomía 5-7 horas
✅ Cargador nuevo y seguro
✅ Batería con 104% de capacidad
✅ Sistema limpio internamente
✅ TLP optimizando consumo automáticamente
Conclusiones y aprendizajes
1. Las baterías hinchadas son peligrosas
No ignores las señales: trackpad elevado, carcasa que no cierra bien, separaciones visibles. Revísalo cuanto antes.
2. Reparar puede ser más inteligente que reemplazar
Contexto importa:
Equipo principal potente → reparar el secundario tiene sentido
Solo uso ocasional → 8GB optimizados son suficientes
Inversión: 140€ vs 300-350€ → ahorro de 160-210€
3. iFixit vale cada euro
Calidad garantizada, herramientas incluidas, guías detalladas, garantía sólida. Para reparaciones importantes, no escatimes en la batería.
4. La calibración NO es opcional
Dos horas extras al 100% + descarga completa + espera 5 horas. Parece tedioso pero es la diferencia entre un indicador preciso y uno errático.
Mi setup final
Equipo principal (oficina/casa):
Slimbook Pro 2019 con 32GB RAM
Backend pesado, Docker, IDEs, múltiples proyectos
Portátil ocasional (movilidad):
MacBook Pro 2013 renovado
Desarrollo ligero, resistente, compacto
Autonomía real de 5-7 horas
Total invertido en renovación: 140€
Batería iFixit: 120€
Cargador SCOVEE: 20€
Vida útil esperada: 3-5 años más para uso ocasional
Si tienes un portátil viejo y la batería está muerta o hinchada:
Revisa la batería (ábrelo y comprueba hinchazón – es peligroso)
iFixit para repuestos (calidad garantizada, incluye herramientas)
Limpia el interior (aire comprimido, aprovecha que está abierto)
Instala TLP (gestión automática de energía en Linux)
Calibra después de batería nueva (proceso completo, no atajos)
Un portátil de 2013 con batería nueva y bien mantenido puede seguir siendo perfectamente usable en 2025 para desarrollo ligero y uso diario. No todo necesita ser reemplazado.
Hardware: MacBook Pro Retina 13″ 2013 (A1502) | Software: Debian GNU/Linux con XFCE
Stremio for Debian: A Journey to 100% System Library Integration
How I replaced every bundled dependency in a complex Qt5 application—and what I learned about patch development, threading bugs, and the art of debugging runtime crashes
I packaged Stremio for Debian by replacing 100% of its bundled dependencies (libmpv, Qt libraries, OpenSSL) with system libraries. Along the way, I debugged five critical issues: QtWebEngine initialization order, threading conflicts with SingleApplication, missing QML modules, Node.js environment variables in QProcess, and debhelper install file pitfalls. The real lesson? I repeated patch creation 5+ times because I tested against modified sources instead of clean upstream. This article shares both the technical solutions and the meta-lesson about efficient patch development workflow that could have saved me 70% of development time.
Key Takeaway: When packaging complex applications, test your patches against pristine upstream at each step, not at the end.
Package Status (October 2025)
This article documents the technical work behind packaging Stremio for Debian. The package has achieved 100% system library integration and is currently:
Technical work: Complete and validated
ITP submitted: Under review by Debian Developer sponsor
This is a technical deep-dive into the challenges and solutions, not an announcement of package availability. The work continues through the Debian review process.
Introduction
When I set out to package Stremio—a popular media center application—for Debian, I had one clear goal: achieve 100% system library integration. No bundled dependencies, no git submodules, just clean integration with Debian’s ecosystem. What seemed like a straightforward build system migration turned into a deep dive into Qt5 threading models, runtime initialization order, and the subtle art of creating minimal, maintainable patches.
This is the story of that journey, the technical challenges I faced, and—perhaps most importantly—the lessons I learned about efficient patch development that could have saved me days of rework.
The Challenge: System Libraries or Bust
Stremio’s upstream repository arrived with several bundled dependencies as git submodules:
libmpv for video playback
qthelper for Qt utilities
singleapplication for single-instance behavior
OpenSSL libraries
The Debian way is clear: use system-provided libraries. This isn’t just philosophical purity—it’s about security updates, dependency management, and integration with the broader ecosystem.
The goal: Replace every bundled dependency with its Debian system library equivalent.
The result: A working .deb package with a 293KB optimized binary using 100% system libraries.
The journey: Five major technical hurdles, each revealing deeper insights into Qt5 application architecture.
The First Victory (That Wasn’t)
Initial packaging seemed straightforward. I modified CMakeLists.txt to use system libraries:
Symptom: Immediate segmentation fault when launching the application.
First debugging attempt: Run with gdb, examine the stack trace:
Program received signal SIGSEGV, Segmentation fault.
0x00007ffff5a2b3c4 in QQmlApplicationEngine::QQmlApplicationEngine() ()
The crash occurred during QQmlApplicationEngine construction. But why? The same code worked fine with bundled libraries.
The investigation: After examining Qt5 WebEngine documentation and several failed attempts to reorganize the code, I discovered a critical initialization requirement buried in the QtWebEngine documentation:
QtWebEngine::initialize() must be called before the QApplication constructor when using QML.
The bundled library setup happened to satisfy this ordering by accident. With system libraries, the default main() function violated it:
// WRONG - causes crashes
int main(int argc, char *argv[]) {
    QApplication app(argc, argv);  // QApplication created first
    // QtWebEngine::initialize() never called!
    QQmlApplicationEngine engine;  // CRASH
}
The fix (patch 0007-add-qtwebengine-initialize-fix.patch):
// CORRECT - initialize QtWebEngine before QApplication
int main(int argc, char *argv[]) {
    QtWebEngine::initialize();     // CRITICAL: Must be first!
    QApplication app(argc, argv);
    QQmlApplicationEngine engine;  // Now works
}
Lesson: When replacing bundled libraries with system ones, initialization order assumptions may change. Always verify startup sequence requirements.
Challenge 2: The SingleApplication Threading Nightmare
Symptom: After fixing QtWebEngine initialization, the application launched but immediately crashed with:
QObject: Cannot create children for a parent that is in a different thread.
The culprit: System library libsingleapplication-dev version 3.3.4.
Stremio needs single-instance behavior—when you launch it a second time, it should activate the existing window rather than start a new process. The upstream code used a bundled singleapplication library. The Debian system provides libsingleapplication-dev. Perfect replacement, right?
Wrong again.
The investigation: The system SingleApplication library sets up a threading context that conflicts with QQmlApplicationEngine. Specifically:
System SingleApplication creates its IPC mechanism in a worker thread
QQmlApplicationEngine expects to be created in the main thread
Qt5’s threading model doesn’t allow cross-thread parent-child relationships for certain QML objects
The bundled version used a different threading approach that happened to work with QML.
The false starts: I tried:
Patching SingleApplication to use main thread (broke IPC)
Result: Perfect single-instance behavior using pure QApplication (no threading conflicts) with QLocalSocket/QLocalServer for IPC.
Binary size: 424KB debug vs 293KB release—both using 100% system libraries.
Key lesson: System libraries may have different implementation details (like threading models) even when providing the same API. Sometimes a custom minimal implementation is cleaner than patching around incompatibilities.
Challenge 3: The Missing QML Modules
Symptom: After fixing both initialization and threading issues, the application launched but showed a black screen with console errors:
module "QtWebEngine" is not installed
module "QtWebChannel" is not installed
module "Qt.labs.platform" is not installed
The problem: Qt5 QML modules are separate runtime packages in Debian, not automatically pulled in by qtdeclarative5-dev.
The investigation: Stremio’s QML code imports numerous Qt modules:
Symptom: GUI loads perfectly, but when trying to play media:
Error while starting streaming server
tcp: Connection to tcp://127.0.0.1:11470 failed: Connection refused
The investigation: Stremio includes a Node.js server component (server.js) for streaming. The shell process log showed:
TypeError [ERR_INVALID_ARG_TYPE]: The "path" argument must be of type string. Received undefined
    at Object.join (node:path:1292:7)
The root cause: Qt’s QProcess doesn’t inherit environment variables by default. The Node.js server expected HOME, USER, and PWD to be available, but they weren’t.
The fix (patch 0011-fix-qprocess-environment-for-server-launch.patch):
// stremioprocess.cpp
void Process::start() {
    // Set up environment variables for Node.js server
    QProcessEnvironment env = QProcessEnvironment::systemEnvironment();

    if (!env.contains("HOME")) {
        env.insert("HOME",
            QStandardPaths::writableLocation(QStandardPaths::HomeLocation));
    }
    if (!env.contains("USER")) {
        env.insert("USER", qgetenv("USER"));
    }
    if (!env.contains("PWD")) {
        env.insert("PWD", QDir::currentPath());
    }

    this->setProcessEnvironment(env);
    QProcess::start();
}
Result: Server starts successfully:
hls executables located -> { ffmpeg: '/usr/bin/ffmpeg', ffsplit: null }
Using app path -> /home/user/.stremio-server
EngineFS server started at http://127.0.0.1:11470
Lesson: When spawning processes from Qt applications, explicitly configure the environment. Don’t assume child processes inherit the parent’s environment variables.
Challenge 5: Debian Packaging Structure Pitfalls
Symptom: Package builds successfully, but files install to wrong locations or with wrong names.
The problem: Misunderstanding debhelper’s .install file behavior.
What I thought:
# debian/stremio.install
build/stremio usr/bin/stremio-bin    # Install as /usr/bin/stremio-bin
What actually happened:
/usr/bin/stremio-bin/stremio # Created DIRECTORY, file inside!
The revelation: In debhelper .install files:
Path ending with / → Install files INTO that directory using original names
Path WITHOUT / → Create directory with that name and install files inside
The correct solution (actual implementation):
# debian/stremio.install
# Binary installed to /usr/libexec (FHS 3.0 compliance for helper executables)
build/stremio usr/libexec/stremio/

# Wrapper script becomes the primary user-facing command
debian/stremio-wrapper usr/bin/

# Desktop file for application menu integration
debian/stremio.desktop usr/share/applications/

# Application icons (multiple resolutions for different contexts)
icons/smartcode-stremio_16.png usr/share/icons/hicolor/16x16/apps/
icons/smartcode-stremio_64.png usr/share/icons/hicolor/64x64/apps/
# ... (additional icon sizes)
Why this structure?
/usr/libexec/stremio/: Modern FHS 3.0 location for internal executables not meant to be called directly by users
Wrapper script at /usr/bin/stremio: Sets environment variables (like QTWEBENGINE_DISABLE_SANDBOX=1) before launching the actual binary
Trailing slashes: Install files INTO directories using original filenames—critical for correct placement
Lesson: Read debhelper documentation carefully. Small syntax details (trailing slashes!) have big consequences. Modern Debian packaging also follows FHS 3.0 standards, placing helper binaries in /usr/libexec/ rather than /usr/bin/.
The Meta-Lesson: Efficient Patch Development
The technical challenges were difficult, but I made them harder through inefficient workflow. I created patches, tested them, found they failed on clean upstream, then reworked them—five times.
The problem: I was testing patches against already-modified sources, not pristine upstream.
Build System Strategy: Patch CMakeLists.txt First
Critical principle: Always prioritize build system patches over source code modifications.
When replacing bundled dependencies with system libraries, the first patches should target CMakeLists.txt:
Why this matters: Smaller, focused patches that address build system integration separately from source code changes are easier to maintain and review.
Build system preference: We used qmake to generate makefiles first (Stremio’s traditional build system), then ensured CMake compatibility. The stremio.pro file and release.makefile workflow took precedence for package builds.
The Anti-Pattern
Modify source files directly to fix issue
Generate patches from modified state
Try to apply patches to clean upstream
Patches fail (missing context, wrong line numbers, missing dependencies)
Repeat
The Efficient Workflow I Should Have Used
# 1. Start with clean upstream
git checkout v4.4.169

# 2. Create isolated test environment
cp -r . /tmp/patch-test/
cd /tmp/patch-test/

# 3. Fix ONE issue, test, generate patch
# (fix QtWebEngine initialization)
mkdir build && cd build && cmake .. && make    # Test build
cd .. && git diff > 0001-qtwebengine-init.patch

# 4. Apply patch to clean upstream, fix next issue
git checkout v4.4.169
patch -p1 < 0001-qtwebengine-init.patch
# (fix next issue)
git diff > 0002-next-fix.patch

# 5. Final validation: apply all patches to clean upstream
git checkout v4.4.169
for patch in *.patch; do
    patch -p1 < $patch || exit 1
done
mkdir build && cd build && cmake .. && make
Dependency analysis checklist I wish I’d used from the start:
## Pre-Patch Analysis Template

### Files to Modify:
- [ ] main.cpp - entry point changes
- [ ] mainapplication.h - class definitions, includes
- [ ] CMakeLists.txt - build system
- [ ] compatible_singleapp.h/cpp - new files

### Dependency Chain:
1. main.cpp includes → mainapplication.h
2. mainapplication.h includes → singleapplication.h (to replace)
3. CMakeLists.txt references → SingleApplication library
4. Qt MOC will process → Q_OBJECT classes (check conflicts!)

### Build Test Plan:
- [ ] Clean cmake build
- [ ] ldd dependency verification
- [ ] Runtime basic functionality
Time saved if I’d done this from the start: ~70% reduction in patch development time.
Key insight: Understand file dependencies and build system BEFORE making changes. Test patches against clean upstream at each step, not just at the end.
The Complete Patch Set
The final working solution consists of 11 patches:
0001-Fix-server.js-path-for-FHS-compliance.patch – Server location
0002-disable-server-download.patch – Use system Node.js
0004-minimal-qthelper-integration.patch – System Qt utilities
0011-fix-qprocess-environment-for-server-launch.patch – Critical: Server environment
Validation Workflow
The final validation workflow ensures patches work on clean upstream, using the GBP (git-buildpackage) import workflow for proper Debian package building:
# Step 1: Create pristine test environment with GBP structure
git clone --branch v4.4.169 https://github.com/Stremio/stremio-shell.git /tmp/validation
cd /tmp/validation
cp -r /path/to/debian .

# Step 2: Apply all patches using quilt
export QUILT_PATCHES=debian/patches
quilt push -a

# Step 3: Test local build first (fastest iteration)
QT_DEFAULT_MAJOR_VERSION=5 dpkg-buildpackage -us -uc

# Step 4: Verify dependencies
ldd debian/stremio/usr/libexec/stremio/stremio | head -5
# Should show: libQt5WebEngine.so.5, libcrypto.so.3, libmpv.so.2

# Step 5: Test with pbuilder (clean chroot environment)
sudo pbuilder update
sudo pbuilder build ../*.dsc

# Step 6: Test with sbuild (production-grade build)
# WARNING: Qt5/WebEngine packages consume significant space
# Typical requirement: 4-6GB build space (overlayfs in tmpfs)
# Solution: Use machine with 16GB+ RAM or configure sbuild on disk

sbuild -d unstable ../*.dsc
# If sbuild fails with "No space left on device":
# - Switch to larger machine (16GB+ RAM recommended)
# - Or configure sbuild to use disk instead of tmpfs
Build Environment Considerations
Memory requirements for Qt5 applications:
dpkg-buildpackage: ~2GB RAM
pbuilder: ~4GB RAM
sbuild with overlayfs in tmpfs: 6-8GB RAM (Qt5WebEngine is memory-intensive)
Our solution: After encountering space exhaustion on 8GB machines during sbuild, we migrated to a 32GB machine. This is typical for Qt5/WebEngine applications—always test sbuild capacity before committing to build infrastructure.
Result: 293KB optimized binary, 100% system libraries, full functionality including streaming.
Lessons for Other Packagers
Technical Takeaways
Initialization order matters: System libraries may have different startup requirements than bundled ones. Always verify initialization sequences.
Threading models vary: Even libraries with identical APIs may use different threading approaches. Watch for cross-thread object creation errors.
Environment variables aren’t automatic: QProcess and similar mechanisms need explicit environment setup.
QML modules are separate packages: Trace every QML import to its Debian package dependency.
Custom implementations beat complex patches: Sometimes writing 100 lines of clean code is better than a 500-line patch to an incompatible library.
Process Takeaways
Always test patches against clean upstream: Never generate patches from already-modified sources.
Map dependencies before coding: Understand file relationships and build system before making changes.
One fix, one patch, one test: Incremental development prevents cascading failures.
Document assumptions: What works «by accident» with bundled libraries may fail with system ones.
Validate completely: Test patches in isolated environments before declaring them «ready».
Conclusion
Packaging Stremio for Debian taught me far more than Qt5 internals and build system integration. It revealed how easily we fall into inefficient workflows when we don’t step back to examine our process.
The technical achievement: A fully functional Debian package using 100% system libraries where the upstream used bundled dependencies—293KB binary, zero submodules, complete feature parity.
The real achievement: Learning that the how of problem-solving matters as much as the what. Efficient patch development isn’t just about technical skill—it’s about disciplined workflow, systematic thinking, and honest self-assessment.
Would I do anything differently? Absolutely. I’d use the validation workflow from day one, map dependencies before coding, and test each patch against clean upstream immediately.
But would I have learned these lessons without making the mistakes? Probably not.
Acknowledgments
Thanks to the Stremio team for creating great software, the Debian community for maintaining high standards, my friend Arturo (a Debian Developer) that knowing my passion for Debian encouraged me to start working as a Debian Maintainer, and to every packager who has documented their struggles—your war stories make ours easier.
Project Status (as of October 3, 2025)
ITP Status: #943703 Submitted and under review by Debian Developer sponsor
Note: This article documents the technical process and challenges. Package acceptance is pending Debian review. Status updates will be posted as the review process continues.
This article is part of my journey toward becoming a Debian Developer. If you’re interested in Debian packaging or have questions about the technical details, feel free to reach out.
Mi viejo MacBookPro Retina del 2013, con Debian GNU/Linux y 8GB de RAM iba bastante lento al usar Firefox con múltiples pestañas.
Estas optimizaciones le dieron una nueva vida sin gastar dinero en hardware.
Problema
Firefox es un devorador de RAM. Con varias pestañas abiertas, especialmente sitios web modernos (aplicaciones JavaScript pesadas), es fácil saturar 8GB de RAM. Cuando esto ocurre, el sistema empieza a usar swap en disco, lo que causa congelaciones y lentitud extrema.
Solución en dos partes
1. Optimizar Firefox
Instalar uBlock Origin:
Ve a: Menú → Complementos → Buscar «uBlock Origin»
Bloquear ads y scripts innecesarios libera fácilmente 1-2GB de RAM
Activar suspensión automática de pestañas:
Opción A – Configuración nativa:
about:config
Busca browser.tabs.unloadOnLowMemory y actívalo (true)
Opción B – Extensión (más control):
Instala la extensión «Auto Tab Discard»
Configura para suspender pestañas después de X minutos sin uso
Reducir historial de sesión (opcional):
about:config
Busca browser.sessionhistory.max_entries y reduce a 5-10 (default: 50)
Alternativa: Probar Brave Si Firefox sigue siendo muy pesado, Brave es un navegador basado en Chromium pero más eficiente con la RAM:
bash
sudo apt install brave-browser
2. Configurar zram (RAM comprimida)
¿Qué es zram? zram crea un dispositivo de swap comprimido en RAM. En vez de escribir al disco cuando se llena la memoria (lento), comprime datos en la propia RAM (rápido). Típicamente logra ratios de compresión 2-3:1, dando efectivamente 10-12GB de RAM «útil» en un sistema de 8GB.
Instalación:
bash
sudo apt install zram-tools
Configuración:
bash
sudo nano /etc/default/zramswap
Configura así:
bash
# Algoritmo de compresión (lz4 es rápido)
ALGO=lz4
# Porcentaje de RAM a usar para zram (50% = ~4GB)
PERCENT=50
# Comenta SIZE si usas PERCENT#SIZE=512# Prioridad alta (usa zram antes que swap en disco)
PRIORITY=100
zramctl
# Deberías ver algo como:# NAME ALGORITHM DISKSIZE DATA COMPR TOTAL STREAMS MOUNTPOINT# /dev/zram0 lz4 3.8G ...
free -h
# Verás el swap total aumentado
3. Ajustar swappiness (opcional)
Por defecto, Linux usa valor 60 de swappiness, que significa que empieza a usar swap relativamente pronto. Con zram, puedes bajarlo para que use más la RAM física primero:
bash
# Ver valor actual
cat /proc/sys/vm/swappiness

# Configurar permanentemente a 10
echo "vm.swappiness=10" | sudo tee -a /etc/sysctl.conf
sudo sysctl -p
Resultados esperados
Después de aplicar estas optimizaciones:
Firefox puede manejar más pestañas sin saturar el sistema
Menos «congelaciones» cuando la RAM se llena
Cambio entre aplicaciones más fluido
Reducción drástica del uso de swap en disco (menos desgaste SSD)
Sistema más responsive en general
Monitorizar el sistema
Para ver zram en acción:
bash
# Ver uso en tiempo real
watch -n 2 zramctl

# Ver estadísticas detalladas
watch -n 2 'cat /sys/block/zram0/mm_stat'
Hardware testado
MacBook Pro Retina 13″ (2013) con 8GB RAM
Debian con XFCE
Firefox con desarrollo web (múltiples pestañas, DevTools)
Conclusión
Con estas optimizaciones, un sistema de 8GB puede comportarse casi como uno de 10-12GB para la mayoría de tareas. No sustituye tener más RAM física para cargas de trabajo muy pesadas (compilaciones masivas, virtualización intensiva), pero para desarrollo web, programación backend ligera y uso diario, la diferencia es notable.
Manage Cookie Consent
To provide the best experiences, we use technologies like cookies to store and/or access device information. Consenting to these technologies will allow us to process data such as browsing behavior or unique IDs on this site. Not consenting or withdrawing consent, may adversely affect certain features and functions.
Functional
Siempre activo
The technical storage or access is strictly necessary for the legitimate purpose of enabling the use of a specific service explicitly requested by the subscriber or user, or for the sole purpose of carrying out the transmission of a communication over an electronic communications network.
Preferencias
El almacenamiento o acceso técnico es necesario para la finalidad legítima de almacenar preferencias no solicitadas por el abonado o usuario.
Statistics
El almacenamiento o acceso técnico que es utilizado exclusivamente con fines estadísticos.The technical storage or access that is used exclusively for anonymous statistical purposes. Without a subpoena, voluntary compliance on the part of your Internet Service Provider, or additional records from a third party, information stored or retrieved for this purpose alone cannot usually be used to identify you.
Marketing
The technical storage or access is required to create user profiles to send advertising, or to track the user on a website or across several websites for similar marketing purposes.