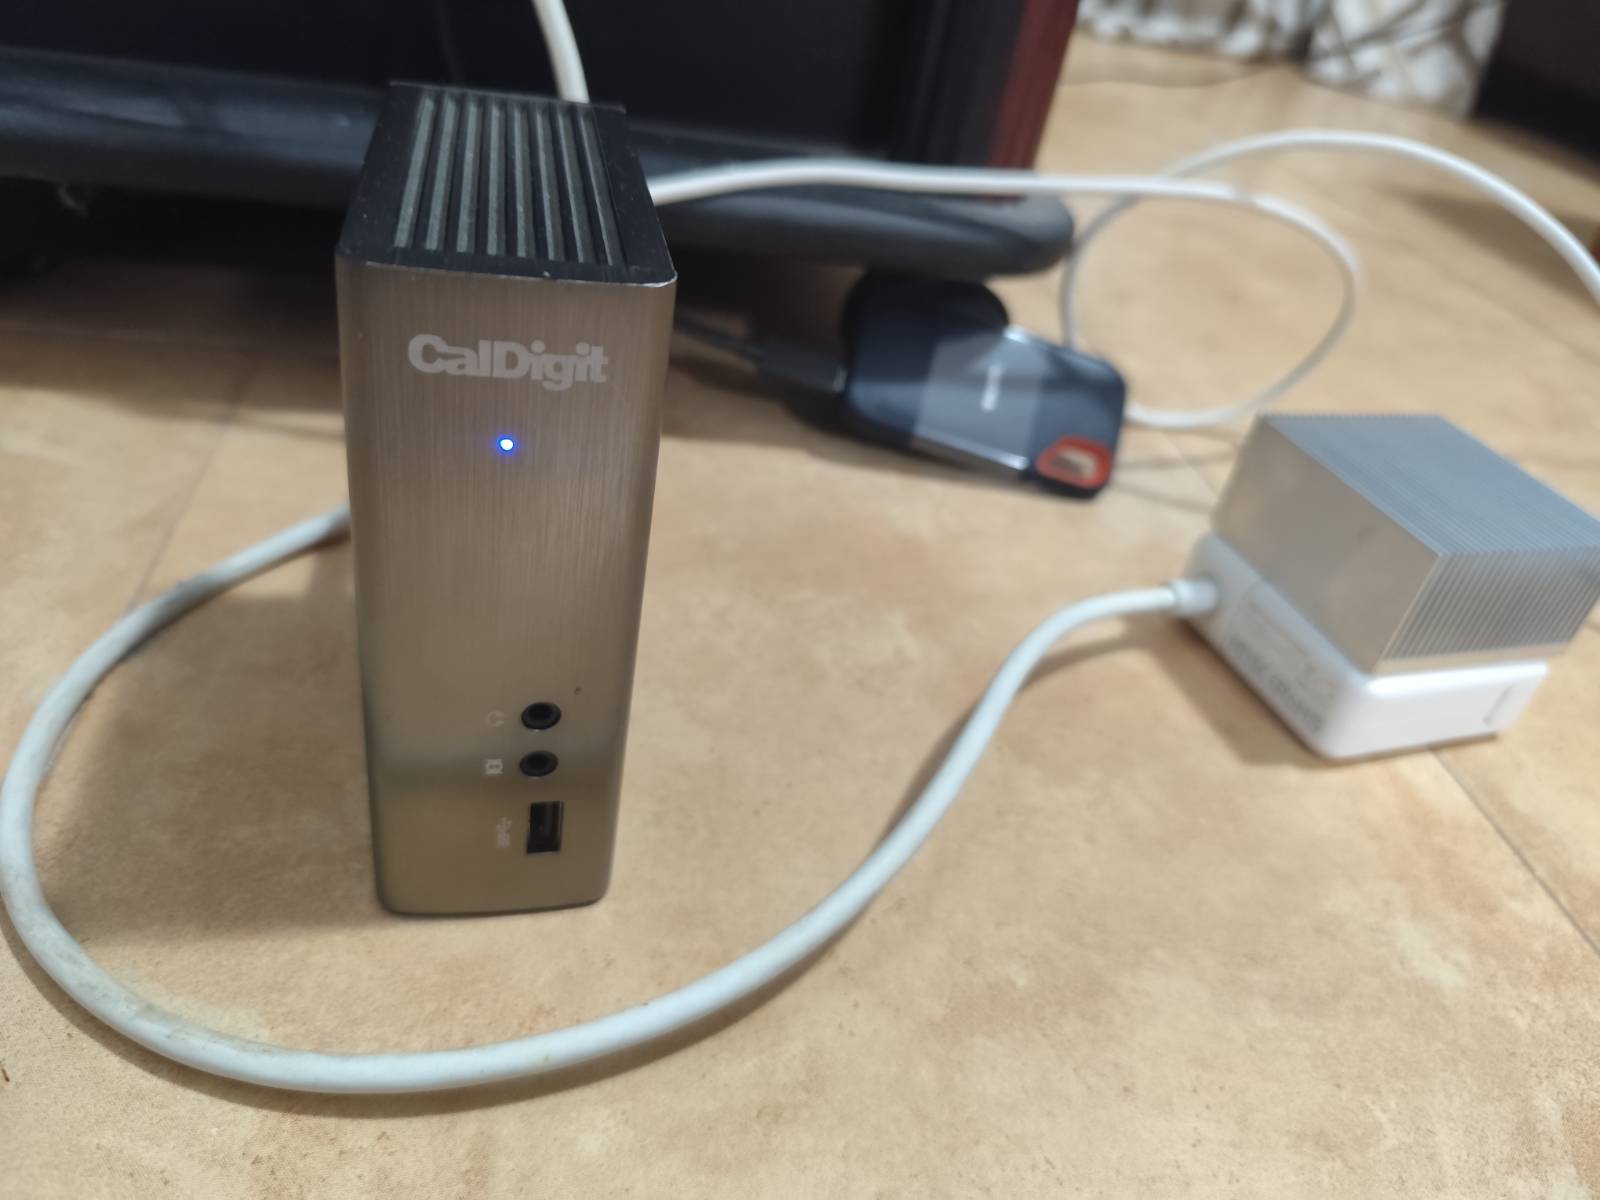
# Check Thunderbolt devices
sudo dmesg | grep -i thunderbolt | head -10

# Should show:
# thunderbolt 0-3: CalDigit, Inc. Thunderbolt Station 2
# No more "device link creation failed" errors

# Verify device listing
ls -la /sys/bus/thunderbolt/devices/
Step 3: Device Authorization with Bolt
Install and configure bolt for Thunderbolt device management:
# Install bolt (if not already installed)
sudo apt update && sudo apt install bolt

# Check device status
sudo boltctl list

# The CalDigit should show as "authorized"
Step 4: Verify USB Functionality
Connect USB devices to the CalDigit and verify recognition:
# Check USB device tree
lsusb -t

# Check connected storage devices
lsblk

# Verify USB devices by-id
ls -la /dev/disk/by-id/ | grep usb
Expected Results
After applying the solution:
Thunderbolt Detection: CalDigit appears as thunderbolt 0-3: CalDigit, Inc. Thunderbolt Station 2
Authorization Status: Device shows as authorized in bolt
USB Devices: Connected USB devices appear normally in lsusb and lsblk
No Error Messages: No more «device link creation failed» or port timeout errors
Troubleshooting Commands
Diagnostic Commands
# View Thunderbolt module parameters
cat /sys/module/thunderbolt/parameters/*

# Check PCI tree for Thunderbolt devices
sudo lspci -tv | grep -A 5 -B 5 Thunderbolt

# Monitor real-time device connections
sudo dmesg -w

# Check device authorization status
cat /sys/bus/thunderbolt/devices/0-3/authorized

# View detailed PCI bridge information
sudo lspci -vvv -s 06:00.0
The solution addresses the core compatibility issues between MacBook Pro 11,1, Liquorix kernel, and CalDigit Thunderbolt Station 2
All kernel parameters are essential for proper operation
USB devices connected to the CalDigit should work normally after applying the solution
The fix is persistent across reboots once GRUB is updated
Monitor dmesg logs if any issues arise with new USB devices
Success Indicators
CalDigit Detection: Device appears in bolt list as authorized No Error Messages: Clean dmesg output for Thunderbolt events USB Functionality: Connected devices appear in lsusb and lsblk Stable Operation: No disconnect/reconnect cycles Storage Access: USB storage devices mount and operate normally
Hardware: MacBook Pro 11,1 (Mid 2013) Software: Kali Linux Rolling 2025.4 + Liquorix kernel 6.17.8 Device: CalDigit Thunderbolt Station 2 + Various USB devices
Termux y Taiscale para usar Android como un servidor totalmente funcional
En el mundo de la seguridad informática y la administración de sistemas, a menudo nos encontramos con máquinas donde no podemos o no queremos instalar software que requiera privilegios de administrador. Ya sea por políticas corporativas, seguridad, o simplemente por mantener un sistema limpio, la necesidad de acceder a redes privadas sin comprometer el sistema host es real.
Hoy les comparto una solución elegante: usar un dispositivo Android como puente para acceder a toda tu red Tailscale, sin instalar absolutamente nada con privilegios root en tu máquina principal.
El servidor SSH de Termux escucha en el puerto 8022 por defecto.
3. Activar Hotspot y Conectar
Activar el hotspot/tethering en Android
Conectar tu máquina al hotspot
Encontrar la IP del gateway (que será Android):
# En macOS/Linux
route -n get default | grep gateway
4. Crear Túneles con socat
Una vez conectado por SSH a Termux:
# Conectar a Termux desde tu máquina
ssh -p 8022 u0_aXXX@IP_GATEWAY

# En Termux, crear túnel hacia servidor en Tailscale
socat TCP-LISTEN:2222,fork,reuseaddr TCP:100.x.x.x:22
Donde 100.x.x.x es la IP de Tailscale del servidor destino.
5. Conectar al Servidor Final
Desde tu máquina, ahora puedes conectar al servidor remoto a través del túnel:
ssh -p 2222 usuario@IP_GATEWAY
Casos de Uso
Esta configuración es perfecta para:
Máquinas corporativas donde no puedes instalar VPNs
Sistemas temporales donde no quieres dejar rastro
Debugging remoto cuando necesitas acceso rápido
Mantener un sistema limpio sin daemons adicionales
Optimizaciones y Automatización
Para uso frecuente, puedes:
Configurar claves SSH para acceso sin contraseña
Usar tmux en Termux para mantener sesiones persistentes
Crear scripts que automaticen la detección de IPs y creación de túneles
Configurar múltiples túneles para diferentes servidores simultáneamente
Consideraciones de Seguridad
Solo usar en redes donde confíes (tu propio hotspot)
Configurar SSH con autenticación por clave, nunca contraseña
El tráfico entre Android y los servidores viaja encriptado por Tailscale
El hotspot crea una red aislada entre tu dispositivo y Android
Conclusión
Esta solución demuestra que con un poco de creatividad, podemos sortear limitaciones técnicas sin comprometer la seguridad. Android se convierte en un poderoso gateway de red, Tailscale provee la conectividad segura, y tu máquina principal permanece limpia y sin modificaciones de sistema.
¿El resultado? Acceso completo a tu infraestructura privada usando solo herramientas estándar y un teléfono que probablemente ya llevas contigo.
¿Has implementado soluciones similares? ¿Qué otros usos creativos le darías a esta arquitectura? Comparte tus ideas en los comentarios.
Capítulo 3: Mi Travesía Personal como Aspirante a Debian Maintainer
Expandiendo las Capacidades de Desarrollo: Setup Híbrido con Proton Drive y Debian GNU/Linux
8 de noviembre, 2025
Las Limitaciones de Espacio con un ordenador portátil de 13 años
Como desarrollador con más de 20 años de experiencia en Unix/Linux, he enfrentado un desafío constante: las limitaciones de almacenamiento local versus la necesidad de mantener múltiples proyectos activos, especialmente cuando trabajo en empaquetado complejo como Chromium Embedded Framework (CEF) para Debian. Recientemente, desarrollé una solución elegante que combina Proton Drive con automatización Linux para crear un ecosistema de desarrollo verdaderamente híbrido.
El Problema: Limitaciones de Hardware Legacy
Mi setup principal incluye un MacBook Pro 11,1 ejecutando Debian, con apenas 100GB de almacenamiento SSD. Con solo 15GB libres después de instalar las herramientas de desarrollo esenciales, cada proyecto de empaquetado se convierte en un juego de tetris de espacio en disco. Los builds de CEF pueden generar varios gigabytes de datos, y mantener múltiples iteraciones para debugging se vuelve imposible.
Además, trabajo desde múltiples máquinas – la principal en casa y una laptop de viaje – lo que requiere sincronización manual constante de archivos de configuración, documentación técnica y progreso de desarrollo.
La Solución: Arquitectura Híbrida con Proton Drive
Componentes del Sistema
1. Almacenamiento Local (SSD 100GB)
Trabajo activo y builds en curso
Máxima velocidad para compilación
Cache temporal del sistema
2. Proton Drive (500GB)
Storage expandido cifrado end-to-end
Backup automático de trabajo
Sincronización entre máquinas
Archive de builds completados
3. Storage Externo (SanDisk + CalDigit)
Almacenamiento masivo para builds históricos
Repositorios de packages grandes
Backup de sistemas completos
Arquitectura de Directorios
# Estructura local
~/development/debian/           # Trabajo activo (local SSD)
~/ProtonDrive/                  # Mount automático (Proton Drive)
├── cef-builds-archive/         # Builds completados
├── documentation-backup/       # Docs técnicas
├── config-backup/             # Configuraciones del sistema
└── temp-builds/               # Storage temporal expandido

# Estructura en Proton Drive
protondrive:/sync/debian/       # Sync automático trabajo activo
protondrive:/mount/             # Storage expandido montado
Implementación Técnica
1. Configuración de RClone
RClone actúa como el puente entre el sistema local y Proton Drive, proporcionando tanto capacidades de sincronización como montaje de filesystem.
# Instalación desde repositorios Debian
sudo apt update
sudo apt install rclone

# Verificar instalación
rclone --version

# Configuración
rclone config
# Seleccionar: protondrive
# Introducir credenciales de Proton Mail
# Configurar 2FA si está habilitado
2. Servicio de Sincronización Automática
Creé un servicio systemd que sincroniza automáticamente el trabajo activo cada 4 horas:
El laptop con 15GB libres ahora puede manejar proyectos de múltiples gigabytes sin impacto en el rendimiento local. Los builds activos permanecen en SSD para velocidad máxima, mientras el archive automático libera espacio continuamente.
2. Continuidad Entre Máquinas
El workflow pull/push permite cambiar entre máquina principal y laptop de viaje sin pérdida de contexto. Cada sesión comienza con start-work.sh y termina con end-work.sh, garantizando sincronización perfecta.
3. Backup Automático Cifrado
Con timer cada 4 horas, nunca pierdo más de 4 horas de trabajo. El cifrado end-to-end de Proton significa que incluso datos sensibles de clients están protegidos.
4. Flexibilidad de Storage
Local: Máxima velocidad para trabajo activo
Mount: Acceso directo como filesystem para casos especiales
Sync: Backup automático sin intervención manual
Externo: Capacidad masiva para archive de largo plazo
Casos de Uso Específicos
Desarrollo CEF (Chromium Embedded Framework)
Los builds de CEF generan varios GB de artifacts. La configuración permite:
Build activo en SSD local (velocidad)
Archive automático de builds completados
Sincronización de documentación técnica entre iteraciones
Backup de scripts de build y patches personalizados
Trabajo Remoto y Viajes
Antes del sistema, trabajar desde la laptop de viaje significaba:
Sincronización manual propensa a errores
Pérdida de contexto entre máquinas
Limitaciones de almacenamiento aún más severas
Ahora es completamente transparente: start-work.sh en cualquier máquina restaura el contexto exacto de la última sesión.
Monitoreo y Mantenimiento
Verificación de Servicios
# Ver estado de servicios
systemctl --user status proton-sync.service
systemctl --user status proton-mount.service

# Ver próximas ejecuciones del timer
systemctl --user list-timers proton-sync.timer

# Logs detallados
journalctl --user -u proton-sync.service --since today
Scripts de Diagnóstico
#!/bin/bash
# check-proton-setup.sh
echo "=== Estado del Sistema Proton Drive ==="

# Verificar mount
if mountpoint -q ~/ProtonDrive; then
    echo "✅ Storage expandido montado correctamente"
    df -h ~/ProtonDrive
else
    echo "❌ Mount no disponible"
fi

# Verificar timer de sync
if systemctl --user is-active proton-sync.timer >/dev/null; then
    echo "✅ Timer de sync activo"
    systemctl --user list-timers proton-sync.timer
else
    echo "❌ Timer no activo"
fi

# Verificar conectividad
if rclone ls protondrive:/sync/ >/dev/null 2>&1; then
    echo "✅ Conectividad con Proton Drive OK"
else
    echo "❌ Problema de conectividad"
fi
Consideraciones de Rendimiento
Red y Latencia
Upload: ~30-80 Mbps después de overhead de encriptación
Download: Near line speed con cache local activo
Latencia: Imperceptible para acceso a archivos cacheados
Optimizaciones Implementadas
VFS cache full: 20GB cache local para acceso rápido
Transfers limitados: 2 transferencias concurrentes para estabilidad
Exclusiones inteligentes: Archivos temporales y logs excluidos del sync
Ignore existing: Evita conflictos en sincronización bidireccional
Impacto en Productividad
Métricas de Mejora
Storage efectivo: De 15GB a 515GB disponibles
Tiempo de setup entre máquinas: De 30+ minutos a <2 minutos
Pérdida máxima de trabajo: De días potenciales a máximo 4 horas
Flexibilidad de proyecto: Múltiples builds CEF simultáneos posibles
Casos de Recuperación
Durante el desarrollo, experimenté una desconexión inesperada que habría resultado en pérdida significativa de trabajo. El sistema automático había sincronizado el progreso 2 horas antes, permitiendo recuperación completa en minutos.
Lecciones Aprendidas
1. Automatización vs Control
El balance entre timer automático (cada 4h) y scripts manuales (pull/push) proporciona tanto protección continua como control granular cuando es necesario.
2. Exclusiones son Críticas
La configuración inicial incluía logs de build (35MB cada uno), saturando la red. Las exclusiones inteligentes mejoraron el rendimiento dramáticamente.
3. Systemd User Services
Los servicios de usuario proporcionan automatización robusta sin requerir privilegios root, ideal para entornos de desarrollo personal.
Conclusión
Esta configuración híbrida resuelve múltiples limitaciones simultáneamente: espacio de almacenamiento, continuidad entre máquinas, backup automático y escalabilidad de proyectos. Para desarrolladores trabajando con proyectos complejos como empaquetado Debian o builds de software extensos, representa una solución elegante que combina lo mejor de storage local rápido con la flexibilidad y seguridad del cloud storage cifrado.
Ventajas Clave del Sistema
Zero downtime por pérdida de trabajo
Escalabilidad transparente de almacenamiento
Continuidad perfecta entre múltiples máquinas
Backup automático cifrado sin intervención manual
Flexibilidad de storage adaptada a diferentes necesidades
Próximos Pasos
Este setup forma la base para expansiones futuras:
Integración con CI/CD para builds automáticos
Monitoreo avanzado con métricas de uso
Sincronización selectiva por proyectos
Archive automático basado en políticas de tiempo
Para desarrolladores que enfrentan limitaciones similares de hardware legacy pero necesitan mantener productividad en proyectos modernos complejos, esta arquitectura híbrida proporciona una solución práctica y escalable.
El código completo de configuración y scripts están disponibles en mi repositorio de dotfiles, y continuaré documentando mejoras y optimizaciones a medida que evolucione el sistema.
How a simple documentation contribution evolved into a full-scale packaging solution with automated CI/CD, multi-distribution support, and deep technical problem-solving
Author: Juan Manuel Méndez Rey Date: October 30, 2025 Reading Time: 25 minutes Technical Level: Advanced
The Beginning: A Documentation Gap
Several years ago, while working with Stremio on Debian systems, I encountered the familiar frustration of Linux users everywhere: a great application with poor installation documentation. The official Stremio releases worked fine on some distributions, but Debian users were left to figure out dependencies, compilation steps, and integration challenges on their own.
That’s when I contributed the original DEBIAN.md file to the Stremio shell repository. It was a straightforward build guide—install these dependencies, run these commands, copy these files. Simple, but functional.
Years passed. Dependencies changed. Qt versions evolved. The simple build instructions became increasingly unreliable on modern Debian systems, and the GitHub issues piled up with frustrated users unable to compile Stremio.
The Problem Grows
By 2025, the situation had become untenable:
Dependency conflicts: The upstream .deb package required libmpv1, but modern Debian ships libmpv2
Missing QML modules: Critical Qt5 components weren’t documented as dependencies
Compilation complexity: Users needed to install 15+ build dependencies to compile from source
No proper integration: Desktop files, icons, and system integration required manual work
The upstream .deb package is outdated, it is providing the 4.4.168 version.
The list continues…
The GitHub issues were a testament to user frustration—dozens of reports about compilation failures, missing dependencies, and broken installations.
The Debian Way: Proper Packaging
Rather than continue patching documentation, I remembered a discussion with my friend, Arturo, about properly packaging Stremio for Debian, he created a RFP (Request for Package) for Stremio in 2020. Years passed and I went into my usual day to day work. This past month I decided I had to fulfill my old dream of becoming an official Debian contributor, so I decided to solve this properly through the Debian packaging system. In late 2025, I filed an Intent To Package (ITP) with Debian:
stremio-server package (non-free) – Proprietary streaming server v4.20.12
Technical Deep Dive: System Library Migration
The most challenging aspect was replacing ALL bundled git submodules with Debian system libraries. This wasn’t just about dependencies—it required fixing fundamental runtime issues.
Problem: System libsingleapplication-dev v3.3.4 caused segmentation faults when used with QQmlApplicationEngine.
Investigation:
# Test with system library:
sudo apt install libsingleapplication-dev
# Build and run: Segmentation fault

# Test without SingleApplication:
# Remove from CMakeLists.txt: Works perfectly
Root Cause: System library sets up threading context incompatible with Qt5 QML engine initialization. The library uses internal threading mechanisms that conflict with QQmlApplicationEngine’s event loop.
Solution: Custom CompatibleSingleApp implementation. This is also to replace one of the bundled submodules that recently modified its MIT license into a dubious license that could be incompatible for Debian DFSG guidelines. See https://github.com/itay-grudev/SingleApplication/issues/210
Challenge 3: QProcess Environment Variables for Node.js Server 🔥 CRITICAL
Problem: Streaming server failed to start with cryptic error:
server-crash 0 null
TypeError [ERR_INVALID_ARG_TYPE]: The "path" argument must be of type string. Received undefined
    at Object.join (node:path:1292:7)
Investigation:
# Manual server test works:
$ /usr/bin/node /usr/share/stremio/server.js
EngineFS server started at http://127.0.0.1:11470

# But QProcess launch fails:
timeout 15s stremio
# Error: server-crash 0 null
Root Cause: QProcess does not inherit environment variables by default. Node.js server.js requires:
HOME – for configuration directory (~/.stremio-server)
USER – for process identification
PWD – for relative path resolution
Solution: Explicit environment setup in stremioprocess.cpp:
void Process::start(QStringList args) {
    // Set up environment variables for Node.js server
    QProcessEnvironment env = QProcessEnvironment::systemEnvironment();

    // Ensure essential environment variables are set for server.js
    if (!env.contains("HOME")) {
        env.insert("HOME", QStandardPaths::writableLocation(QStandardPaths::HomeLocation));
    }
    if (!env.contains("USER")) {
        env.insert("USER", qgetenv("USER"));
    }
    if (!env.contains("PWD")) {
        env.insert("PWD", QDir::currentPath());
    }

    this->setProcessEnvironment(env);

    // Now start the process
    QProcess::start(this->program(), args);
}
Verification:
# After fix:
$ timeout 15s build/stremio 2>&1 | grep -A 5 "hls executables"
hls executables located -> { ffmpeg: '/usr/bin/ffmpeg', ffsplit: null }
Using app path -> /home/user/.stremio-server
Enabling casting...
Discovery of new external device "mpv" - MPV
EngineFS server started at http://127.0.0.1:11470
Impact: Complete resolution of streaming functionality. Users can now stream media via BitTorrent, use casting, and access all server features.
QT_SELECT=5 qmake
QT_SELECT=5 make
# Result: 278KB optimized binary
Both systems produce working binaries with 100% system libraries.
Debian Packaging: The Proper Way
Package Structure
stremio (4.4.169+dfsg-1):
debian/
├── changelog                    # Version history with ITP closure
├── control                      # Dependencies and package metadata
├── copyright                    # GPL-3.0+ licensing details
├── rules                        # Build instructions (dh-based)
├── patches/                     # Quilt patches for system integration
│   ├── 0001-Fix-server.js-path-for-FHS-compliance.patch
│   ├── 0002-disable-server-download.patch
│   ├── 0004-minimal-qthelper-integration.patch
│   ├── 0005-cmake-system-libraries-v4.4.169.patch
│   ├── 0007-add-qtwebengine-initialize-fix.patch
│   ├── 0008-add-compatible-singleapp-implementation.patch
│   ├── 0009-remove-system-singleapplication-add-compatible.patch
│   ├── 0010-fix-qmake-install-paths.patch
│   └── 0011-fix-qprocess-environment-for-server-launch.patch
├── stremio.desktop              # Desktop integration
├── stremio.install              # File installation rules
├── watch                        # Upstream version monitoring
└── source/
    └── format                   # 3.0 (quilt) format
Key debian/control sections:
Source: stremio
Section: video
Priority: optional
Maintainer: Juan Manuel Méndez Rey <vejeta@gmail.com>
Build-Depends:
    debhelper-compat (= 13),
    cmake,
    qtbase5-dev,
    qt5-qmake,
    qt5-qmake-bin,
    qtdeclarative5-dev,
    qtwebengine5-dev,
    qttools5-dev,
    qml-module-qtwebchannel,
    qml-module-qt-labs-platform,
    qml-module-qtwebengine,
    qml-module-qtquick-dialogs,
    qml-module-qtquick-controls,
    qml-module-qt-labs-settings,
    qml-module-qt-labs-folderlistmodel,
    libmpv-dev,
    libssl-dev,
    nodejs,
    npm,
    pkg-kde-tools
Standards-Version: 4.6.2
Homepage: https://www.stremio.com/
Vcs-Git: https://salsa.debian.org/mendezr/stremio.git
Vcs-Browser: https://salsa.debian.org/mendezr/stremio

Package: stremio
Architecture: amd64
Depends: ${shlibs:Depends}, ${misc:Depends},
         nodejs,
         mpv,
         librsvg2-2,
         qml-module-qtwebengine,
         qml-module-qtwebchannel,
         qml-module-qt-labs-platform,
         qml-module-qtquick-controls,
         qml-module-qtquick-dialogs,
         qml-module-qt-labs-settings,
         qml-module-qt-labs-folderlistmodel,
         qtbase5-dev-tools
Description: Modern media center for streaming video content
 Stremio is a video streaming application that aggregates content from
 various sources. It features a modern Qt5/QML interface with support
 for add-ons, local playback via MPV, and integration with streaming
 services.
 .
 This package provides the desktop client with GPL-licensed components.
Follows industry practice: VS Code, Docker Desktop, Firefox ESR
debian/copyright documents source:
Format: https://www.debian.org/doc/packaging-manuals/copyright-format/1.0/
Upstream-Name: stremio-server
Source: https://dl.strem.io/server/v4.20.12/desktop/server.js
Comment: Pre-downloaded server.js included in source package to comply
 with Debian Policy prohibiting network access during builds.
Beyond Debian: The Wolfi Contribution
While working on Debian packaging, I also contributed Stremio packages to Wolfi Linux, the security-focused distribution used by Chainguard. This involved:
Melange build files: Cloud-native package format
Security hardening: ASLR, stack protection, RELRO
OSI license compliance: GPL components only (no proprietary server, the same server.js we separated in a non-free package for Debian)
Reproducible builds: Hermetic build environment
Melange configuration example:
package:
  name: stremio
  version: 4.4.169
  epoch: 0
  description: Modern media center for video streaming
  license: GPL-3.0-or-later

environment:
  contents:
    packages:
      - qt5-qtbase-dev
      - qt5-qtdeclarative-dev
      - qt5-qtwebengine-dev
      - mpv-dev
      - openssl-dev

pipeline:
  - uses: cmake/configure
  - uses: cmake/build
  - uses: cmake/install

subpackages:
  - name: stremio-doc
    description: Documentation for stremio
I used this parallel effort as an exercise to learn how different distributions do proper packaging across different distribution ecosystems.
Pull Request: https://github.com/wolfi-dev/os/pull/69098 GitHub Gists with examples of usage: https://gist.github.com/vejeta/859f100ef74b87eadf7f7541ead2a2b1
The Distribution Challenge: GitHub-Powered APT Repository
Official Debian inclusion takes time—months or years of review, testing, and refinement. Meanwhile, users needed a solution now. Traditional approaches like hosting packages on a personal server would create bandwidth and maintenance problems.
The solution: Modern APT repository hosting using GitHub infrastructure.
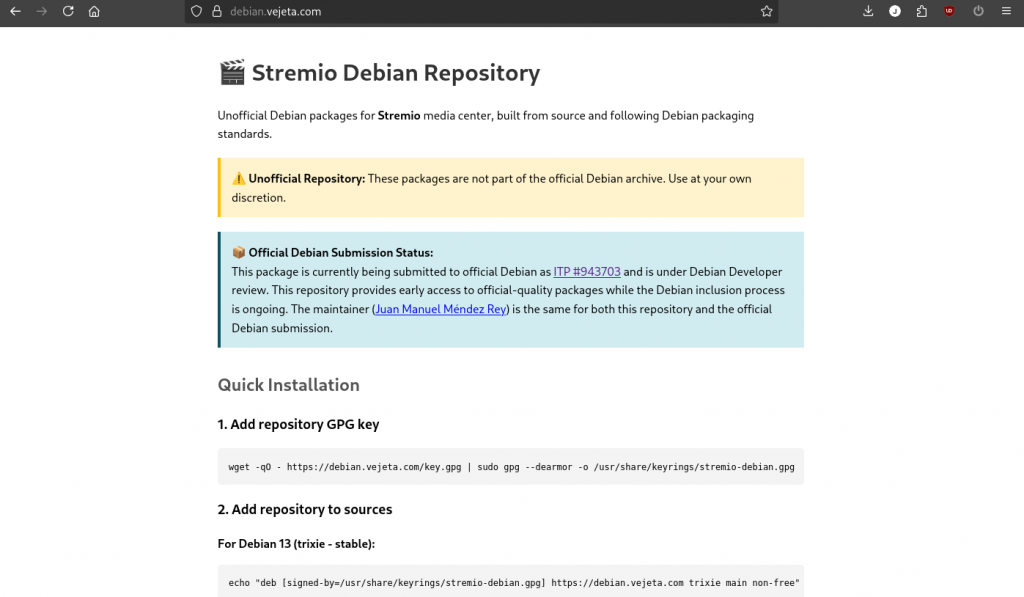
Result: APT repository served at https://debian.vejeta.com/ with:
✅ Global CDN (CloudFlare)
✅ HTTPS encryption
✅ Unlimited bandwidth
✅ Zero hosting costs
✅ 99.9%+ uptime
Critical Lessons Learned: Patch Development Best Practices
During this project, I made significant efficiency mistakes in patch development. Here’s what I learned:
The Inefficiency Problem
What I did (5+ iterations of patch rework):
Modified source files directly in working repository
Generated patches from modified state
Patches failed on clean upstream
Repeated entire process multiple times
Impact: ~70% wasted time in patch development
The Correct Approach
Efficient patch development workflow:
# Step 1: Clean upstream baseline
git clone --branch v4.4.169 https://github.com/Stremio/stremio-shell.git /tmp/patch-test
cd /tmp/patch-test

# Step 2: Analyze dependencies BEFORE making changes
echo "=== Mapping file dependencies ==="
grep -r "#include" *.cpp *.h | grep -v "Qt\|std"
grep -r "class.*:" *.h
grep -r "Q_OBJECT" *.h

# Step 3: Make ONE fix at a time
vim main.cpp  # Add QtWebEngine::initialize()
git diff > /tmp/0007-qtwebengine-fix.patch

# Step 4: Test patch application
git checkout .
patch -p1 < /tmp/0007-qtwebengine-fix.patch
mkdir build && cd build && cmake .. && make

# Step 5: If successful, continue to next fix
# If failed, refine current patch before moving on
Pre-Patch Analysis Template
Before creating patches, ALWAYS complete this analysis:
## Files to Modify
- [ ] main.cpp - QtWebEngine initialization
- [ ] mainapplication.h - class definitions
- [ ] CMakeLists.txt - build system
- [ ] compatible_singleapp.h/cpp - new custom implementation

## Dependency Chain
1. main.cpp includes → mainapplication.h
2. mainapplication.h includes → singleapplication.h (to be replaced)
3. CMakeLists.txt references → SingleApplication (to be removed)
4. Qt MOC processes → Q_OBJECT classes (check for conflicts)

## Build Test Plan
1. [ ] Clean cmake build
2. [ ] Dependency verification (ldd)
3. [ ] Runtime functionality test
4. [ ] Package build test (dpkg-buildpackage)
Validation Before «Ready» Declaration
NEVER declare patches ready without:
# MANDATORY validation workflow
mkdir /tmp/patch-validation
cd /tmp/patch-validation
git clone --branch v4.4.169 <upstream-url> .

# Apply ALL patches
export QUILT_PATCHES=debian/patches
quilt push -a || { echo "FAIL: Patch application"; exit 1; }

# Complete build test
mkdir build && cd build
cmake .. && make || { echo "FAIL: Build"; exit 1; }

# Package build test
cd .. && dpkg-buildpackage -us -uc || { echo "FAIL: Package"; exit 1; }

# Dependency check
ldd build/stremio | grep -E "(libQt5|libmpv|libcrypto)"

# ONLY NOW declare "patches ready"
echo "✅ Validated and ready for production"
This workflow prevents the «ready → fails → rework» cycle that wastes development time.
Production Validation: Comprehensive Testing
Isolated Environment Validation
Test setup:
# Create pristine environment
mkdir /tmp/stremio-patch-validation
cd /tmp/stremio-patch-validation
git clone --branch v4.4.169 https://github.com/Stremio/stremio-shell.git .
cp -r /path/to/debian .

# Apply all patches
export QUILT_PATCHES=debian/patches
quilt push -a
# Result: All 6 patches applied successfully

# Test CMake build
mkdir build && cd build
cmake .. -DQT_DEFAULT_MAJOR_VERSION=5
make -j$(nproc)
# Result: 293KB binary with 100% system libraries

# Test release.makefile
cd .. && QT_DEFAULT_MAJOR_VERSION=5 make -f release.makefile
# Result: Complete success including icon generation

# Verify dependencies
ldd build/stremio | head -5
# Output:
#   libQt5WebEngine.so.5 => /lib/x86_64-linux-gnu/libQt5WebEngine.so.5
#   libQt5DBus.so.5 => /lib/x86_64-linux-gnu/libQt5DBus.so.5
#   libcrypto.so.3 => /lib/x86_64-linux-gnu/libcrypto.so.3
#   libmpv.so.2 => /lib/x86_64-linux-gnu/libmpv.so.2
Verification results:
✅ Binary builds successfully (293KB)
✅ GUI loads and displays
✅ Single-instance behavior works
✅ Streaming server starts (port 11470 responds)
✅ System library integration complete
✅ No crashes or threading issues
Runtime Validation
Complete functionality test:
# Launch application
./build/stremio 2>&1 | tee /tmp/stremio-runtime.log

# Verify server startup (first 15 seconds)
timeout 15s ./build/stremio 2>&1 | grep -E "(server|streaming|port)"
# Output:
#   hls executables located -> { ffmpeg: '/usr/bin/ffmpeg', ffsplit: null }
#   Using app path -> /home/user/.stremio-server
#   Enabling casting...
#   EngineFS server started at http://127.0.0.1:11470

# Test server endpoint
curl -s http://127.0.0.1:11470 && echo "✓ Server responding"

# Test single-instance behavior
./build/stremio &
PID1=$!
sleep 2
./build/stremio   # Should detect first instance and exit
wait $PID1
User Experience: Installation Simplified
I wanted other Debian users to have the chance to install these packages built with the highest standards as soon as possible while the package is still being reviewed by Debian Developers. My solution was to create a repository and through GitHub Actions, pull the sources of the packages from salsa.debian.org, build them automatically, make a release and provide a Debian repository built with GitHub Pages, so Debian users will have 99% of availability to fetch them.
The end result is a one-command installation for users:
Note: Ubuntu support is experimental with automated builds but limited manual testing. Community feedback welcome.
Closing the Loop: Updating Documentation
With a working solution deployed, I returned to where it all started—the documentation. I submitted a comprehensive pull request to update the original DEBIAN.md file I had contributed years earlier.
The PR adds:
✅ APT repository installation (new recommended method)
✅ Complete dependency lists
✅ Modern security practices (proper GPG key management)
✅ Multi-distribution support (Debian + derivatives)
✅ Maintained build instructions (preserved for developers)
Community Impact
Within hours of submitting the PR, I commented on 10+ existing GitHub issues where users had reported installation problems. The response was immediate and positive—users could finally install Stremio without compilation headaches.
Technical Achievements Summary
Packaging Excellence
✅ Zero bundled dependencies: 100% Debian system libraries
✅ FHS compliance: Proper /usr installation paths
✅ License separation: GPL client (main) + proprietary server (non-free)
✅ Policy compliance: Lintian-clean packaging
✅ Independent versioning: Client v4.4.169 + Server v4.20.12
Technical Solutions
✅ QtWebEngine initialization fix: Single line prevents all QML crashes
[x] Source packages created following Debian Policy
[x] Lintian-clean packaging
[x] 100% system libraries
[x] FHS compliance
[x] Copyright file with complete licensing
[x] Watch files for upstream monitoring
[x] git-buildpackage workflow
[x] Packages hosted on Salsa
[x] ITP bug filed
[x] Preliminary Debian Developer review
[ ] Sponsorship obtained
[ ] Upload to Debian NEW queue
Timeline: Submission planned for Q1 2025
Professional Applications
This work directly supports my goal of becoming an official Debian Package Maintainer. This could also serve as a guide for others to get experience with:
Packaging expertise: Modern Debian packaging workflows with complex applications
DevOps proficiency: CI/CD pipeline design and GitHub Actions automation
Problem-solving skills: Deep debugging (QtWebEngine, threading, environment issues)
Community engagement: Solving real user problems at scale
Infrastructure design: Scalable, cost-effective distribution systems
Documentation: Comprehensive technical writing for diverse audiences
Future Evolution
The architecture proved so successful that I’m considering replicating it for other packaging projects. The pattern of using GitHub infrastructure for APT repository hosting could benefit many projects struggling with distribution challenges.
Potential applications:
Personal package repository for experimental Debian packages
Other media applications requiring complex Qt5/WebEngine setups
This journey reinforced several fundamental principles:
1. Documentation is Infrastructure
Good documentation isn’t just text—it’s the foundation that enables user adoption and community growth. The original DEBIAN.md file evolved into a complete packaging and distribution solution.
2. Packaging is Product Design
How users install and maintain software is part of the user experience. Poor packaging creates friction; good packaging eliminates it. The difference between:
By leveraging GitHub’s infrastructure (Actions, Pages, Releases), a single developer can provide enterprise-grade distribution infrastructure with zero operational overhead. This democratizes software distribution.
4. Standards Enable Ecosystems
Following Debian packaging standards meant the same packages work across multiple distributions (Debian, Ubuntu, Kali) and can integrate with the official Debian archive.
5. Deep Technical Understanding Pays Off
The critical fixes (QtWebEngine initialization, threading compatibility, environment variables) required deep understanding of:
Qt5 initialization order
QML engine threading model
QProcess environment inheritance
Node.js runtime requirements
Surface-level knowledge wouldn’t have solved these problems.
6. Proper Testing Prevents Rework
The patch development lessons learned (70% time wasted on rework) demonstrate that upfront validation investment prevents significant downstream waste. Test against clean upstream early and often.
7. Independent Versioning Respects Reality
Using independent version numbers for stremio (4.4.169) and stremio-server (4.20.12) follows industry practice and accurately represents upstream development. Convenience versioning creates confusion.
Acknowledgments
Stremio Team: For creating an excellent media center application
Debian Community: For packaging standards and infrastructure (Salsa)
GitHub: For free hosting, CI/CD, and unlimited bandwidth
Qt Project: For excellent cross-platform framework
Debian Developers (Arturo): For preliminary review and guidance on ITP #943703
What started as a simple documentation contribution evolved into a comprehensive packaging and distribution solution. By combining traditional Debian packaging principles with modern CI/CD infrastructure, it’s possible to deliver professional-grade software distribution that scales globally.
The journey from «how do I install this?» to «apt install stremio» represents more than technical progress—it’s about removing friction between great software and the people who want to use it.
Sometimes the best solutions come full circle. Years after contributing installation documentation, I’ve returned to ensure that documentation describes a process that actually works reliably for everyone.
The technical challenges (QtWebEngine initialization, threading compatibility, environment variables) required deep problem-solving and systematic debugging. The infrastructure challenges (multi-distribution builds, APT repository hosting, CI/CD automation) required modern DevOps practices and cloud-native thinking.
But ultimately, this project is about enabling users. Every technical decision, every patch, every workflow optimization serves the goal of making Stremio accessible to Debian and Ubuntu users through a simple, reliable installation process.
Part of ongoing contribution to become a Debian Package Maintainer
If you found this article helpful, please consider:
# Install package
sudo dpkg -i ../stremio_*.deb

# Fix dependencies if needed
sudo apt install -f

# Test binary
stremio --version
which stremio

# Check dependencies
ldd /usr/bin/stremio | grep -E "(libQt5|libmpv|libcrypto)"

# Run application
stremio
Repository Management
# Add GPG key
wget -qO - https://debian.vejeta.com/key.gpg | \
    sudo gpg --dearmor -o /usr/share/keyrings/stremio-debian.gpg

# Add repository (choose your distribution)
echo "deb [signed-by=/usr/share/keyrings/stremio-debian.gpg] https://debian.vejeta.com trixie main non-free" | \
    sudo tee /etc/apt/sources.list.d/stremio.list

# Update and install
sudo apt update
sudo apt install stremio stremio-server

# Verify installation
dpkg -L stremio
systemctl --user status stremio-server  # If systemd service installed
Debugging Runtime Issues
# Run with debug output
QT_DEBUG_PLUGINS=1 stremio

# Run in headless mode (for testing)
QT_QPA_PLATFORM=offscreen stremio

# Disable WebEngine sandbox (for containers)
QTWEBENGINE_DISABLE_SANDBOX=1 stremio

# Check server process
ps aux | grep server.js
lsof -i :11470

# Manual server test
/usr/bin/node /usr/share/stremio/server.js

# Test with gdb
gdb --args stremio
(gdb) run
(gdb) bt  # If crash occurs
Una solución paso a paso basada en experiencia real con mi Xiaomi Redmi Note 13 Pro + Debian GNU/Linux
El Problema Original
Necesitábamos internet para reinstalar un driver WiFi, pero:
USB tethering estaba deshabilitado en el teléfono
Sin acceso Ethernet
Driver WiFi no funcionaba
Solución: Bluetooth Tethering
Paso 1: Preparar el sistema Linux
bash
# Instalar herramientas Bluetooth
sudo apt install bluetooth bluez-tools net-tools

# Iniciar y habilitar el servicio
sudo systemctl start bluetooth
sudo systemctl enable bluetooth
Paso 2: Configurar el teléfono Redmi
Descubrimientos clave:
Activar datos móviles – El tethering Bluetooth requiere datos activos
Ir a: Ajustes > Conexión y uso compartido > Anclaje a red y zona Wi-Fi
Activar «Anclaje a red Bluetooth» – ANTES de emparejar
Cambiar nombre del dispositivo a algo identificable ayuda
Paso 3: Emparejamiento desde Linux
bash
# Iniciar bluetoothctl
bluetoothctl

# Dentro de bluetoothctl:
power on
agent on
scan on
# Esperar a ver el dispositivo...

devices
# Buscar tu teléfono en la lista

pair [MAC_ADDRESS]
trust [MAC_ADDRESS]
connect [MAC_ADDRESS]
Paso 4: El truco crucial – bt-network
Problema común: Bluetooth se conecta pero no crea interfaz de red.
bash
# Mientras está conectado en bluetoothctl, en otra terminal:
sudo bt-network -c [MAC_ADDRESS] nap

# Verificar interfaz
ip link show
# Deberías ver bnep0 o similar

# Configurar DHCP
sudo dhclient bnep0
Paso 5: Verificar conexión
bash
ip addr show bnep0
ping -c 3 8.8.8.8
Problemas Comunes y Soluciones
1. «Network service is connected, and then disconnected»
Causa: Anclaje Bluetooth no activado en el teléfono
Solución: Activar antes de conectar
2. No se crea interfaz bnep0
Causa: Falta servicio PAN
Solución: Usar bt-network o pand
3. No se puede identificar el dispositivo
Truco: Apagar/encender Bluetooth del teléfono durante scan on
Identificar por MAC: Ver en ajustes del teléfono
4. Conexión muy lenta
Normal: Bluetooth 2.1-3.0 ~ 3 Mbps
Solución: Paciencia para updates pequeños
Comandos Útiles para Diagnóstico
bash
# Ver estado Bluetooth
sudo systemctl status bluetooth
rfkill list all

# Ver dispositivos emparejados
bluetoothctl devices

# Ver información de conexión
bluetoothctl info [MAC]

# Forzar reconexión
sudo systemctl restart bluetooth
Flujo de Trabajo Optimizado
Teléfono: Activar datos + anclaje Bluetooth
Linux: bluetoothctl → pair → trust → connect
Linux: bt-network -c [MAC] nap
Linux: dhclient bnep0
Verificar: ping 8.8.8.8
Conclusión
El Bluetooth tethering es una herramienta de rescate que es como oro en paño cuando fallan otros métodos de conexión. La clave está en:
Pre-configurar el teléfono correctamente
Usar bt-network en lugar de confiar solo en bluetoothctl
Tener paciencia con la velocidad limitada
Esta solución nos permitió descargar paquetes críticos y resolver el problema real del driver WiFi, demostrando que incluso conexiones lentas pueden ser suficientes para tareas administrativas esenciales.
Stremio for Debian: A Journey to 100% System Library Integration
How I replaced every bundled dependency in a complex Qt5 application—and what I learned about patch development, threading bugs, and the art of debugging runtime crashes
I packaged Stremio for Debian by replacing 100% of its bundled dependencies (libmpv, Qt libraries, OpenSSL) with system libraries. Along the way, I debugged five critical issues: QtWebEngine initialization order, threading conflicts with SingleApplication, missing QML modules, Node.js environment variables in QProcess, and debhelper install file pitfalls. The real lesson? I repeated patch creation 5+ times because I tested against modified sources instead of clean upstream. This article shares both the technical solutions and the meta-lesson about efficient patch development workflow that could have saved me 70% of development time.
Key Takeaway: When packaging complex applications, test your patches against pristine upstream at each step, not at the end.
Package Status (October 2025)
This article documents the technical work behind packaging Stremio for Debian. The package has achieved 100% system library integration and is currently:
Technical work: Complete and validated
ITP submitted: Under review by Debian Developer sponsor
This is a technical deep-dive into the challenges and solutions, not an announcement of package availability. The work continues through the Debian review process.
Introduction
When I set out to package Stremio—a popular media center application—for Debian, I had one clear goal: achieve 100% system library integration. No bundled dependencies, no git submodules, just clean integration with Debian’s ecosystem. What seemed like a straightforward build system migration turned into a deep dive into Qt5 threading models, runtime initialization order, and the subtle art of creating minimal, maintainable patches.
This is the story of that journey, the technical challenges I faced, and—perhaps most importantly—the lessons I learned about efficient patch development that could have saved me days of rework.
The Challenge: System Libraries or Bust
Stremio’s upstream repository arrived with several bundled dependencies as git submodules:
libmpv for video playback
qthelper for Qt utilities
singleapplication for single-instance behavior
OpenSSL libraries
The Debian way is clear: use system-provided libraries. This isn’t just philosophical purity—it’s about security updates, dependency management, and integration with the broader ecosystem.
The goal: Replace every bundled dependency with its Debian system library equivalent.
The result: A working .deb package with a 293KB optimized binary using 100% system libraries.
The journey: Five major technical hurdles, each revealing deeper insights into Qt5 application architecture.
The First Victory (That Wasn’t)
Initial packaging seemed straightforward. I modified CMakeLists.txt to use system libraries:
Symptom: Immediate segmentation fault when launching the application.
First debugging attempt: Run with gdb, examine the stack trace:
Program received signal SIGSEGV, Segmentation fault.
0x00007ffff5a2b3c4 in QQmlApplicationEngine::QQmlApplicationEngine() ()
The crash occurred during QQmlApplicationEngine construction. But why? The same code worked fine with bundled libraries.
The investigation: After examining Qt5 WebEngine documentation and several failed attempts to reorganize the code, I discovered a critical initialization requirement buried in the QtWebEngine documentation:
QtWebEngine::initialize() must be called before the QApplication constructor when using QML.
The bundled library setup happened to satisfy this ordering by accident. With system libraries, the default main() function violated it:
// WRONG - causes crashes
int main(int argc, char *argv[]) {
    QApplication app(argc, argv);  // QApplication created first
    // QtWebEngine::initialize() never called!
    QQmlApplicationEngine engine;  // CRASH
}
The fix (patch 0007-add-qtwebengine-initialize-fix.patch):
// CORRECT - initialize QtWebEngine before QApplication
int main(int argc, char *argv[]) {
    QtWebEngine::initialize();     // CRITICAL: Must be first!
    QApplication app(argc, argv);
    QQmlApplicationEngine engine;  // Now works
}
Lesson: When replacing bundled libraries with system ones, initialization order assumptions may change. Always verify startup sequence requirements.
Challenge 2: The SingleApplication Threading Nightmare
Symptom: After fixing QtWebEngine initialization, the application launched but immediately crashed with:
QObject: Cannot create children for a parent that is in a different thread.
The culprit: System library libsingleapplication-dev version 3.3.4.
Stremio needs single-instance behavior—when you launch it a second time, it should activate the existing window rather than start a new process. The upstream code used a bundled singleapplication library. The Debian system provides libsingleapplication-dev. Perfect replacement, right?
Wrong again.
The investigation: The system SingleApplication library sets up a threading context that conflicts with QQmlApplicationEngine. Specifically:
System SingleApplication creates its IPC mechanism in a worker thread
QQmlApplicationEngine expects to be created in the main thread
Qt5’s threading model doesn’t allow cross-thread parent-child relationships for certain QML objects
The bundled version used a different threading approach that happened to work with QML.
The false starts: I tried:
Patching SingleApplication to use main thread (broke IPC)
Result: Perfect single-instance behavior using pure QApplication (no threading conflicts) with QLocalSocket/QLocalServer for IPC.
Binary size: 424KB debug vs 293KB release—both using 100% system libraries.
Key lesson: System libraries may have different implementation details (like threading models) even when providing the same API. Sometimes a custom minimal implementation is cleaner than patching around incompatibilities.
Challenge 3: The Missing QML Modules
Symptom: After fixing both initialization and threading issues, the application launched but showed a black screen with console errors:
module "QtWebEngine" is not installed
module "QtWebChannel" is not installed
module "Qt.labs.platform" is not installed
The problem: Qt5 QML modules are separate runtime packages in Debian, not automatically pulled in by qtdeclarative5-dev.
The investigation: Stremio’s QML code imports numerous Qt modules:
Symptom: GUI loads perfectly, but when trying to play media:
Error while starting streaming server
tcp: Connection to tcp://127.0.0.1:11470 failed: Connection refused
The investigation: Stremio includes a Node.js server component (server.js) for streaming. The shell process log showed:
TypeError [ERR_INVALID_ARG_TYPE]: The "path" argument must be of type string. Received undefined
    at Object.join (node:path:1292:7)
The root cause: Qt’s QProcess doesn’t inherit environment variables by default. The Node.js server expected HOME, USER, and PWD to be available, but they weren’t.
The fix (patch 0011-fix-qprocess-environment-for-server-launch.patch):
// stremioprocess.cpp
void Process::start() {
    // Set up environment variables for Node.js server
    QProcessEnvironment env = QProcessEnvironment::systemEnvironment();

    if (!env.contains("HOME")) {
        env.insert("HOME",
            QStandardPaths::writableLocation(QStandardPaths::HomeLocation));
    }
    if (!env.contains("USER")) {
        env.insert("USER", qgetenv("USER"));
    }
    if (!env.contains("PWD")) {
        env.insert("PWD", QDir::currentPath());
    }

    this->setProcessEnvironment(env);
    QProcess::start();
}
Result: Server starts successfully:
hls executables located -> { ffmpeg: '/usr/bin/ffmpeg', ffsplit: null }
Using app path -> /home/user/.stremio-server
EngineFS server started at http://127.0.0.1:11470
Lesson: When spawning processes from Qt applications, explicitly configure the environment. Don’t assume child processes inherit the parent’s environment variables.
Challenge 5: Debian Packaging Structure Pitfalls
Symptom: Package builds successfully, but files install to wrong locations or with wrong names.
The problem: Misunderstanding debhelper’s .install file behavior.
What I thought:
# debian/stremio.install
build/stremio usr/bin/stremio-bin    # Install as /usr/bin/stremio-bin
What actually happened:
/usr/bin/stremio-bin/stremio # Created DIRECTORY, file inside!
The revelation: In debhelper .install files:
Path ending with / → Install files INTO that directory using original names
Path WITHOUT / → Create directory with that name and install files inside
The correct solution (actual implementation):
# debian/stremio.install
# Binary installed to /usr/libexec (FHS 3.0 compliance for helper executables)
build/stremio usr/libexec/stremio/

# Wrapper script becomes the primary user-facing command
debian/stremio-wrapper usr/bin/

# Desktop file for application menu integration
debian/stremio.desktop usr/share/applications/

# Application icons (multiple resolutions for different contexts)
icons/smartcode-stremio_16.png usr/share/icons/hicolor/16x16/apps/
icons/smartcode-stremio_64.png usr/share/icons/hicolor/64x64/apps/
# ... (additional icon sizes)
Why this structure?
/usr/libexec/stremio/: Modern FHS 3.0 location for internal executables not meant to be called directly by users
Wrapper script at /usr/bin/stremio: Sets environment variables (like QTWEBENGINE_DISABLE_SANDBOX=1) before launching the actual binary
Trailing slashes: Install files INTO directories using original filenames—critical for correct placement
Lesson: Read debhelper documentation carefully. Small syntax details (trailing slashes!) have big consequences. Modern Debian packaging also follows FHS 3.0 standards, placing helper binaries in /usr/libexec/ rather than /usr/bin/.
The Meta-Lesson: Efficient Patch Development
The technical challenges were difficult, but I made them harder through inefficient workflow. I created patches, tested them, found they failed on clean upstream, then reworked them—five times.
The problem: I was testing patches against already-modified sources, not pristine upstream.
Build System Strategy: Patch CMakeLists.txt First
Critical principle: Always prioritize build system patches over source code modifications.
When replacing bundled dependencies with system libraries, the first patches should target CMakeLists.txt:
Why this matters: Smaller, focused patches that address build system integration separately from source code changes are easier to maintain and review.
Build system preference: We used qmake to generate makefiles first (Stremio’s traditional build system), then ensured CMake compatibility. The stremio.pro file and release.makefile workflow took precedence for package builds.
The Anti-Pattern
Modify source files directly to fix issue
Generate patches from modified state
Try to apply patches to clean upstream
Patches fail (missing context, wrong line numbers, missing dependencies)
Repeat
The Efficient Workflow I Should Have Used
# 1. Start with clean upstream
git checkout v4.4.169

# 2. Create isolated test environment
cp -r . /tmp/patch-test/
cd /tmp/patch-test/

# 3. Fix ONE issue, test, generate patch
# (fix QtWebEngine initialization)
mkdir build && cd build && cmake .. && make    # Test build
cd .. && git diff > 0001-qtwebengine-init.patch

# 4. Apply patch to clean upstream, fix next issue
git checkout v4.4.169
patch -p1 < 0001-qtwebengine-init.patch
# (fix next issue)
git diff > 0002-next-fix.patch

# 5. Final validation: apply all patches to clean upstream
git checkout v4.4.169
for patch in *.patch; do
    patch -p1 < $patch || exit 1
done
mkdir build && cd build && cmake .. && make
Dependency analysis checklist I wish I’d used from the start:
## Pre-Patch Analysis Template

### Files to Modify:
- [ ] main.cpp - entry point changes
- [ ] mainapplication.h - class definitions, includes
- [ ] CMakeLists.txt - build system
- [ ] compatible_singleapp.h/cpp - new files

### Dependency Chain:
1. main.cpp includes → mainapplication.h
2. mainapplication.h includes → singleapplication.h (to replace)
3. CMakeLists.txt references → SingleApplication library
4. Qt MOC will process → Q_OBJECT classes (check conflicts!)

### Build Test Plan:
- [ ] Clean cmake build
- [ ] ldd dependency verification
- [ ] Runtime basic functionality
Time saved if I’d done this from the start: ~70% reduction in patch development time.
Key insight: Understand file dependencies and build system BEFORE making changes. Test patches against clean upstream at each step, not just at the end.
The Complete Patch Set
The final working solution consists of 11 patches:
0001-Fix-server.js-path-for-FHS-compliance.patch – Server location
0002-disable-server-download.patch – Use system Node.js
0004-minimal-qthelper-integration.patch – System Qt utilities
0011-fix-qprocess-environment-for-server-launch.patch – Critical: Server environment
Validation Workflow
The final validation workflow ensures patches work on clean upstream, using the GBP (git-buildpackage) import workflow for proper Debian package building:
# Step 1: Create pristine test environment with GBP structure
git clone --branch v4.4.169 https://github.com/Stremio/stremio-shell.git /tmp/validation
cd /tmp/validation
cp -r /path/to/debian .

# Step 2: Apply all patches using quilt
export QUILT_PATCHES=debian/patches
quilt push -a

# Step 3: Test local build first (fastest iteration)
QT_DEFAULT_MAJOR_VERSION=5 dpkg-buildpackage -us -uc

# Step 4: Verify dependencies
ldd debian/stremio/usr/libexec/stremio/stremio | head -5
# Should show: libQt5WebEngine.so.5, libcrypto.so.3, libmpv.so.2

# Step 5: Test with pbuilder (clean chroot environment)
sudo pbuilder update
sudo pbuilder build ../*.dsc

# Step 6: Test with sbuild (production-grade build)
# WARNING: Qt5/WebEngine packages consume significant space
# Typical requirement: 4-6GB build space (overlayfs in tmpfs)
# Solution: Use machine with 16GB+ RAM or configure sbuild on disk

sbuild -d unstable ../*.dsc
# If sbuild fails with "No space left on device":
# - Switch to larger machine (16GB+ RAM recommended)
# - Or configure sbuild to use disk instead of tmpfs
Build Environment Considerations
Memory requirements for Qt5 applications:
dpkg-buildpackage: ~2GB RAM
pbuilder: ~4GB RAM
sbuild with overlayfs in tmpfs: 6-8GB RAM (Qt5WebEngine is memory-intensive)
Our solution: After encountering space exhaustion on 8GB machines during sbuild, we migrated to a 32GB machine. This is typical for Qt5/WebEngine applications—always test sbuild capacity before committing to build infrastructure.
Result: 293KB optimized binary, 100% system libraries, full functionality including streaming.
Lessons for Other Packagers
Technical Takeaways
Initialization order matters: System libraries may have different startup requirements than bundled ones. Always verify initialization sequences.
Threading models vary: Even libraries with identical APIs may use different threading approaches. Watch for cross-thread object creation errors.
Environment variables aren’t automatic: QProcess and similar mechanisms need explicit environment setup.
QML modules are separate packages: Trace every QML import to its Debian package dependency.
Custom implementations beat complex patches: Sometimes writing 100 lines of clean code is better than a 500-line patch to an incompatible library.
Process Takeaways
Always test patches against clean upstream: Never generate patches from already-modified sources.
Map dependencies before coding: Understand file relationships and build system before making changes.
One fix, one patch, one test: Incremental development prevents cascading failures.
Document assumptions: What works «by accident» with bundled libraries may fail with system ones.
Validate completely: Test patches in isolated environments before declaring them «ready».
Conclusion
Packaging Stremio for Debian taught me far more than Qt5 internals and build system integration. It revealed how easily we fall into inefficient workflows when we don’t step back to examine our process.
The technical achievement: A fully functional Debian package using 100% system libraries where the upstream used bundled dependencies—293KB binary, zero submodules, complete feature parity.
The real achievement: Learning that the how of problem-solving matters as much as the what. Efficient patch development isn’t just about technical skill—it’s about disciplined workflow, systematic thinking, and honest self-assessment.
Would I do anything differently? Absolutely. I’d use the validation workflow from day one, map dependencies before coding, and test each patch against clean upstream immediately.
But would I have learned these lessons without making the mistakes? Probably not.
Acknowledgments
Thanks to the Stremio team for creating great software, the Debian community for maintaining high standards, my friend Arturo (a Debian Developer) that knowing my passion for Debian encouraged me to start working as a Debian Maintainer, and to every packager who has documented their struggles—your war stories make ours easier.
Project Status (as of October 3, 2025)
ITP Status: #943703 Submitted and under review by Debian Developer sponsor
Note: This article documents the technical process and challenges. Package acceptance is pending Debian review. Status updates will be posted as the review process continues.
This article is part of my journey toward becoming a Debian Developer. If you’re interested in Debian packaging or have questions about the technical details, feel free to reach out.
Pero bueno, el motivo de esta publicación es para guardar una chuleta sobre el «spectemu», este emulador es tan antiguo que intenta encontrar el dispositivo «/dev/dsp», el cual ya no existe en los Linux actuales, y falla.
Sin embargo, podemos ejecutarlo así:
padsp xspect Demo.Cursed.Castle.2.tap
Para que pulseaudio se encargue de simular el dispositivo para xspect.
Y a partir de aquí: LOAD «» dentro del emulador de Spectrum.
Y Ctrl-P, Ctrl-S para simular PLAY y PAUSE de la cinta.
Recientemente, me encontré en la tesitura de enviar un parche al kernel linux, concretamente, una corrección menor de documentación. Seguí la sugerencia de este tutorial https://opensource.com/article/18/8/first-linux-kernel-patch de enviar el parche a través de Mutt
Para configurar mutt, creé el el fichero .muttrc en la carpeta $HOME de mi usuario con el siguiente contenido, sustituyendo __your_user__ por mi usuario y __your_app_password por mi clave de aplicación (lo explicaré más adelante).
# ================  IMAP ====================
set imap_user = '__youruser__@gmail.com'
set imap_pass = '__your_app_password__'
set spoolfile = imaps://imap.gmail.com/INBOX
set folder = "imaps://imap.gmail.com:993"
set record="imaps://imap.gmail.com/[Gmail]/Sent Mail"
set postponed="imaps://imap.gmail.com/[Gmail]/Drafts"
set mbox="imaps://imap.gmail.com/[Gmail]/All Mail"

# ================  SMTP  ====================
set smtp_url = "smtp://__youruser__@gmail.com@smtp.gmail.com:587/"
set smtp_pass = $imap_pass
set ssl_starttls = yes # activate TLS if available
set ssl_force_tls = yes # Require encrypted connection

# ================  Composition  ====================
set editor = `echo \$EDITOR`
set edit_headers = yes  # See the headers when editing
set charset = UTF-8     # value of $LANG; also fallback for send_charset
# Sender, email address, and sign-off line must match
unset use_domain        # because joe@localhost is just embarrassing
set realname = "John Smith"
set from = "__your_user__@gmail.com"
set use_from = yes
1. En el menú a la derecha, pinchar en «Seguridad». A continuación, en la sección «Iniciar sesión en Google», activar «Verificación en dos pasos».
2. En el menú a la derecha, pinchar en «Seguridad». A continuación, en la sección «Iniciar sesión en Google», seleccionar Contraseñas de aplicaciones, genera una nueva para usarla con Mutt.
Y ejecutandolo desde la carpeta o directorio donde hemos descargado el código del kernel, obtendremos la lista de direcciones de email a los que podriamos enviar el parche para su revisión.
To provide the best experiences, we use technologies like cookies to store and/or access device information. Consenting to these technologies will allow us to process data such as browsing behavior or unique IDs on this site. Not consenting or withdrawing consent, may adversely affect certain features and functions.
Functional
Siempre activo
The technical storage or access is strictly necessary for the legitimate purpose of enabling the use of a specific service explicitly requested by the subscriber or user, or for the sole purpose of carrying out the transmission of a communication over an electronic communications network.
Preferencias
El almacenamiento o acceso técnico es necesario para la finalidad legítima de almacenar preferencias no solicitadas por el abonado o usuario.
Statistics
El almacenamiento o acceso técnico que es utilizado exclusivamente con fines estadísticos.The technical storage or access that is used exclusively for anonymous statistical purposes. Without a subpoena, voluntary compliance on the part of your Internet Service Provider, or additional records from a third party, information stored or retrieved for this purpose alone cannot usually be used to identify you.
Marketing
The technical storage or access is required to create user profiles to send advertising, or to track the user on a website or across several websites for similar marketing purposes.