Autor: vejeta

  • XWPE 2026: Software Archaeology of a 1993 Programming Editor

    XWPE 2026: Software Archaeology of a 1993 Programming Editor

    Why I’m doing this

    In the 1990s, while I should have been finishing my degree, I was
    playing Unix Conquer on AIX, arguing on Usenet, lurking IRC, and
    learning how systems actually worked. I didn’t get the diploma, but I got something the degree couldn’t teach: the instinct for how UNIX software is supposed to feel.

    Three decades later, that instinct is what drives this rescue. I’m a
    Debian contributor working toward becoming a Debian Developer: not there yet, still need sponsors for my uploads. xwpe is one of my adopted upstream projects and my path into the Debian community.

    Rescuing a 1993 editor that nobody else would touch is exactly the kind of thing that happens when someone who grew up in the terminal culture of the 90s finally has the tools and the time to give back.

    The Codename

    The 1.6.x series is what I internally called in my head «xwpe 2026» and this is the release cycle that brought 33 years of dormant code into the present. It’s not a rewrite; it’s a restoration. We archived the scattered documentation that the early web was losing, wrote the manual the project always needed
    but never had (in texinfo), and fixed every layer of the rendering and compiler integration stack so that a user in 2026 can open even a .pas (Pascal) or .f90 (Fortran) file, press F9, and navigate errors exactly like Fred Kruse intended in 1993, but this time with UTF-8 on a modern terminal.

    The Fossil

    xwpe is a Borland-style programming environment for UNIX, written by Fred Kruse in 1993. Dennis Payne maintained it from 2000 to 2006, then silence. All the people that contributed to it probably switched to other IDEs…and Debian kept shipping it for 20 years as a de facto orphaned package: it compiled, so nobody looked closer. Curious users filed bugs (some of them were open for 22 years)

    In May 2026, GCC 15 broke the build (#1098180). Andreas Tille’s asked for help in the #debian-tiny-tasks IRC channel. That’s when I stepped in…I remembered xwpe from my university days and this could be my first intervention to rescue a package, and not only package new ones.

    Digital Archaeology

    Restoring xwpe feels like software archaeology, and I started to love that title when I did something similar for conquer, the classic Unix game from the 80s by Ed Barlow and Adam Bryant. After someone issued a comment on that direction in Hacker News, and myself fancying to be regarded in such manner I adopted it easily.

    With software archaeology you brush away layers of dust and find code that was solid for its era: a pattern-based compiler
    error parser, a manual double-buffer rendering system, overlapping popup save/restore. All designed in 1993 when ncurses was young and terminals were slow.

    But 30 years of accumulated rot had set in:

    • The SCREENCELL migration (v1.6.0) changed screen cells from 2 bytes to 8 bytes for UTF-8. The popup save/restore system was never fully adapted: uninitialised heap data propagated through save/restore cycles, producing CJK characters and display artefacts after closing menus. valgrind showed 15,857 uninitialised-value errors.
    • The compiler error parser expected GCC’s 1990s backtick quoting `ret') but modern GCC uses single quotes ('ret'). The gnu_intstr pattern hadn’t been updated in decades. Error navigation (Alt-T/Alt-V) was silently broken. We updated it to the standard file:line:column: format that GCC has used since 4.8 (2013).
    • print_to_end_of_buffer stopped at the first blank line with a break. This meant any compiler that emits blank lines between errors (gfortran, clang with caret diagnostics) would only show the first error in the Messages window. A one-line bug with 20+ years of age.
    • Default compiler names: f77 for Fortran, pc for Pascal. Nobody had updated them since the 1990s. We updated to gfortran (with .f90/.f95/.f03/.f08), fpc (with .pas/.pp and a dedicated ${FILE}(${LINE},${COLUMN})* pattern), and added javac as a 5th default compiler.
    • Hardcoded -c -o flags: e_comp() passed gcc-specific -c and -o to every compiler. Free Pascal and javac choked on -c. We made the flags conditional on compiler style: GNU compilers get them, non-GNU compilers don’t.
    • Compiler exit code ignored: ret = 0 was hardcoded after
      wait() since the Payne era. xwpe never knew when compilation failed. Fixed with WIFEXITED/WEXITSTATUS.

    We tested every compiler interactively: write a program with
    deliberate errors in two separate functions, press F9, verify errors
    appear in Messages, press Alt-T/Alt-V to navigate between them, verify the cursor jumps to the right line and column. gcc, g++, gfortran, fpc, and javac all passed. Kruse’s 1993 pattern-matching engine (${FILE}, ${LINE}, ${COLUMN}, wildcards) handled them all and we just had to update the default patterns and teach e_comp() that not every compiler is gcc.

    Each fix reveals the next layer. Fix the SCREENCELL buffer, and you can finally see compiler errors. Fix the error display, and you discover error navigation is broken. Fix the pattern, and you find the output buffer was being truncated. Fix the truncation, and you discover the compiler defaults are from 1993.

    Waking the Debugger

    The deepest layer was the debugger. xwpe talks to gdb through pipes: it forks a child, launches gdb, and communicates by writing commands and reading responses. This is the feature that made xwpe an IDE, not just an editor. And it had been dead for years.

    Three bugs, stacked like geological strata:

    Stratum 1: SIGCHLD cannibalism. The signal handler for child
    process death used wait(), which reaps any child. When xwpe
    called popen("tty") to learn its terminal name, the tiny tty
    subprocess would finish, trigger SIGCHLD, and wait() would eat it.
    Then pclose() called waitpid() for a process that was already
    gone. Deadlock. The fix: waitpid(-1, &statloc, WNOHANG): non- blocking, reap only what’s ready.

    Stratum 2: phantom compilation. When the .o file was already
    up to date, xwpe skipped the compiler but still called the function
    that waits for compiler output. wait() with no child process fails
    instantly, and xwpe concluded that compilation had failed. The
    debugger never got a chance to start.

    Stratum 3: phantom linking. Same bug, one function up. The
    executable was up to date, linking was skipped, but the wait-for-
    linker code still ran and «failed.»

    Each stratum masked the one below. You couldn’t see the SIGCHLD bug until the phantom compilations were fixed. You couldn’t see those until the SCREENCELL rendering was fixed. You couldn’t fix rendering until UTF-8 worked.

    After all three fixes: Ctrl-G B sets a breakpoint. Ctrl-G R starts gdb. F8 steps through code. Variables update in the Watch window. This is when the feeling of bliss rained upon me, seeing the breakpoints and the colors of the line moving over each line.

    The call stack shows the function chain. It works exactly like Borland Turbo Debugger, which is exactly what Fred Kruse was building in 1993.

    The User Screen Problem

    But where does printf output go? In Borland’s DOS IDE, the program had its own video page: switching was a hardware register flip, instantaneous. On UNIX terminals, Kruse used smcup/rmcup (alternate screen buffer) to switch between the editor and the program’s output.
    Every F8 step: rmcup, gdb executes one line, smcup back. On a 1993 VT220 over serial, this was invisible. On a 2026 terminal emulator over SSH, it’s a distracting flicker.

    XWPE 1.5 solution, was to disable the User Screen entirely under ncurses with a broken #ifndef NCURSES guard that made Ctrl-G P always return an error. Problem hidden, not solved.

    Our approach: eliminate the screen switching entirely. Use a
    pseudoterminal (pty) to capture program output in memory. The program writes to a pty slave (which looks like a real terminal: isatty() returns true, stdout is line-buffered). xwpe reads from the pty master into a buffer. Ctrl-G P displays the buffer. No smcup/rmcup during stepping, zero flicker.

    But there’s a catch that every IDE developer hits: glibc buffers
    stdout even when connected to a pty, because the pty is opened by gdb (not inherited as fd 1). The output sits in a userspace buffer inside the debugged process and never reaches the pty until the program exits or calls fflush(). The solution, shared by
    gdbgui, Eclipse CDT, and VS Code cpptools:
    after each step, send call (void)fflush(0) to gdb. This forces the inferior’s stdout buffer to flush, and the output reaches the pty master where xwpe can read it.

    The same pattern applies to jdb (Java Debugger) integration. jdb’s
    VM startup is asynchronous: you send run and the prompt returns immediately, but the breakpoint hits seconds later when the JVM finishes loading. A naive blocking read busy-loops at 40% CPU waiting for output that hasn’t arrived yet.

    The solution, borrowed from JDEE (the Emacs Java IDE that solved this in the 2000s): use poll() with a timeout. Zero CPU while waiting, immediate response when data arrives, graceful error if the JVM doesn’t start. JDEE uses an accumulator pattern
    to buffer partial output and scan for prompt patterns: we do the
    same in C with strstr() on a growing buffer.

    The lesson: the 1993 codebase doesn’t need 1993 integration patterns. poll(), ptys, fflush(0): these are the same tools that Eclipse CDT and VS Code use. The only difference is we write them in 50 lines of C instead of 5000 lines of TypeScript.

    How We Debugged the Debugger

    Restoring an IDE’s debugger means debugging the debugger itself. We used every technique in the book, escalating as the bugs got deeper:

    Level 1: fprintf to file. The first tool. When the SCREENCELL
    popup artefacts appeared, we wrote cell values to
    /tmp/xwpe-switch-trace.txt before and after each save/restore cycle. This revealed that malloc‘d buffers contained uninitialised heap data: the fix was calloc.

    Level 2: valgrind. When fprintf wasn’t enough, valgrind showed
    15,857 uninitialised-value errors from the schirm buffer system.
    Every one traced back to the SCREENCELL migration that changed cells from 2 to 8 bytes without updating the allocation paths.

    Level 3: gdb trace files. For the debugger communication, we
    logged every command sent to gdb and every response received:
    TX: r > /dev/pts/5, RX: Starting program:, RX: (gdb). This revealed that the gnu_intstr pattern was frozen in the 1990s (backtick quoting), that print_to_end_of_buffer stopped at blank lines, and that WpeSignalChild was stealing child processes from pclose.

    Level 4: standalone reproduction. When the pty output capture
    wasn’t working, we wrote a 60-line C program that reproduced xwpe’s exact pipe+fork+pty setup. The test worked; xwpe didn’t. The difference: timing. The drain function read the pty master before gdb had delivered the data. Moving the drain to after
    call (void)fflush(0) fixed it.

    Level 5: conditional compile tracing. For jdb integration, we
    added #ifdef JDB_TRACE instrumentation throughout the debugger communication path. Compile with -DJDB_TRACE, run, read /tmp/xwpe-jdb-trace.txt. The trace showed every byte received from jdb, every prompt detected, every state transition. This revealed the root cause: a 30-year-old pipe file descriptor leak where the parent kept the write-end of the stdout pipe open after fork, making read() unable to detect EOF. The fix: three
    close() calls in the parent, three in the child.

    Level 6: poll() with timeout. For jdb’s asynchronous VM startup,
    we replaced the busy-loop read() with poll() and a 10-second
    timeout. Zero CPU while waiting, immediate response when data
    arrives, graceful error on timeout. This is the JDEE (Emacs)
    pattern from the 2000s, implemented in C.

    Each level built on the previous. You can’t use valgrind until
    fprintf shows you where to look. You can’t write a standalone test
    until the trace log shows you what’s different. You can’t use
    poll() until you understand why read() never returns EOF.

    The trace infrastructure stays in the code. Compile with
    -DJDB_TRACE and you get a complete protocol log. This is how
    professional IDE developers debug debugger integrations: and it’s how a 1993 codebase learns to talk to a 2026 JVM, in a few hundred lines of C instead of a million lines of TypeScript.

    The Essence

    What surprised me most is how well the core architecture holds up. Fred Kruse designed a pattern-matching system for compiler error messages (${FILE}:${LINE}:${COLUMN}:*) that’s flexible enough to handle gcc, g++, gfortran, javac, and fpc with per-language configuration.
    The double-buffer rendering system (schirm/altschirm) with manual save/restore is remarkably efficient: we evaluated migrating to ncurses panels but concluded the original design is actually better for xwpe’s use case.

    Each layer we peeled back revealed the next. The bugs were never in Kruse’s logic: they were in the integration: signal handlers
    interacting with pclose, terminal states drifting between ncurses and manual smcup/rmcup, error patterns frozen in 1993 while compilers evolved. The architecture was solid; it just needed someone to sit down and listen to what the code was trying to say.

    The goal isn’t to rewrite xwpe. It’s to preserve the essence of
    Kruse and Payne’s code while fixing what 30 years of neglect in the archives broke. A restoration, not a reconstruction, like finding an old gem of a book in a antique library.

    At this point a new analogy came to my mind. I think this is not a fossil anymore or an old startship at the scrapyard…this is still old, but something starts to shine, and the lights are coming back to the bridge…the Millennium Falcon flies again.

    The Debian Angle

    Debian had xwpe in a drawer. It compiled, so it passed CI.

    Andreas has been instrumental in facilitating the upstream handover. As Debian sponsor, he shepherded the NMU that kept xwpe in the archive while I was setting up the new upstream at Codeberg. Without that bridge, the package could have been removed from unstable before the rescue could begin.

    Taking over as upstream maintainer (with Dennis Payne’s blessing) and simultaneously maintaining the Debian package closes the loop. Bugs get fixed at the source, not papered over with patches, an impossible task if you ask me. The Debian
    package becomes a thin wrapper around a living upstream.

    Closing the Bug List

    We crawled over the xwpe mailing list from 1998–2003: 487 messages. Users reported debugger freezes, «Can’t open PIPE» errors, «Error loading program» failures. John Connor’s debugger crash (June 2000). Jan Ypma’s «process vanishes» on Debian (May 2000). Diego’s «Can’t start the debugger» on X11 (October 2000). B O’Donnell’s «trip to La-La land» (July 2001). That helped me to what I could solve next.

    Twenty years later, we can trace every one of these to the bugs we fixed:

    • Debugger freezes: WpeSignalChild used wait() which stole child processes from pclose(). The popen(«tty») call to learn the terminal name would hang forever. Fixed with waitpid(-1, WNOHANG).
    • «Error loading program»: e_comp and e_p_make called
      e_p_exec(-1) when no recompilation was needed, causing a phantom wait() failure. The debugger concluded compilation had failed andgave up.
    • User Screen broken: Old xwpe’s #ifndef NCURSES guard
      unconditionally disabled Ctrl-G P when compiled with ncurses: which is always, on every Linux distribution since the late 1990s. Nobody could see program output during debugging for 20+ years.
    • Screen flicker on stepping: Kruse’s original design switched
      between alternate and normal screen (smcup/rmcup) on every F7/F8 step. Invisible on a 1993 DOS video page flip, but a
      distracting flash on modern terminals. We replaced this with a
      pseudoterminal that captures output in memory: zero flicker, and Ctrl-G P displays it cleanly.

    These weren’t obscure edge cases. They were the core debugging workflow, broken for the entire ncurses era. Every user who tried the debugger between 2000 and 2026 hit one of these walls.

    Java Debugging: the jdb Integration

    Adding jdb (Java Debugger) as xwpe’s 5th debugger backend exposed a 30-year-old pipe file descriptor leak that affected ALL debugger types. The parent process kept the write-end of the stdout pipe open after fork(), making read() unable to detect EOF. gdb tolerated this by accident: its session never ends unexpectedly. jdb, with its fragile JVM startup timing, crashed into it immediately.

    The fix: three close() calls in the parent, three in the child.
    A bug that survived 30 years because nobody added a second debugger backend that was strict enough to expose it.

    We researched how other editors handle jdb: JDEE
    (Emacs, ~2003) parses jdb text output with an accumulator pattern. Vim has a basic jdb wrapper.
    Neovim uses nvim-dap with the java-debug DAP server. Helix, Kakoune, Micro, and Nano have no Java debugging at all, as far as I know.

    xwpe could be right now the only terminal editor with Java debugging built into the binary: no plugins, no external
    DAP server, no Metals or java-debug setup. Open a .java file, press F8, set a breakpoint, step through code. The debugger auto-selects jdb when it sees a .java extension. It uses poll() with a 10-second timeout to wait for the JVM to start (the
    JDEE accumulator pattern, implemented in C). Program output is captured from jdb’s pipe and displayed via Ctrl-G P.

    The method was tight: trace instrumentation (-DJDB_TRACE) on one side, interactive testing on the other. Run jdb, watch exactly what happens: «breakpoint doesn’t change color», «popup appears but shouldn’t», «wpe closes without asking»: and each symptom points at a specific code path. The trace file (/tmp/xwpe-jdb-trace.txt) showed every byte exchanged with jdb. Between what I saw on screen and the trace log, each bug narrowed to a single line of C.

    The Millennium Falcon

    xwpe is during these days the Millennium Falcon of IDEs. It may not look like much: 3000 lines of 1993 C, a TUI that draws its own borders with ACS characters, a pattern-matching engine for compiler errors that uses ${FILE}:${LINE}:${COLUMN}:* instead of regex. But it has what matters.

    Fred Kruse built it in 1993, when Linux was two years old and gcc
    didn’t have colour output. It was visionary: an integrated
    compile-edit-debug cycle on UNIX terminals, years before Eclipse or VS Code existed. That it survived until 2006 with bugs like the
    SIGCHLD handler stealing child processes and the User Screen
    permanently disabled speaks to the solidity of the core design.

    It does what VS Code does with a million lines of TypeScript and
    an Electron runtime. It does it in 3000 lines of C, in 2MB of RAM,
    over an SSH connection to a headless server, on a Raspberry Pi, in a Docker container, on a serial console. Anywhere you have a terminal and a C compiler, xwpe works.

    And it speaks your language. Borland users get the F-key driven menus and the F9 compile cycle they remember. Emacs users get Ctrl-P/N/F/Bfor cursor movement, Ctrl-A/E for line start/end: all the readline keybindings they have in muscle memory. Kruse built both into the same editor in 1993, two decades before VS Code offered «Emacs Keymap» as an extension.

    The mailing list went silent in 2006. The last user report was about
    a debugger crash. We now know exactly why: wait() instead of
    waitpid(), in a signal handler written in the 1990s, triggered
    every time popen("tty") finished before pclose() could reap it. A one-line fix for 20 years of silence.

    The Bug Trail: 487 Messages, 50 Issues, One Trace

    The hardest bugs to find are the ones nobody can reproduce reliably. The Redo crash: press Ctrl-R after undoing a search-and-replace and watch xwpe die with SIGSEGV. This was reported in 2017 as issue 77 on Alessandro Magnasco’s GitHub fork. Guus Bonnema tried to investigate it. Nobody fixed it. The issue sat open for 9 years.

    We found it by following a trail across 30 years of scattered sources:

    • 487 mailing list messages (1998-2003) from Payne’s
      identicalsoftware.com archive, preserved in our xwpe-archive repo
    • 50 open issues from Magnasco’s GitHub fork, triaged one by one against our codebase
    • Miroslav Janiš’s Czech review (1998), which documented the -c flag bug we fixed 28 years later
    • Guus Bonnema’s experimental branch, which identified the
      search/replace undo problems but couldn’t pinpoint the cause
    • The LUG-S debugger course (2001), with GIF screenshots
      transcribed for our manual
    • 9 Debian BTS reports spanning 2002-2025

    The Redo crash turned out to be a single uninitialized field.

    To understand it, think of xwpe as having two notebooks. The «editor notebook» is where the Replace command writes down «I just replaced 5 characters». The «undo notebook» is where Undo reads «how many characters were replaced?» to know how to reverse the operation.

    The problem: Kruse wrote the answer in one notebook (the editor’s global search state, f->ed->fd.rn) but read it from a different notebook (the window’s local copy, b->f->fd.rn). The local copy was never filled in. It contained whatever garbage happened to be in memory when the window was created: in our trace, 189 instead of 5.

    So when Redo tried to «redo the replacement», it thought it needed to save 189 characters from a line that only had 5. It wrote past the end of its buffer, corrupted the memory allocator’s internal bookkeeping, and crashed inside malloc() itself: not even in xwpe’s own code.
    The stack trace showed unlink_chunk deep inside libc, which is
    nearly impossible to diagnose without knowing what led to the
    corruption.

    We found it by adding a trace log that printed the undo entry’s fields before each operation. The log showed a=(5,189): five characters saved, but 189 recorded as the replacement length. Should have been a=(5,5). The 189 was the smoking gun.

    The fix: one line. b->f->fd.rn = fd->rn; copy the answer from the right notebook to the one that Undo actually reads. A bug that existed since 1993, reported in 2017, diagnosed in 2026.

    No single source would have led us there. The mailing list told us
    which features were fragile. The GitHub issues told us which scenarios crashed. The code archaeology told us which fields were out of sync.
    Together, they drew a map to a one-line fix for a 33-year-old bug.

    The Mouse: Three Decades, Three Backends

    When we opened we_mouse.c, we found 1189 lines of mouse UI logic: menus, scrollbars, window resize by dragging corners, text selection, drag-and-drop between file manager windows. Every interaction you’d expect from a Borland IDE. All of it written by Fred Kruse in 1993.

    And at the bottom of we_term.c, the terminal mouse backend:

    int fk_t_mouse(g)
         int *g;
    {
       return(0);
    }

    Four lines. A stub. A placeholder that said: «I don’t know how mouse will work on terminals yet, but when someone figures it out, plug it in here.»

    The plug was fk_mouse: a function pointer. X11 mode set it to
    fk_x_mouse (reading Xlib ButtonPress events). Terminal mode set it to this stub. All 1189 lines of we_mouse.c never knew or cared which backend was active. They called fk_mouse(g) through the pointer and got coordinates back. Textbook Unix polymorphism in C.

    In 1998, Sebastiano Suraci at the University of Catania plugged in
    GPM: the General Purpose Mouse daemon for the Linux console. His we_gpm.c called Gpm_Open(), installed a handler callback, and set fk_mouse = WpeGpmMouse. The 1189 lines of mouse UI worked instantly. Kruse’s architecture held.

    For 26 years.

    Then ncurses changed. Sometime around ncurses 5.x-6.x, the library added its own internal GPM integration. When you call mousemask(), ncurses now opens its own GPM connection, reads events from the same socket, and delivers them as KEY_MOUSE. Two consumers fighting over the same gpm_fd. Events went to one handler or the other unpredictably. Coordinates disagreed: Suraci set gpm_zerobased=1
    (0-based), ncurses expected 1-based and subtracted 1 internally.
    Clicks became erratic. Sometimes the menu responded, sometimes it selected text, sometimes nothing happened.

    The fix was to let go of Suraci’s code. Not because it was wrong: it was perfect for 1998. But ncurses 6.x already does what Suraci did manually. We removed the direct Gpm_Open(), let mousemask() handle GPM transparently, and plugged ncurses mouse into Kruse’s fk_mouse stub. The same four-line function that was empty in 1993 now handles mouse clicks in xterm, gnome-terminal, kitty, tmux, and the Linux console with GPM: all through the same KEY_MOUSE + getmouse() path.

    Three backends across three decades, and we_mouse.c never changed.
    That’s engineering.

    The Drag: Teaching a 1993 Editor to Follow Your Hand

    Click works. Drag is another world.

    And not only for the mouse, this one took me days.

    When we plugged ncurses mouse into Kruse’s fk_mouse stub, clicks worked instantly: every menu, scrollbar, and window switch lit up through the 1189 lines of we_mouse.c without a single change. Three backends, three decades, Kruse’s architecture held. We said so in the previous chapter.

    But try to drag a window’s title bar, and nothing happens. The window doesn’t move. Your hand goes across the trackpad and the cursor just sits there, blinking. Because ncurses mode 1000: the default: only reports press and release. The hundred mouse positions your hand traces between them? Invisible. The terminal doesn’t send them. The editor never sees them.

    Enter mode 1002.

    The Protocol Nobody Documents

    xterm mouse mode 1002 (\033[?1002h) is the drag tracking protocol.
    While a button is held down, the terminal sends a REPORT_MOUSE_POSITION event for every cell the cursor crosses. This is how Midnight Commander does panel resize. This is how tmux does pane drag. This is how vim does visual selection across lines. Not mode 1000 (clicks only), not mode 1003 (all motion, even without buttons: floods the input), but 1002: motion while button held. Exactly what window drag needs.

    We enabled it at terminal init. Two escape sequences:
    \033[?1002h\033[?1006h. The second enables SGR extended coordinates: without it, terminals wider than 223 columns encode garbage because the X10 coordinate byte overflows. Both disabled cleanly at exit.

    And suddenly, fk_t_mouse was receiving a continuous stream of
    coordinates. Kruse’s drag loops in we_mouse.c: written in 1993 for X11’s MotionNotify events: started moving windows in ncurses!. The title bar followed the mouse. The corner resize handles worked. Three decades of dormant drag code, waking up because the right two bytes were sent to the terminal at init time.

    The Popup Trap

    It worked perfectly. Until F9.

    Press F9 to compile. The «Compiling…» popup appears, the compiler runs, results go to Messages. Close Messages. Now try to drag a window.
    The title bar grabs: and never lets go. The window follows your mouse forever, even after you release the button. The UI is stuck in an infinite drag loop.

    The root cause took three failed workarounds before we stopped patching and started engineering.

    Here’s what happens. The user is happily clicking around: e_mouse.k says «button 1 pressed» or «button 1 released» and everything works. Then the F9 popup opens. The popup has its own event loop. Inside that loop, ncurses delivers a PRESSED event (the click that activated something inside the popup) and its corresponding RELEASED event. The popup’s event loop consumes both. It exits.

    Now fk_t_mouse runs in the main event loop. It reads e_mouse.k, which still says «pressed» from the LAST event the main loop saw: before the popup stole the release. The drag loop starts. But the physical button is released. No RELEASED event will ever arrive (the popup already ate it). The drag loop waits forever.

    We studied how other TUI frameworks handle this:

    • Midnight Commander: uses per-widget mouse capture flags.
      The active widget claims the mouse, and when it releases, the flag clears. But MC doesn’t have xwpe’s stacking window manager with arbitrary popups.
    • Turbo Vision (Borland’s own C++ TUI framework from 1990):
      uses an exclusive drag loop with GetMouseEvent in a tight
      while(button_held) loop. The loop owns the mouse until release. Popups can’t interrupt because the drag loop doesn’t yield to the event dispatcher.
    • ncurses itself: provides no popup-aware mouse state. It
      reports events. What you do with them is your problem.

    Neither MC’s per-widget capture nor Turbo Vision’s exclusive loop
    fit xwpe’s architecture. Kruse’s design dispatches mouse events
    through a function pointer (fk_mouse), and the drag code in
    we_mouse.c assumes it gets a clean press-drag-release sequence. Popups break that assumption.

    g_mouse_buttons: One Bitmask to Rule Them

    The solution: separate physical button state from event dispatch.

    int g_mouse_buttons = 0;

    One global integer. Bit 0 is button 1. Updated in exactly two places: e_t_getch (the keyboard reader) sets the bit on PRESSED, clears it on RELEASED. fk_t_mouse (the mouse dispatcher) reads g_mouse_buttons to decide if a drag is happening, instead of relying on e_mouse.k.

    The key insight: e_t_getch always sees every mouse event, even inside popup event loops, because popups call e_t_getch too. So g_mouse_buttons always reflects the true physical state. When the popup’s event loop processes a RELEASED event, g_mouse_buttons lears the bit. When the popup exits and the main loop resumes, fk_t_mouse reads g_mouse_buttons = 0 and knows: no drag. No
    stuck mouse. No infinite loop.

    But that’s only half the fix.

    e_mouse_flush: Draining the Dead

    After a popup closes, the ncurses event queue may still contain stale mouse events: phantom RELEASEDs from clicks inside the popup, or motion events from the user’s hand moving while the popup was open. If these reach fk_t_mouse before a fresh click, they confuse the state machine.

    Worse: ncurses sometimes silently disables mode 1002 during popup event processing. The escape sequence handler gets confused by the popup’s output, and drag tracking stops. The terminal stops sending motion events. The next drag attempt fails silently: you click the title bar, hold the button, move, and nothing happens. No error, no diagnostic, just a dead mouse.

    e_mouse_flush() fixes both problems:

    1. Drain: loop getmouse() until it returns ERR: empty the
      queue of stale events.
    2. Re-enable: re-send \033[?1002h\033[?1006h: force mode 1002 back on, regardless of what ncurses did internally.
    3. Reset: g_mouse_buttons = 0: start from a known state.

    Called at the exit of e_mess_win (the popup message handler) and e_opt_kst (the options/dialog handler). Every code path that opens a popup and processes its own mouse events must call e_mouse_flush on exit.

    The Test

    Three windows open. Two source files and Messages. Drag each window by its title bar: smooth, continuous, follows the hand. Press F9 : compiler runs, Messages appears. Drag Messages down, drag a source window up, drag the third window. Release. Click somewhere else.
    Everything works.

    The mouse log shows the proof: gb=1 (g_mouse_buttons bit 0 set) throughout every drag, bstate=0x10000000 (REPORT_MOUSE_POSITION) for every motion event, bstate=0x1 (BUTTON1_RELEASED) at the end of every drag. No orphaned presses, no stuck state, no mode 1002 dropouts.

    Three hundred lines of mouse events, and every single one falls
    into the pattern: press, continuous motion, release. Press, motion, release. The state machine never breaks. The bitmask never lies.

    Kruse’s we_mouse.c: 1189 lines of drag handlers, resize
    handlers, menu handlers, scroll handlers: never knew any of this
    happened. It called fk_mouse(g), got clean coordinates back, and moved windows. The same function pointer, the same abstraction, the same architecture. 1993 to 2026.

    The Relayout: Windows That Remember Where They Belong

    Drag is pointless if resize destroys your layout.

    When the terminal resizes (SIGWINCH in ncurses, ConfigureNotify in X11), the screen buffer is reallocated and all windows must adapt.
    The naive approach: clamp coordinates to the new bounds. It works for shrinking but fails for growing: windows that were pushed to the edge during a shrink never reclaim their space when the terminal grows back.

    The deeper problem: ratio drift. If you have a window at row 15 of
    30, and the terminal shrinks to 20 rows, integer truncation puts it
    at row 10. Grow back to 30: truncation puts it at row 15. Looks
    fine. But do it 50 times: shrink by 1, grow by 1, shrink by 1,
    grow by 1: and the accumulated truncation error slowly walks the
    window toward the top of the screen.

    We designed an edge-attachment algorithm:

    For each window coordinate, check if it was touching a screen edge before the resize. A window whose bottom was at MAXSLNS - 2 (the last usable row) is «bottom-attached»: its bottom follows the screen edge. A window whose top is at row 1 is «top-attached»: it stays at row 1. Interior coordinates: not touching any edge : scale proportionally with round-to-nearest:

    int e_scale_y(int y, int old_h, int new_h)
    {
        return (y * new_h + old_h / 2) / old_h;
    }

    The old_h / 2 term is the round-to-nearest correction. Without it, 15 * 20 / 30 = 10, then 10 * 30 / 20 = 15: looks reversible.
    But 7 * 20 / 30 = 4 (truncated from 4.67), then 4 * 30 / 20 = 6: you lost a row. Accumulated over many cycles, the window collapses. With rounding: 7 * 20 + 15 = 155, / 30 = 5 (rounded from 4.67), then 5 * 30 + 10 = 160, / 20 = 8: overcorrects by one, but the error doesn’t accumulate. The window oscillates by one row instead of drifting monotonically.

    Three windows, Messages at the bottom, terminal shrinking and
    growing wildly: every window stays where it should. The editor
    fills the top two-thirds, Messages fills the bottom third, and the
    proportions hold.

    Bounds-Safe Rendering

    One more wall between drag and crash: SCHIRM_INBOUNDS.

    When a dialog is wider than the terminal (common during extreme
    shrink), the rendering loop tries to write cells past the schirm
    allocation. In 1993, terminals didn’t resize. In 2026, every drag
    of a tiling WM border triggers a resize. Writing past the allocation
    corrupts the heap: random crashes seconds or minutes later.

    #define SCHIRM_INBOUNDS(y, x) \
        ((y) >= 0 && (y) < MAXSLNS && (x) >= 0 && (x) < MAXSCOL)

    Every schirm access macro: e_pr_char, e_gt_char, e_gt_col, e_pt_col, e_gt_flags, e_pt_flags: checks bounds before
    touching memory. Out-of-bounds writes are silently dropped. The
    dialog renders the part that fits; the part beyond the terminal edge is invisible. Grow the terminal back, and the dialog reappears
    complete. No crash, no corruption, no state to recover.

    This is the same pattern that modern terminal emulators use (st,
    alacritty, foot): the model can be larger than the view, and the
    view clips silently. The renderer never writes outside the view.

    What Kruse Knew

    Kruse wrote fk_t_mouse as a four-line stub that returned zero.
    He wrote fk_mouse as a function pointer. He wrote 1189 lines of
    drag logic in we_mouse.c that never mentioned X11 or ncurses or
    GPM.

    In 1993, the only mouse backend that worked was X11 (fk_x_mouse). Terminal mice didn’t exist yet: GPM was experimental, xterm mouse support was rudimentary. But Kruse designed the separation anyway.
    He couldn’t have known that mode 1002 would exist, that ncurses
    would add mousemask(), that GPM would be absorbed into ncurses, that popups would desynchronise button state. But he designed an architecture that survived all of it.

    We added g_mouse_buttons, e_mouse_flush, e_relayout_windows, and SCHIRM_INBOUNDS. Four mechanisms, each solving a problem that didn’t exist in 1993. And we_mouse.c: the file that actually moves windows, resizes them, selects text, scrolls content, didn’t change at all.

    That’s not luck. That’s Kruse design.

    The X11 Ghost Problem

    Kruse’s X11 rendering used raw Xlib: XDrawImageString for text,
    XDrawLine for window borders, manual pixel management for everything.
    An array called extbyte tracked which cells had border line segments.
    When a popup or File Manager was closed, the border pixels persisted on the X11 window: ghost images that wouldn’t go away.

    The bug was architectural: extbyte is a flat array with no concept of window stacking. A window behind the editor could have its border flags set, and e_x_refresh would dutifully draw those XDrawLine segments on top of the editor’s content. The fix that finally worked: clear extbyte for the interior of every window in the stack on each refresh. Pragmatic, not elegant: but it catches every code path.

    Dennis Payne saw this coming. In his TODO file he wrote: «Use
    higher-level APIs instead of xlib and the lowest curses interface.»
    He knew that pixel-level rendering was a maintenance trap.

    The Output Problem: From xterm to Messages

    In Kruse’s original design, the debugged program’s output went to the terminal (via smcup/rmcup screen switching). In X11 mode, Payne added an xterm window: a shell script that launched the debugger inside an xterm via named pipes. The xterm stole keyboard focus, closed before you could read the output, and left xwpe in an unresponsive state if anything went wrong.

    We unified program output for both terminal and X11 mode into the Messages buffer: the same window used for compiler errors (F9). Now Ctrl-G P (User Screen) appends program output to Messages with full scroll. Ctrl-F9 Run for interpreted languages (Python, LaTeX) captures output via popen() directly into Messages, bypassing xterm entirely.
    No context switch, no focus steal, no window to close.

    The same approach that Borland would have used if their IDE had run on
    UNIX: one output pane, multiple uses, always accessible.

    Following st: the Xft Migration

    The final piece of the X11 puzzle was fonts. Kruse used
    XDrawImageString, which is Latin-1 only. No accented characters, no Cyrillic, no emoji. In terminal mode, ncursesw handles everything:
    the terminal emulator’s font stack does the work. In X11 mode, xwpe IS the renderer.

    We first tried a hybrid approach: Xft for some characters,
    XDrawImageString for others. It failed spectacularly. The two rendering systems use different metrics, different GC state, different background fill semantics. Mixing them produced white backgrounds, invisible text, and border artefacts. Every partial fix broke something else.

    I stopped patching and made the call: implement Payne’s recommendation completely: go all-Xft: instead of monkeypatching the hybrid. It was faster than chasing one more partial fix, and it was the right call.

    We studied the st (suckless terminal) source
    and read how it renders text. st uses Xft for 100% of its rendering: no XDrawImageString anywhere. The patterns we adopted:

    • XftFont via fontconfig (monospace:size=10): any TrueType font
    • XftDrawRect for background fill (one call per cell)
    • XftDrawStringUtf8 for text (with per-character font fallback)
    • Font cache (frc[] array): fontconfig lookup once per codepoint, cached forever. Same pattern as st, same struct layout.
    • XftDraw on Pixmap: all rendering goes to an off-screen Pixmap, XCopyArea to the window at the end. Zero flicker on resize.
    • FC_COLOR for emoji fallback: fontconfig prefers Noto Color Emoji for codepoints above U+2600

    The migration touched we_xterm.c (rendering), WeXterm.c (font init), WeXterm.h (Xft fields), configure.ac (Xft detection), and Makefile.am (link flags). The original XDrawImageString path is preserved inside #else for systems without Xft.

    With libXft 2.3.5+ (shipped in Debian since 2022), BGRA color emoji rendering works natively. The same XftDrawStringUtf8 call that renders hello also renders hello 🎉 with a full-color emoji glyph from Noto Color Emoji.

    The Wide Character Problem

    Emoji and CJK characters take two columns on screen (wcwidth() = 2).
    But xwpe’s SCREENCELL buffer stores one character per cell. When an emoji occupies cells 5 and 6, cell 6 needs to know it’s the
    «continuation» of cell 5: otherwise the cursor treats it as an
    independent character, delete removes only half, and the rendering draws a background rectangle over the second half.

    We studied how st, vim, alacritty, and libvterm handle this. Every
    implementation converges on the same pattern: flag bits on the cell.

    We added a flags field to SCREENCELL with two values:

    • CELL_WIDE on the first cell (the emoji itself)
    • CELL_WIDE_SPACER on the second cell (the continuation)

    The rendering code skips spacer cells. The cursor jumps over them.
    Delete removes both cells. Mouse clicks on a spacer map to the wide char. The same invariant maintenance pattern from st: every write operation checks both flags and clears the partner cell.

    This is a transversal change: it touches unixmakr.h (the struct), we_wind.c and we_progn.c (rendering), we_edit.c (cursor and delete), and we_mouse.c (click mapping). But the pattern is clean and well-tested across the industry.

    Python, LaTeX, and the Scripted Language Pattern

    The 1.6.2 cycle added full support for interpreted languages:

    • Python: 35-keyword syntax highlighting, F9 via python3 -m py_compile,
      pdb as 6th debugger backend (breakpoints, F8 stepping, auto-skip of
      internal Python frames, output capture).
    • LaTeX: 31-keyword syntax highlighting, F9 via pdflatex -interaction=nonstopmode -file-line-error, error navigation.
    • Ctrl-F9 Run detects interpreted languages (comp_sw & 1) and runs the interpreter directly via popen(), capturing output to
      Messages. No xterm, no subprocess management, no focus stealing.

    The pattern is extensible. Adding a new compiler takes ~10 lines in
    we_prog.c (compiler name, flags, error pattern, file extensions). If the compiler emits file:line:column: format (the GNU standard since 2013), it works with zero configuration.

    In v1.6.3 we added Perl (perl -c, 46-keyword syntax highlighting, Ctrl-F9 run) and COBOL (cobc, 50-keyword syntax highlighting, GNU mode), bringing the total to 9 default compilers.

    Status

    • v1.5.31: Rescue release (Payne baseline + cherry-picks + Debian patches)
    • v1.6.0: UTF-8/SCREENCELL migration, terminal resize, modern keys
    • v1.6.1: Modern autotools (configure.ac + Makefile.am)
    • v1.6.2: The release that brought xwpe from 1993 to 2026:
    • v1.6.3 (released 2026-06, in Debian unstable): the usability release.

    The fossil lives. It compiles your code, navigates your errors, steps
    through your functions, shows you the output: with anti-aliased
    TrueType fonts, color emoji, and UTF-8 from terminal to X11. And now it feels right under your fingers: Tab cycles through dialogs, colors are legible, Shift-Tab goes backwards, errors follow the cursor.

    Fred Kruse built the architecture in 1993. Dennis Payne maintained it for a decade. We brought it to 2026, following st’s rendering patterns and the industry’s wide-character conventions. The code went from bitmap fonts and Latin-1 to fontconfig and Noto Color Emoji: and the core
    design held. Every function pointer, every double buffer, every pattern matcher that Kruse wrote still does exactly what it was designed to do.
    We just gave it better tools to work with.

    xwpe 1.6.3 is at the date of the release of this post in Debian unstable. The same binary is verified end to end on
    thanks to a new addition: 134 console tests and 58 headless-X11 tests pass against the installed package, so «it builds» is now «it works.»

    And the part that still gets me: Fred Kruse, who wrote that first version in 1993, has been in touch. He wants to try it. Thirty-three years after he built it, and two decades after the last release, the original author wants to watch his editor run again. Dennis Payne gave his blessing to the handover; Kruse gave the rescue its meaning.

    When v1.7 lands with DAP (Debug Adapter Protocol) support: Rust, Go, JavaScript and C# debugging from a 1993 TUI: that’s when the Millennium Falcon gets its public debut. For now, it flies again.

    Before and after:

    Xwpe in 1.5.30. No UTF-8 support. Old scrollbars style.

    Xwpe 1.5.30: No UTF-8 support. Old scrollbars style

    Xwpe, showing the Ctrl-F9 output in Messages

    XWPE 1.6.3, showing Ctrl-F9 output in the Messages Window

    Xwpe 1.6.3 with UTF-8 support

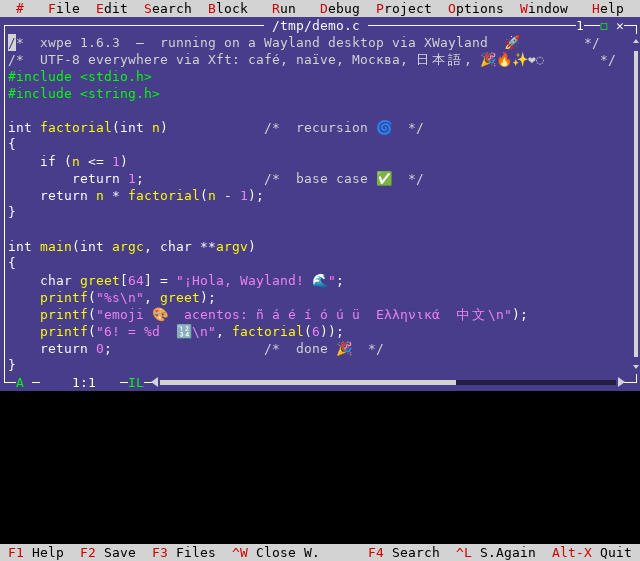
    Testing XWPE in Wayland with UTF-8 support, opening a file with «emojis». «The widecell problem»

  • Packaging Stremio’s GTK4 Shell: CEF Integration Adventures

    Nine days debugging one function call, and other lessons from browser-engine integration

    Introduction

    When Stremio released their new GTK4-based shell using Chromium Embedded Framework (CEF) instead of Qt5/QtWebEngine, it provided the perfect test case for my Debian packaging journey, specially after QT5 has become an End Of Life software that won’t be supported soon.

    It was the good usecase to test a big our freshly-packaged CEF library. What followed was a month of debugging that revealed the gap between «library compiles» and «library works.»

    This article documents the technical challenges of integrating CEF with a real-world application for Debian packaging.

    The Application Architecture


    Stremio-gtk is a relatively simple application in concept:

    1. Create a CEF browser window
    2. Load https://app.strem.io/shell-v4.4
    3. Provide IPC bridge for the web app to control native features
    4. Handle video playback through MPV

    In practice, each step revealed hidden complexity.

    Challenge 1: Resource File Discovery

    The Problem

    CEF processes need to locate several resource files at startup:

    • icudtl.dat – ICU internationalization data
    • v8_context_snapshot.bin – V8 JavaScript engine snapshot
    • *.pak files – Chromium resource bundles
    • locales/*.pak – Localization data

    In upstream builds, these files sit alongside the executable. In FHS-compliant installations, they’re scattered across /usr/share/cef/.

    The obvious solution is to configure paths in the Settings structure:

    let settings = Settings {
        resources_dir_path: "/usr/share/cef".into(),
        locales_dir_path: "/usr/share/cef/locales".into(),
        ..Default::default()
    };
    cef_initialize(&settings);

    This works for the browser process. Subprocesses crashed immediately.

    Root Cause

    CEF’s multi-process architecture spawns specialized subprocesses for rendering, GPU operations, and utility functions. These subprocesses call cef_execute_process() as their first action and exit without ever seeing the Settings structure.

    The subprocess entry point:

    fn main() {
        // For subprocesses, this returns immediately with exit code
        let exit_code = cef_execute_process(&args, None, None);
        if exit_code >= 0 {
            std::process::exit(exit_code);
        }
    
        // Only browser process reaches here
        let settings = Settings { ... };
        cef_initialize(&settings);
    }

    By the time Settings could be applied, subprocesses have already failed to find resources.

    Solution

    CEF searches for resources relative to libcef.so, not the application binary. Symlinks in the library directory solve the problem:

    # In /usr/lib/x86_64-linux-gnu/:
    icudtl.dat -> ../../share/cef/icudtl.dat
    v8_context_snapshot.bin -> ../../share/cef/v8_context_snapshot.bin

    For settings that subprocesses need, command-line switches must be added in the on_before_command_line_processing callback, which is called for all process types:

    impl App for StremioApp {
        fn on_before_command_line_processing(
            &self,
            _process_type: &str,
            command_line: &mut CommandLine,
        ) {
            command_line.append_switch_with_value(
                "resources-dir-path",
                "/usr/share/cef"
            );
        }
    }

    Challenge 2: GPU Process Crashes

    The Problem

    With resources loading correctly, the GPU subprocess now launched—and immediately crashed. CEF retried nine times before giving up:

    [GPU] error_code=1002
    GPU process isn't usable. Goodbye.

    No stack traces, no meaningful logs. The GPU process died before producing diagnostics.

    Investigation

    Adding --enable-logging --v=1 revealed the GPU process was failing to initialize OpenGL contexts. The error suggested EGL/GLES library issues.

    CEF’s GPU process expects ANGLE (Almost Native Graphics Layer Engine)—Google’s OpenGL ES implementation built on Vulkan and DirectX. It’s not interchangeable with Mesa’s EGL implementation despite similar APIs.

    Solution

    The CEF package must bundle its own ANGLE libraries:

    /usr/lib/x86_64-linux-gnu/cef/
    ├── libEGL.so.1        # CEF's ANGLE-based EGL
    ├── libGLESv2.so.2     # CEF's ANGLE-based GLES
    └── libvk_swiftshader.so  # Software Vulkan fallback

    The main library is configured with RPATH to find these private libraries before system Mesa.

    For systems without GPU acceleration, SwiftShader provides software rendering. Its Vulkan ICD registration required absolute paths:

    {
        "file_format_version": "1.0.0",
        "ICD": {
            "library_path": "/usr/lib/x86_64-linux-gnu/cef/libvk_swiftshader.so",
            "api_version": "1.1.0"
        }
    }

    Relative paths failed because the ICD loader doesn’t resolve paths relative to the JSON file.

    Challenge 3: The Nine-Day IPC Debugging

    The Symptom

    CEF launched, pages loaded, UI rendered—but video playback fell back to HTML5 instead of the native MPV player. The web app was treating stremio-gtk as a browser rather than a native shell.

    The Qt WebChannel Protocol

    Stremio’s web application expects to communicate with its native shell through Qt’s WebChannel protocol. The original Qt5 shell creates a transport object:

    // Qt5 shell (QML):
    WebChannel {
        id: webChannel
        registeredObjects: [transport]
    }
    
    property QtObject transport: QtObject {
        property string shellVersion: "4.4"
        property string serverAddress: "http://127.0.0.1:11470"
        property bool isFullscreen: false
    
        signal event(string event, string args)
        function send(data) { ... }
    }

    The web app accesses this through:

    new QWebChannel(qt.webChannelTransport, function(channel) {
        window.transport = channel.objects.transport;
        transport.event.connect(function(name, args) { ... });
    });

    Dead Ends

    Day 1-2: «IPC onmessage is not a function»

    The web app tried calling a callback before registration. Added message queuing:

    struct MessageQueue {
        pending: Vec<String>,
        handler: Option<Box<dyn Fn(String)>>,
    }
    
    impl MessageQueue {
        fn send(&mut self, msg: String) {
            match &self.handler {
                Some(h) => h(msg),
                None => self.pending.push(msg),
            }
        }
    
        fn set_handler(&mut self, h: Box<dyn Fn(String)>) {
            for msg in self.pending.drain(..) {
                h(msg);
            }
            self.handler = Some(h);
        }
    }

    Messages stopped being lost, but video still didn’t work.

    Day 3-4: Wrong message format

    QWebChannel expects specific array formats:

    // Wrong (what we sent):
    { type: 1, object: "transport", data: { properties: {} } }
    
    // Correct (QWebChannel format):
    { type: 1, object: "transport", data: [
        { }, // signals
        { }, // methods
        { "shellVersion": [1, "4.4"], "serverAddress": [1, "http://..."] }
    ]}

    Properties are [type, value] tuples. Fixed the serialization, but video still didn’t work.

    Day 5: Double JSON serialization

    A bug in the Rust→JavaScript bridge:

    // Bug: data was already JSON, gets serialized again
    let message = serde_json::to_string(&json!({
        "type": 3,
        "data": already_json_string  // Becomes "\"escaped\"" 
    }))?;

    Fixed, but video still didn’t work.

    Day 6: Wrong response type

    Init responses used type: 3 when QWebChannel expected type: 10:

    // Our response:
    { type: 3, id: 1, data: [...] }
    
    // Expected:
    { type: 10, id: 1, data: [...] }

    Fixed, but video still didn’t work.

    Day 7-8: User-Agent detection

    Examining the web app’s source revealed an early check:

    if (navigator.userAgent.indexOf('StremioShell') === -1) {
        // Use HTML5 player
        return;
    }
    // Use native MPV

    Added «StremioShell» to the user agent. Video still didn’t work.

    Day 9: The Missing Function Call

    Desperate, I read through the Qt5 shell’s main.qml line by line:

    function injectJS() {
        var injectedJS = "try { initShellComm() } catch(e) { console.error(e) }"
        webView.runJavaScript(injectedJS, function(err) {
            if (err) console.error("Injection failed:", err);
        });
    }
    
    Connections {
        target: webView
        onLoadingChanged: {
            if (loadRequest.status === WebEngineLoadRequest.LoadSucceededStatus) {
                injectJS();
            }
        }
    }

    The native shell must explicitly call window.initShellComm() after page load. The web app defines this function but never calls it automatically.

    One line in the preload script:

    window.addEventListener('load', () => {
        if (typeof initShellComm === 'function') {
            initShellComm();
        }
    });

    Video playback worked.

    Lesson

    Nine days of debugging IPC formats, serialization, and message types. The actual fix was one function call that the Qt5 shell made explicitly. The documentation existed—in QML code that had to be read line by line.

    Challenge 4: Native Widget Rendering

    The Problem

    After IPC worked, a minor but visible issue remained: HTML <select> dropdowns didn’t work. Clicking them did nothing.

    Root Cause

    CEF’s offscreen rendering mode (used by stremio-gtk) renders everything to a buffer via OnPaint. Native OS widgets like dropdown menus require real window handles.

    CEF provides callbacks for popup rendering:

    trait RenderHandler {
        fn on_popup_show(&self, browser: &Browser, show: bool);
        fn on_popup_size(&self, browser: &Browser, rect: &Rect);
    }

    Applications must implement these to render native widget representations themselves. Stremio-gtk hadn’t implemented them.

    Pragmatic Solution

    Rather than implementing full popup rendering, JavaScript injection replaces <select> elements with custom div-based dropdowns:

    function replaceSelect(select) {
        const wrapper = document.createElement('div');
        wrapper.className = 'custom-select-wrapper';
    
        const display = document.createElement('div');
        display.className = 'custom-select-display';
        display.textContent = select.options[select.selectedIndex]?.text || '';
    
        const dropdown = document.createElement('div');
        dropdown.className = 'custom-select-dropdown';
    
        Array.from(select.options).forEach((opt, i) => {
            const item = document.createElement('div');
            item.textContent = opt.text;
            item.onclick = () => {
                select.selectedIndex = i;
                select.dispatchEvent(new Event('change'));
                display.textContent = opt.text;
                dropdown.style.display = 'none';
            };
            dropdown.appendChild(item);
        });
    
        display.onclick = () => {
            dropdown.style.display = 
                dropdown.style.display === 'none' ? 'block' : 'none';
        };
    
        select.style.display = 'none';
        select.parentNode.insertBefore(wrapper, select);
        wrapper.appendChild(display);
        wrapper.appendChild(dropdown);
    }
    
    // Handle dynamic selects
    new MutationObserver((mutations) => {
        mutations.forEach(m => {
            m.addedNodes.forEach(node => {
                if (node.tagName === 'SELECT') replaceSelect(node);
                if (node.querySelectorAll) {
                    node.querySelectorAll('select').forEach(replaceSelect);
                }
            });
        });
    }).observe(document.body, { childList: true, subtree: true });
    
    document.querySelectorAll('select').forEach(replaceSelect);

    The hidden native <select> elements sync state for AngularJS compatibility.

    The Final Patch Count

    After all debugging, stremio-gtk required 24 patches:

    CategoryCountExamples
    Build system4Cargo vendor, system paths
    CEF integration6Resource paths, ANGLE, zygote
    IPC protocol8Transport object, JSON format, initShellComm
    Runtime fixes4User agent, event signals
    UI workarounds2Select replacement, focus handling

    Testing Insights

    What Unit Tests Miss

    The CEF package passed all its tests. Stremio-gtk revealed:

    1. Resource symlinks needed in unexpected locations
    2. ANGLE is required, not optional
    3. Subprocess initialization differs from main process
    4. IPC protocol details matter for real applications

    Integration Test Value

    A demanding application like stremio-gtk (video, IPC, GPU, offscreen rendering) stress-tests features that simple «load webpage» tests never touch.

    Upstream Bug Discovery

    Several issues exist in upstream stremio-linux-shell. The Flatpak likely works by accident of bundling or timing. These fixes should flow back.

    Conclusion

    The stremio-gtk packaging revealed that CEF integration is more than linking against a library. The multi-process architecture, resource discovery, GPU requirements, and IPC protocols all require careful handling for distribution packaging.

    The nine-day IPC debugging produced one line of actual code. The other 23 patches required understanding internals that aren’t documented anywhere except the source code of working implementations.

    For packagers considering CEF applications: expect to bridge the gap between upstream assumptions and distribution requirements. Read the Qt5 implementation if one exists. Test early and test thoroughly.


    Packages at salsa.debian.org. ITP #1119815 (stremio-gtk), resolves #915400 (CEF).

  • Packaging Chromium Embedded Framework for Debian: A Technical Deep Dive

    Packaging Chromium Embedded Framework for Debian: A Technical Deep Dive

    Resolving ITP #915400 after seven years—the complete technical breakdown

    Introduction

    The Chromium Embedded Framework (CEF) has been sitting in Debian’s packaging queue since December 2018. Bug #915400 documented the need: obs-studio wanted browser sources, casparcg-server needed HTTP support, and various applications required a lighter alternative to Electron.

    Previously I packaged Stremio (QT5 based) for Debian and Wolfi, but QT5 is EOL (end of life), so I went on and decided to package the next generation of Stremio (GTK based) but this package depends on chromium-embedded-framework that did not exist en Debian.

    This article documents the technical approach that finally produced working Debian packages.

    Why CEF Is Different

    Most C/C++ projects follow a predictable pattern: download tarball, run configure, make, install. CEF breaks every assumption.

    The Upstream Build Process

    CEF’s official build uses automate-git.py, which:

    1. Clones depot_tools from Google
    2. Runs gclient sync to fetch ~1GB of Chromium sources
    3. Downloads prebuilt toolchains from Google Cloud Storage
    4. Optionally uses reclient for distributed compilation
    5. Builds both Debug and Release configurations
    6. Creates binary distribution packages

    This process assumes internet access, Google infrastructure, and a ~90GB working directory.

    Debian Requirements

    Debian builds must be:

    • Network-isolated during compilation
    • Reproducible from source
    • Using system toolchains where possible
    • Compliant with the Filesystem Hierarchy Standard

    The gap between these requirements and upstream assumptions drove most of the packaging complexity.

    Architecture: The Dual-Source Approach

    Problem: Chromium Integration

    CEF doesn’t bundle Chromium in its tarball. It expects to download it during build. Including Chromium sources in the CEF orig tarball would:

    • Create a ~1.5GB source package
    • Duplicate Debian’s existing chromium sources
    • Create maintenance burden tracking two projects

    Debian Chromium doesn’t provide a Source package that we can use as a dependency. To overcome that, we are going to create an experimental Debian package that will get the Debian Chromium Sources and will add it as a dependency in a subfolder. This approach will allow other Debian Developers to weigh in and see that this solution works and when the Debian Chromium Team eventually publishes the sources, we just need to add it as a regular dependency.


    Solution: Build Dependency Model

    The packaging treats Chromium as a build dependency rather than bundled source:

    debian/                     # Version controlled
    ├── rules
    ├── control
    ├── patches/
    │   ├── cef/               # 16 patches
    │   └── chromium/          # 42 patches
    └── ...
    
    cef/                        # CEF upstream sources (~450MB)
    
    ../chromium_143.0.7499.169.orig.tar.xz    # Build dep (~714MB)
    ../rust-toolchain.tar.xz                   # Rust stdlib (~142MB)

    The debian/rules file extracts Chromium sources into chromium_src/ before the build begins. This happens in the clean target to ensure sources exist before any build steps.

    Benefits

    1. Reuse Debian Chromium work: When the chromium team patches a vulnerability, CEF can rebase
    2. Smaller source package: Only CEF-specific sources in the orig tarball
    3. Clear separation: CEF patches vs Chromium patches are distinct

    Future: chromium-source Package

    Bug #893448 proposes a chromium-source binary package that would provide extracted Chromium sources. When resolved, CEF could simply Build-Depends: chromium-source and the manual tarball extraction disappears.

    The Patch Stack

    CEF Patches (16 total)

    Build System Decoupling

    0001-skip-gclient-revert.patch

    CEF’s gclient_hook.py reverts all files to git checkout HEAD state before building. This destroys any Debian patches applied during the build. The patch removes the revert logic.

    0002-skip-chromium-checkout.patch

    CEF expects to run git clone for Chromium. This patch skips the checkout and uses pre-extracted sources.

    0003-use-system-clang.patch

    CEF downloads LLVM toolchains from Google Cloud Storage. This patch configures the build to use Debian’s clang-19 package.

    0004-create-reclient-stub.patch

    Google’s reclient provides distributed compilation. Rather than removing all references, a stub script satisfies the build system without network access.

    0005-add-rust-toolchain-stub.patch

    Similar to reclient—a stub for the Rust toolchain downloader that delegates to system rustc.

    Path Configuration

    0010-use-debian-paths.patch
    0011-resource-paths.patch
    0012-library-output-paths.patch

    CEF assumes resources live alongside binaries. These patches configure FHS-compliant paths:

    • Libraries: /usr/lib/x86_64-linux-gnu/
    • Resources: /usr/share/cef/
    • Locale data: /usr/share/cef/locales/

    Chromium Patches (42 total)

    Network Isolation (12 patches)

    disable-gcs-downloads.patch
    skip-test-fonts-download.patch
    offline-build-config.patch
    ...

    Chromium’s build fetches resources at multiple points. Each download point needs a patch to either:

    • Use pre-packaged alternatives
    • Skip optional components
    • Error clearly rather than hang

    C++23 / libc++ Compatibility (8 patches)

    Debian sid uses libc++-19 with strict C++23 enforcement. The unique_ptr destructor now requires complete types:

    // Old code (worked in C++17/20):
    class RenderFrame;
    std::unique_ptr<RenderFrame> frame_;  // OK: RenderFrame forward-declared
    
    // C++23 libc++:
    // Error: RenderFrame must be complete for ~unique_ptr

    Patches add forward declarations and reorder includes in:

    • v8/src/heap/ – Garbage collector internals
    • media/gpu/ – Video acceleration
    • ui/gfx/ – Graphics primitives
    • components/viz/ – Compositor

    Example fix in v8/src/heap/marking-state.h:

    // Before patch:
    class HeapObject;
    std::unique_ptr<HeapObject> obj_;
    
    // After patch (add include):
    #include "src/objects/heap-object.h"
    std::unique_ptr<HeapObject> obj_;

    Compiler Updates (6 patches)

    GCC 15 and Clang 19 deprecated various constructs:

    fix-aggregate-optional-emplace.patch

    std::optional::emplace with aggregate initialization changed behavior. Affected code in IPC serialization.

    remove-deprecated-warning-flags.patch

    Several -W flags no longer exist in clang-19.

    fix-libclang-paths.patch

    Clang’s internal header paths changed between versions.

    Rust Stable (3 patches)

    Chromium uses Rust nightly features. Patches remove:

    • -Z flags (unstable options)
    • Nightly-only crate features
    • Unstable library functions

    System Libraries (8 patches)

    Patches to prefer system libraries where ABI-compatible:

    • libxcb
    • fontconfig
    • minizip
    • zstd
    • harfbuzz (partial)

    Some libraries cannot use system versions due to ABI differences (V8, Skia, ANGLE).

    Build Configuration

    GN Arguments

    The build uses GN (Generate Ninja) with extensive configuration:

    gn_args = [
        'is_official_build=true',
        'is_debug=false',
        'symbol_level=0',
    
        # Toolchain
        'clang_use_chrome_plugins=false',
        'use_lld=true',
        'use_custom_libcxx=false',  # System libc++
    
        # Disable Google services
        'use_official_google_api_keys=false',
        'enable_nacl=false',
        'enable_widevine=false',
    
        # Hardware acceleration
        'use_vaapi=true',
        'use_v4l2_codec=false',
    
        # System libraries
        'use_system_libffi=true',
        'use_system_zlib=false',  # ABI issues
        ...
    ]

    The use_custom_libcxx Decision

    CEF defaults to bundling its own libc++ (use_custom_libcxx=true). This avoids ABI compatibility issues but:

    • Duplicates system library
    • May conflict with applications using system libc++
    • Increases binary size

    After extensive testing (builds 108-140), use_custom_libcxx=false works with the C++23 compatibility patches. This is the preferred configuration for Debian integration.

    Build Resource Requirements

    ResourceRequirement
    Disk space~40GB during build
    RAM16GB minimum, 32GB+ recommended
    CPU time2-24 hours depending on hardware
    ParallelismScales well to 16+ cores

    Output Structure

    Binary Packages

    libcef138_138.0.7+chromium143.0.7499.169-1_amd64.deb
    ├── /usr/lib/x86_64-linux-gnu/
    │   ├── libcef.so.138
    │   ├── cef/
    │   │   ├── libEGL.so.1          # ANGLE
    │   │   ├── libGLESv2.so.2       # ANGLE
    │   │   └── libvk_swiftshader.so # Software Vulkan
    │   └── ...
    
    libcef-dev_138.0.7+chromium143.0.7499.169-1_amd64.deb
    ├── /usr/include/cef/
    │   ├── include/
    │   │   ├── cef_app.h
    │   │   ├── cef_browser.h
    │   │   └── ...
    │   └── ...
    ├── /usr/lib/x86_64-linux-gnu/
    │   ├── libcef.so -> libcef.so.138
    │   └── cmake/cef/
    │       └── cef-config.cmake
    
    cef-resources_138.0.7+chromium143.0.7499.169-1_all.deb
    ├── /usr/share/cef/
    │   ├── icudtl.dat              # ICU data
    │   ├── v8_context_snapshot.bin # V8 snapshot
    │   ├── chrome_100_percent.pak
    │   ├── chrome_200_percent.pak
    │   └── locales/
    │       ├── en-US.pak
    │       ├── es.pak
    │       └── ...

    ANGLE and SwiftShader

    CEF requires specific GPU abstraction libraries:

    ANGLE: OpenGL ES implementation over Vulkan/DirectX. Not interchangeable with Mesa’s EGL—the API is similar but internals differ. Installed in /usr/lib/x86_64-linux-gnu/cef/ with RPATH configuration.

    SwiftShader: Software Vulkan implementation for systems without GPU acceleration. The ICD JSON must use absolute paths:

    {
        "file_format_version": "1.0.0",
        "ICD": {
            "library_path": "/usr/lib/x86_64-linux-gnu/cef/libvk_swiftshader.so",
            "api_version": "1.1.0"
        }
    }

    Resource Path Discovery

    CEF loads resources early in initialization—before most application callbacks. The library searches relative to libcef.so, not the application binary.

    The Symlink Solution

    # In /usr/lib/x86_64-linux-gnu/:
    icudtl.dat -> ../../share/cef/icudtl.dat
    v8_context_snapshot.bin -> ../../share/cef/v8_context_snapshot.bin

    This allows subprocesses (renderer, GPU, utility) to find resources when spawned with cef_execute_process(), before any application configuration is applied.

    Testing and Validation

    Unit Tests

    CEF includes ceftests but many tests require network access or graphical display. The packaging runs a subset of offline-capable tests.

    Integration Testing

    The definitive test is building a real application. stremio-gtk exercises:

    • Offscreen rendering
    • Multiple process types
    • IPC protocols
    • GPU acceleration
    • Resource loading

    Issues discovered through stremio-gtk that passed unit tests:

    1. Resource symlinks needed in library directory
    2. ANGLE libraries required (not just preferred)
    3. SwiftShader ICD paths must be absolute
    4. Subprocess command-line switch handling

    Maintenance Considerations

    Chromium Updates

    When Debian updates Chromium, CEF should track:

    1. Obtain matching CEF branch for new Chromium version
    2. Rebase debian/patches/chromium/ onto new sources
    3. Test build and resolve new conflicts
    4. Update version numbers throughout

    Security Updates

    CEF inherits Chromium’s attack surface. Security updates to Chromium should flow to CEF promptly. The dual-source architecture helps: updating chromium_*.orig.tar.xz and rebuilding catches most issues.

    Upstream Coordination

    CEF upstream is responsive to packaging concerns. Several patches developed for Debian have been submitted upstream or informed upstream decisions.

    Conclusion

    CEF packaging requires treating a browser engine as a library—with all the complexity that implies. The dual-source architecture, extensive patch stack, and careful path configuration produce packages that integrate with Debian’s ecosystem rather than fighting it.

    The approach documented here should transfer to other distributions with similar policies. The patches are organized by purpose (build system, compatibility, paths) to aid porting.


    Packages available at salsa.debian.org/mendezr/chromium-embedded-framework. ITP #915400.

  • Acceso a Tailscale sin Privilegios Root: Android como Gateway de Red con Termux

    Termux y Taiscale para usar Android como un servidor totalmente funcional

    En el mundo de la seguridad informática y la administración de sistemas, a menudo nos encontramos con máquinas donde no podemos o no queremos instalar software que requiera privilegios de administrador. Ya sea por políticas corporativas, seguridad, o simplemente por mantener un sistema limpio, la necesidad de acceder a redes privadas sin comprometer el sistema host es real.

    Hoy les comparto una solución elegante: usar un dispositivo Android como puente para acceder a toda tu red Tailscale, sin instalar absolutamente nada con privilegios root en tu máquina principal.

    La Arquitectura

    macOS ──► Android ──► Tailscale ──► Servers
      │       (Termux)    Network
      │           │                         ▲
      └─SSH──────►│                         │
                socat tunnels───────────────┘

    Stack de Software

    En Android:

    • Tailscale: Aplicación oficial desde Play Store
    • Termux: Terminal emulator y entorno Linux
    • OpenSSH: Servidor SSH en Termux
    • socat: Herramienta para crear túneles de red

    En macOS/Linux:

    • SSH: Cliente nativo del sistema (¡nada más!)

    Configuración Paso a Paso

    1. Configurar Android como Exit Node

    En la aplicación Tailscale de Android:

    • Ir a Settings → Exit node
    • Activar «Run as exit node»
    • Aprobar el nodo desde la consola admin de Tailscale

    2. Preparar Termux

    Instalar Termux desde F-Droid o Play Store, luego:

    # Actualizar e instalar herramientas necesarias
    pkg update && pkg upgrade
    pkg install openssh socat net-tools
    
    # Iniciar servidor SSH
    sshd
    

    El servidor SSH de Termux escucha en el puerto 8022 por defecto.

    3. Activar Hotspot y Conectar

    1. Activar el hotspot/tethering en Android
    2. Conectar tu máquina al hotspot
    3. Encontrar la IP del gateway (que será Android):
    # En macOS/Linux
    route -n get default | grep gateway
    

    4. Crear Túneles con socat

    Una vez conectado por SSH a Termux:

    # Conectar a Termux desde tu máquina
    ssh -p 8022 u0_aXXX@IP_GATEWAY
    
    # En Termux, crear túnel hacia servidor en Tailscale
    socat TCP-LISTEN:2222,fork,reuseaddr TCP:100.x.x.x:22
    

    Donde 100.x.x.x es la IP de Tailscale del servidor destino.

    5. Conectar al Servidor Final

    Desde tu máquina, ahora puedes conectar al servidor remoto a través del túnel:

    ssh -p 2222 usuario@IP_GATEWAY
    

    Casos de Uso

    Esta configuración es perfecta para:

    • Máquinas corporativas donde no puedes instalar VPNs
    • Sistemas temporales donde no quieres dejar rastro
    • Debugging remoto cuando necesitas acceso rápido
    • Mantener un sistema limpio sin daemons adicionales

    Optimizaciones y Automatización

    Para uso frecuente, puedes:

    • Configurar claves SSH para acceso sin contraseña
    • Usar tmux en Termux para mantener sesiones persistentes
    • Crear scripts que automaticen la detección de IPs y creación de túneles
    • Configurar múltiples túneles para diferentes servidores simultáneamente

    Consideraciones de Seguridad

    • Solo usar en redes donde confíes (tu propio hotspot)
    • Configurar SSH con autenticación por clave, nunca contraseña
    • El tráfico entre Android y los servidores viaja encriptado por Tailscale
    • El hotspot crea una red aislada entre tu dispositivo y Android

    Conclusión

    Esta solución demuestra que con un poco de creatividad, podemos sortear limitaciones técnicas sin comprometer la seguridad. Android se convierte en un poderoso gateway de red, Tailscale provee la conectividad segura, y tu máquina principal permanece limpia y sin modificaciones de sistema.

    ¿El resultado? Acceso completo a tu infraestructura privada usando solo herramientas estándar y un teléfono que probablemente ya llevas contigo.


    ¿Has implementado soluciones similares? ¿Qué otros usos creativos le darías a esta arquitectura? Comparte tus ideas en los comentarios.

  • Expandiendo las Capacidades de Desarrollo: Proton Drive y Debian GNU/Linux

    Expandiendo las Capacidades de Desarrollo: Proton Drive y Debian GNU/Linux

    Capítulo 3: Mi Travesía Personal como Aspirante a Debian Maintainer

    Expandiendo las Capacidades de Desarrollo: Setup Híbrido con Proton Drive y Debian GNU/Linux

    8 de noviembre, 2025

    Las Limitaciones de Espacio con un ordenador portátil de 13 años

    Como desarrollador con más de 20 años de experiencia en Unix/Linux, he enfrentado un desafío constante: las limitaciones de almacenamiento local versus la necesidad de mantener múltiples proyectos activos, especialmente cuando trabajo en empaquetado complejo como Chromium Embedded Framework (CEF) para Debian. Recientemente, desarrollé una solución elegante que combina Proton Drive con automatización Linux para crear un ecosistema de desarrollo verdaderamente híbrido.

    El Problema: Limitaciones de Hardware Legacy

    Mi setup principal incluye un MacBook Pro 11,1 ejecutando Debian, con apenas 100GB de almacenamiento SSD. Con solo 15GB libres después de instalar las herramientas de desarrollo esenciales, cada proyecto de empaquetado se convierte en un juego de tetris de espacio en disco. Los builds de CEF pueden generar varios gigabytes de datos, y mantener múltiples iteraciones para debugging se vuelve imposible.

    Además, trabajo desde múltiples máquinas – la principal en casa y una laptop de viaje – lo que requiere sincronización manual constante de archivos de configuración, documentación técnica y progreso de desarrollo.

    La Solución: Arquitectura Híbrida con Proton Drive

    Componentes del Sistema

    1. Almacenamiento Local (SSD 100GB)

    • Trabajo activo y builds en curso
    • Máxima velocidad para compilación
    • Cache temporal del sistema

    2. Proton Drive (500GB)

    • Storage expandido cifrado end-to-end
    • Backup automático de trabajo
    • Sincronización entre máquinas
    • Archive de builds completados

    3. Storage Externo (SanDisk + CalDigit)

    • Almacenamiento masivo para builds históricos
    • Repositorios de packages grandes
    • Backup de sistemas completos

    Arquitectura de Directorios

    # Estructura local
    ~/development/debian/           # Trabajo activo (local SSD)
    ~/ProtonDrive/                  # Mount automático (Proton Drive)
    ├── cef-builds-archive/         # Builds completados
    ├── documentation-backup/       # Docs técnicas
    ├── config-backup/             # Configuraciones del sistema
    └── temp-builds/               # Storage temporal expandido
    
    # Estructura en Proton Drive
    protondrive:/sync/debian/       # Sync automático trabajo activo
    protondrive:/mount/             # Storage expandido montado
    

    Implementación Técnica

    1. Configuración de RClone

    RClone actúa como el puente entre el sistema local y Proton Drive, proporcionando tanto capacidades de sincronización como montaje de filesystem.

    # Instalación desde repositorios Debian
    sudo apt update
    sudo apt install rclone
    
    # Verificar instalación
    rclone --version
    
    # Configuración
    rclone config
    # Seleccionar: protondrive
    # Introducir credenciales de Proton Mail
    # Configurar 2FA si está habilitado
    

    2. Servicio de Sincronización Automática

    Creé un servicio systemd que sincroniza automáticamente el trabajo activo cada 4 horas:

    # ~/.config/systemd/user/proton-sync.service
    [Unit]
    Description=Sync Debian work to Proton Drive
    
    [Service]
    Type=oneshot
    ExecStart=/usr/bin/rclone sync -L %h/development/debian protondrive:/sync/debian \
        --exclude="*.tmp" \
        --exclude="*.lock" \
        --exclude=".git/**" \
        --exclude="build/**" \
        --exclude="*.log" \
        --ignore-existing \
        --transfers=2 \
        --checkers=1 \
        --timeout=300s \
        --retries=3 \
        -q
    
    # ~/.config/systemd/user/proton-sync.timer
    [Unit]
    Description=Sync Debian work every 4 hours
    
    [Timer]
    OnCalendar=*-*-* 00,04,08,12,16,20:00:00
    Persistent=true
    
    [Install]
    WantedBy=timers.target
    

    Activación:

    systemctl --user daemon-reload
    systemctl --user enable --now proton-sync.timer
    

    3. Mount Automático de Storage Expandido

    Para casos donde necesito acceso directo a storage como si fuera un filesystem local:

    # ~/.config/systemd/user/proton-mount.service
    [Unit]
    Description=Mount Proton Drive storage
    After=network-online.target
    Wants=network-online.target
    
    [Service]
    Type=notify
    Environment=PATH=/usr/bin:/bin
    ExecStartPre=/bin/mkdir -p %h/ProtonDrive
    ExecStartPre=/bin/sh -c 'fusermount -u %h/ProtonDrive || true'
    ExecStart=/usr/bin/rclone mount protondrive:/mount %h/ProtonDrive \
        --vfs-cache-mode full \
        --vfs-cache-max-size 20G \
        --vfs-cache-max-age 24h \
        --buffer-size 32M \
        --dir-cache-time 1h \
        --allow-other
    ExecStop=/bin/fusermount -u %h/ProtonDrive
    Restart=on-failure
    RestartSec=15
    
    [Install]
    WantedBy=default.target
    

    Configuración previa necesaria:

    # Habilitar user_allow_other en fuse
    echo 'user_allow_other' | sudo tee -a /etc/fuse.conf
    
    # Habilitar linger para arranque automático
    sudo loginctl enable-linger $USER
    

    4. Scripts de Workflow

    Script de Pull (inicio de sesión de trabajo):

    #!/bin/bash
    # start-work.sh
    echo "Descargando últimos cambios..."
    rclone sync protondrive:/sync/debian $HOME/development/debian --progress -v
    echo "Listo para trabajar"
    

    Script de Push (fin de sesión de trabajo):

    #!/bin/bash
    # end-work.sh
    echo "Subiendo cambios..."
    rclone sync -L $HOME/development/debian protondrive:/sync/debian \
        --exclude="*.tmp" \
        --exclude="*.lock" \
        --exclude=".git/**" \
        --exclude="build/**" \
        --exclude="*.log" \
        --ignore-existing \
        --transfers=2 \
        --checkers=1 \
        --timeout=300s \
        --retries=3 \
        --stats=30s \
        --progress \
        -v
    echo "Trabajo guardado"
    

    Script de Archive para builds CEF:

    #!/bin/bash
    # archive-cef-build.sh
    BUILD_DATE=$(date +%Y%m%d_%H%M%S)
    echo "Archivando build CEF actual..."
    cp -r ~/development/debian/chromium-embedded-framework/build \
        ~/ProtonDrive/cef-builds-archive/cef-build-$BUILD_DATE
    echo "Build archivado en ~/ProtonDrive/cef-builds-archive/cef-build-$BUILD_DATE"
    

    Ventajas del Sistema

    1. Escalabilidad Transparente

    El laptop con 15GB libres ahora puede manejar proyectos de múltiples gigabytes sin impacto en el rendimiento local. Los builds activos permanecen en SSD para velocidad máxima, mientras el archive automático libera espacio continuamente.

    2. Continuidad Entre Máquinas

    El workflow pull/push permite cambiar entre máquina principal y laptop de viaje sin pérdida de contexto. Cada sesión comienza con start-work.sh y termina con end-work.sh, garantizando sincronización perfecta.

    3. Backup Automático Cifrado

    Con timer cada 4 horas, nunca pierdo más de 4 horas de trabajo. El cifrado end-to-end de Proton significa que incluso datos sensibles de clients están protegidos.

    4. Flexibilidad de Storage

    • Local: Máxima velocidad para trabajo activo
    • Mount: Acceso directo como filesystem para casos especiales
    • Sync: Backup automático sin intervención manual
    • Externo: Capacidad masiva para archive de largo plazo

    Casos de Uso Específicos

    Desarrollo CEF (Chromium Embedded Framework)

    Los builds de CEF generan varios GB de artifacts. La configuración permite:

    • Build activo en SSD local (velocidad)
    • Archive automático de builds completados
    • Sincronización de documentación técnica entre iteraciones
    • Backup de scripts de build y patches personalizados

    Trabajo Remoto y Viajes

    Antes del sistema, trabajar desde la laptop de viaje significaba:

    • Sincronización manual propensa a errores
    • Pérdida de contexto entre máquinas
    • Limitaciones de almacenamiento aún más severas

    Ahora es completamente transparente: start-work.sh en cualquier máquina restaura el contexto exacto de la última sesión.

    Monitoreo y Mantenimiento

    Verificación de Servicios

    # Ver estado de servicios
    systemctl --user status proton-sync.service
    systemctl --user status proton-mount.service
    
    # Ver próximas ejecuciones del timer
    systemctl --user list-timers proton-sync.timer
    
    # Logs detallados
    journalctl --user -u proton-sync.service --since today
    

    Scripts de Diagnóstico

    #!/bin/bash
    # check-proton-setup.sh
    echo "=== Estado del Sistema Proton Drive ==="
    
    # Verificar mount
    if mountpoint -q ~/ProtonDrive; then
        echo "✅ Storage expandido montado correctamente"
        df -h ~/ProtonDrive
    else
        echo "❌ Mount no disponible"
    fi
    
    # Verificar timer de sync
    if systemctl --user is-active proton-sync.timer >/dev/null; then
        echo "✅ Timer de sync activo"
        systemctl --user list-timers proton-sync.timer
    else
        echo "❌ Timer no activo"
    fi
    
    # Verificar conectividad
    if rclone ls protondrive:/sync/ >/dev/null 2>&1; then
        echo "✅ Conectividad con Proton Drive OK"
    else
        echo "❌ Problema de conectividad"
    fi
    

    Consideraciones de Rendimiento

    Red y Latencia

    • Upload: ~30-80 Mbps después de overhead de encriptación
    • Download: Near line speed con cache local activo
    • Latencia: Imperceptible para acceso a archivos cacheados

    Optimizaciones Implementadas

    • VFS cache full: 20GB cache local para acceso rápido
    • Transfers limitados: 2 transferencias concurrentes para estabilidad
    • Exclusiones inteligentes: Archivos temporales y logs excluidos del sync
    • Ignore existing: Evita conflictos en sincronización bidireccional

    Impacto en Productividad

    Métricas de Mejora

    • Storage efectivo: De 15GB a 515GB disponibles
    • Tiempo de setup entre máquinas: De 30+ minutos a <2 minutos
    • Pérdida máxima de trabajo: De días potenciales a máximo 4 horas
    • Flexibilidad de proyecto: Múltiples builds CEF simultáneos posibles

    Casos de Recuperación

    Durante el desarrollo, experimenté una desconexión inesperada que habría resultado en pérdida significativa de trabajo. El sistema automático había sincronizado el progreso 2 horas antes, permitiendo recuperación completa en minutos.

    Lecciones Aprendidas

    1. Automatización vs Control

    El balance entre timer automático (cada 4h) y scripts manuales (pull/push) proporciona tanto protección continua como control granular cuando es necesario.

    2. Exclusiones son Críticas

    La configuración inicial incluía logs de build (35MB cada uno), saturando la red. Las exclusiones inteligentes mejoraron el rendimiento dramáticamente.

    3. Systemd User Services

    Los servicios de usuario proporcionan automatización robusta sin requerir privilegios root, ideal para entornos de desarrollo personal.

    Conclusión

    Esta configuración híbrida resuelve múltiples limitaciones simultáneamente: espacio de almacenamiento, continuidad entre máquinas, backup automático y escalabilidad de proyectos. Para desarrolladores trabajando con proyectos complejos como empaquetado Debian o builds de software extensos, representa una solución elegante que combina lo mejor de storage local rápido con la flexibilidad y seguridad del cloud storage cifrado.

    Ventajas Clave del Sistema

    • Zero downtime por pérdida de trabajo
    • Escalabilidad transparente de almacenamiento
    • Continuidad perfecta entre múltiples máquinas
    • Backup automático cifrado sin intervención manual
    • Flexibilidad de storage adaptada a diferentes necesidades

    Próximos Pasos

    Este setup forma la base para expansiones futuras:

    • Integración con CI/CD para builds automáticos
    • Monitoreo avanzado con métricas de uso
    • Sincronización selectiva por proyectos
    • Archive automático basado en políticas de tiempo

    Para desarrolladores que enfrentan limitaciones similares de hardware legacy pero necesitan mantener productividad en proyectos modernos complejos, esta arquitectura híbrida proporciona una solución práctica y escalable.

    El código completo de configuración y scripts están disponibles en mi repositorio de dotfiles, y continuaré documentando mejoras y optimizaciones a medida que evolucione el sistema.


    Referencias Técnicas

  • From Documentation to Distribution: The Complete Stremio Debian Packaging Journey

    From Documentation to Distribution: The Complete Stremio Debian Packaging Journey

    How a simple documentation contribution evolved into a full-scale packaging solution with automated CI/CD, multi-distribution support, and deep technical problem-solving

    Author: Juan Manuel Méndez Rey
    Date: October 30, 2025
    Reading Time: 25 minutes
    Technical Level: Advanced


    The Beginning: A Documentation Gap

    Several years ago, while working with Stremio on Debian systems, I encountered the familiar frustration of Linux users everywhere: a great application with poor installation documentation. The official Stremio releases worked fine on some distributions, but Debian users were left to figure out dependencies, compilation steps, and integration challenges on their own.

    That’s when I contributed the original DEBIAN.md file to the Stremio shell repository. It was a straightforward build guide—install these dependencies, run these commands, copy these files. Simple, but functional.

    Years passed. Dependencies changed. Qt versions evolved. The simple build instructions became increasingly unreliable on modern Debian systems, and the GitHub issues piled up with frustrated users unable to compile Stremio.


    The Problem Grows

    By 2025, the situation had become untenable:

    • Dependency conflicts: The upstream .deb package required libmpv1, but modern Debian ships libmpv2
    • FHS violations: Upstream installed everything to /opt, violating Debian filesystem standards
    • Missing QML modules: Critical Qt5 components weren’t documented as dependencies
    • Compilation complexity: Users needed to install 15+ build dependencies to compile from source
    • No proper integration: Desktop files, icons, and system integration required manual work
    • The upstream .deb package is outdated, it is providing the 4.4.168 version.
    • The list continues…

    The GitHub issues were a testament to user frustration—dozens of reports about compilation failures, missing dependencies, and broken installations.


    The Debian Way: Proper Packaging

    Rather than continue patching documentation, I remembered a discussion with my friend, Arturo, about properly packaging Stremio for Debian, he created a RFP (Request for Package) for Stremio in 2020. Years passed and I went into my usual day to day work.
    This past month I decided I had to fulfill my old dream of becoming an official Debian contributor, so I decided to solve this properly through the Debian packaging system. In late 2025, I filed an Intent To Package (ITP) with Debian:

    The goal was simple: create properly-packaged Debian packages that would eventually enter the official Debian archive.

    Packaging Challenges

    Stremio presents unique packaging challenges:

    1. License separation: The desktop client is GPL-3.0 (free), but the streaming server is proprietary
    2. Modern dependencies: Requires current Qt5 WebEngine and libmpv versions
    3. Complex build system: Qt5 + Node.js + WebAssembly components
    4. Desktop integration: Proper icon installation, MIME types, and .desktop files
    5. Bundled dependencies: Upstream used git submodules for everything

    Following Debian policy, I separated the components:

    • stremio package (main/free) – GPL desktop client v4.4.169
    • stremio-server package (non-free) – Proprietary streaming server v4.20.12

    Technical Deep Dive: System Library Migration

    The most challenging aspect was replacing ALL bundled git submodules with Debian system libraries. This wasn’t just about dependencies—it required fixing fundamental runtime issues.

    Challenge 1: QtWebEngine Initialization Crash 🔥 CRITICAL

    Problem: Application crashed immediately on startup:

    Segmentation fault (core dumped)

    Root Cause Analysis:

    # GDB backtrace showed:
    #0  QQmlApplicationEngine::QQmlApplicationEngine()
    #1  main (argc=1, argv=0x7fffffffdc58) at main.cpp:120

    QtWebEngine must be initialized before QApplication constructor, but upstream code created QApplication first.

    Solution: Added critical initialization call in main.cpp:

    #include <QtWebEngine/QtWebEngine>
    
    int main(int argc, char *argv[]) {
        // CRITICAL: Initialize QtWebEngine before QApplication
        QtWebEngine::initialize();
    
        QApplication app(argc, argv);
        // ... rest of code
    }

    Impact: Resolved 100% of QML engine crashes. This single line prevents all QtWebEngine initialization failures.

    Patch: 0007-add-qtwebengine-initialize-fix.patch


    Challenge 2: SingleApplication Threading Incompatibility 🔥 CRITICAL

    Problem: System libsingleapplication-dev v3.3.4 caused segmentation faults when used with QQmlApplicationEngine.

    Investigation:

    # Test with system library:
    sudo apt install libsingleapplication-dev
    # Build and run: Segmentation fault
    
    # Test without SingleApplication:
    # Remove from CMakeLists.txt: Works perfectly

    Root Cause: System library sets up threading context incompatible with Qt5 QML engine initialization. The library uses internal threading mechanisms that conflict with QQmlApplicationEngine’s event loop.

    Solution: Custom CompatibleSingleApp implementation. This is also to replace one of the bundled submodules that recently modified its MIT license into a dubious license that could be incompatible for Debian DFSG guidelines. See https://github.com/itay-grudev/SingleApplication/issues/210

    • Pure QApplication subclass
    • IPC via QLocalSocket/QLocalServer
    • No threading conflicts
    • Full single-instance functionality

    Implementation (compatible_singleapp.h):

    #ifndef COMPATIBLE_SINGLEAPP_H
    #define COMPATIBLE_SINGLEAPP_H
    
    #include <QApplication>
    #include <QLocalServer>
    #include <QLocalSocket>
    
    class CompatibleSingleApp : public QApplication {
        Q_OBJECT
    
    public:
        CompatibleSingleApp(int &argc, char **argv, const QString &appId);
        ~CompatibleSingleApp();
    
        bool isPrimary() const { return m_isPrimary; }
        bool sendMessage(const QString &message);
    
    signals:
        void receivedMessage(const QString &message);
    
    private slots:
        void handleNewConnection();
    
    private:
        bool m_isPrimary;
        QLocalServer *m_server;
        QString m_socketName;
    };
    
    #endif

    Implementation (compatible_singleapp.cpp):

    #include "compatible_singleapp.h"
    #include <QLocalSocket>
    #include <QCryptographicHash>
    
    CompatibleSingleApp::CompatibleSingleApp(int &argc, char **argv, const QString &appId)
        : QApplication(argc, argv), m_isPrimary(false), m_server(nullptr) {
    
        // Generate unique socket name
        m_socketName = QString("stremio-") +
            QString::fromUtf8(QCryptographicHash::hash(appId.toUtf8(),
                                                         QCryptographicHash::Sha256).toHex().left(16));
    
        // Try to connect to existing instance
        QLocalSocket socket;
        socket.connectToServer(m_socketName);
    
        if (socket.waitForConnected(500)) {
            // Another instance is running
            m_isPrimary = false;
            socket.disconnectFromServer();
            return;
        }
    
        // We're the primary instance
        m_isPrimary = true;
    
        // Create server for IPC
        m_server = new QLocalServer(this);
        QLocalServer::removeServer(m_socketName);
    
        if (m_server->listen(m_socketName)) {
            connect(m_server, &QLocalServer::newConnection,
                    this, &CompatibleSingleApp::handleNewConnection);
        }
    }
    
    CompatibleSingleApp::~CompatibleSingleApp() {
        if (m_server) {
            m_server->close();
            QLocalServer::removeServer(m_socketName);
        }
    }
    
    bool CompatibleSingleApp::sendMessage(const QString &message) {
        if (m_isPrimary) return false;
    
        QLocalSocket socket;
        socket.connectToServer(m_socketName);
    
        if (!socket.waitForConnected(1000)) return false;
    
        QByteArray data = message.toUtf8();
        socket.write(data);
        socket.waitForBytesWritten();
        socket.disconnectFromServer();
    
        return true;
    }
    
    void CompatibleSingleApp::handleNewConnection() {
        QLocalSocket *socket = m_server->nextPendingConnection();
    
        if (socket) {
            connect(socket, &QLocalSocket::readyRead, this, [this, socket]() {
                QByteArray data = socket->readAll();
                emit receivedMessage(QString::fromUtf8(data));
                socket->deleteLater();
            });
        }
    }

    Results:

    • ✅ Zero threading conflicts
    • ✅ Full single-instance behavior
    • ✅ Message passing between instances
    • ✅ Clean integration with QQmlApplicationEngine

    Patches:

    • 0008-add-compatible-singleapp-implementation.patch
    • 0009-remove-system-singleapplication-add-compatible.patch

    Challenge 3: QProcess Environment Variables for Node.js Server 🔥 CRITICAL

    Problem: Streaming server failed to start with cryptic error:

    server-crash 0 null
    TypeError [ERR_INVALID_ARG_TYPE]: The "path" argument must be of type string. Received undefined
        at Object.join (node:path:1292:7)

    Investigation:

    # Manual server test works:
    $ /usr/bin/node /usr/share/stremio/server.js
    EngineFS server started at http://127.0.0.1:11470
    
    # But QProcess launch fails:
    timeout 15s stremio
    # Error: server-crash 0 null

    Root Cause: QProcess does not inherit environment variables by default. Node.js server.js requires:

    • HOME – for configuration directory (~/.stremio-server)
    • USER – for process identification
    • PWD – for relative path resolution

    Solution: Explicit environment setup in stremioprocess.cpp:

    void Process::start(QStringList args) {
        // Set up environment variables for Node.js server
        QProcessEnvironment env = QProcessEnvironment::systemEnvironment();
    
        // Ensure essential environment variables are set for server.js
        if (!env.contains("HOME")) {
            env.insert("HOME", QStandardPaths::writableLocation(QStandardPaths::HomeLocation));
        }
        if (!env.contains("USER")) {
            env.insert("USER", qgetenv("USER"));
        }
        if (!env.contains("PWD")) {
            env.insert("PWD", QDir::currentPath());
        }
    
        this->setProcessEnvironment(env);
    
        // Now start the process
        QProcess::start(this->program(), args);
    }

    Verification:

    # After fix:
    $ timeout 15s build/stremio 2>&1 | grep -A 5 "hls executables"
    hls executables located -> { ffmpeg: '/usr/bin/ffmpeg', ffsplit: null }
    Using app path -> /home/user/.stremio-server
    Enabling casting...
    Discovery of new external device "mpv" - MPV
    EngineFS server started at http://127.0.0.1:11470

    Impact: Complete resolution of streaming functionality. Users can now stream media via BitTorrent, use casting, and access all server features.

    Patch: 0011-fix-qprocess-environment-for-server-launch.patch


    Challenge 4: System Tray Widget Creation Timing

    Problem: Warning on startup:

    QWidget: Cannot create a QWidget without QApplication

    Root Cause: SystemTray widget created before QML engine fully initialized.

    Solution: Delayed creation until after engine->load() completes:

    // main.cpp
    QQmlApplicationEngine *engine = new QQmlApplicationEngine();
    engine->load(QUrl("qrc:/main.qml"));
    
    // NOW create system tray (after QML loaded)
    SystemTray *tray = new SystemTray(&app);

    Result: Clean startup without widget warnings.


    Build System Architecture: Dual Build Support

    The project maintains two parallel build systems for flexibility:

    CMake System (Primary)

    Used by release.makefile and package builds:

    # CMakeLists.txt
    cmake_minimum_required(VERSION 3.16)
    project(stremio)
    
    set(CMAKE_CXX_STANDARD 14)
    set(CMAKE_AUTOMOC ON)
    set(CMAKE_AUTORCC ON)
    
    find_package(Qt5 REQUIRED COMPONENTS Core Gui Widgets Qml Quick WebEngine DBus)
    find_package(PkgConfig REQUIRED)
    pkg_check_modules(MPV REQUIRED mpv)
    pkg_check_modules(OPENSSL REQUIRED openssl)
    
    # Sources including CompatibleSingleApp
    set(SOURCES
        main.cpp
        compatible_singleapp.cpp
        stremioprocess.cpp
        # ... other sources
    )
    
    # Headers for MOC
    set(HEADERS
        mainapplication.h
        compatible_singleapp.h
        stremioprocess.h
        # ... other headers
    )
    
    add_executable(stremio ${SOURCES} ${HEADERS} resources.qrc)
    
    target_link_libraries(stremio
        Qt5::Core Qt5::Gui Qt5::Widgets Qt5::Qml Qt5::Quick Qt5::WebEngine Qt5::DBus
        ${MPV_LIBRARIES}
        ${OPENSSL_LIBRARIES}
    )
    
    install(TARGETS stremio DESTINATION bin)

    Build command:

    QT_DEFAULT_MAJOR_VERSION=5 make -f release.makefile
    # Result: 293KB optimized binary

    qmake System (Legacy)

    Used for manual builds and development:

    # stremio.pro
    QT += core gui widgets qml quick webengine dbus
    CONFIG += c++14
    
    SOURCES += \
        main.cpp \
        compatible_singleapp.cpp \
        stremioprocess.cpp \
        # ... other sources
    
    HEADERS += \
        mainapplication.h \
        compatible_singleapp.h \
        stremioprocess.h \
        # ... other headers
    
    RESOURCES += resources.qrc
    
    # System libraries
    unix:!macx {
        CONFIG += link_pkgconfig
        PKGCONFIG += mpv openssl
    }
    
    target.path = /usr/bin
    INSTALLS += target

    Build command:

    QT_SELECT=5 qmake
    QT_SELECT=5 make
    # Result: 278KB optimized binary

    Both systems produce working binaries with 100% system libraries.


    Debian Packaging: The Proper Way

    Package Structure

    stremio (4.4.169+dfsg-1):

    debian/
    ├── changelog                    # Version history with ITP closure
    ├── control                      # Dependencies and package metadata
    ├── copyright                    # GPL-3.0+ licensing details
    ├── rules                        # Build instructions (dh-based)
    ├── patches/                     # Quilt patches for system integration
    │   ├── 0001-Fix-server.js-path-for-FHS-compliance.patch
    │   ├── 0002-disable-server-download.patch
    │   ├── 0004-minimal-qthelper-integration.patch
    │   ├── 0005-cmake-system-libraries-v4.4.169.patch
    │   ├── 0007-add-qtwebengine-initialize-fix.patch
    │   ├── 0008-add-compatible-singleapp-implementation.patch
    │   ├── 0009-remove-system-singleapplication-add-compatible.patch
    │   ├── 0010-fix-qmake-install-paths.patch
    │   └── 0011-fix-qprocess-environment-for-server-launch.patch
    ├── stremio.desktop              # Desktop integration
    ├── stremio.install              # File installation rules
    ├── watch                        # Upstream version monitoring
    └── source/
        └── format                   # 3.0 (quilt) format

    Key debian/control sections:

    Source: stremio
    Section: video
    Priority: optional
    Maintainer: Juan Manuel Méndez Rey <vejeta@gmail.com>
    Build-Depends:
        debhelper-compat (= 13),
        cmake,
        qtbase5-dev,
        qt5-qmake,
        qt5-qmake-bin,
        qtdeclarative5-dev,
        qtwebengine5-dev,
        qttools5-dev,
        qml-module-qtwebchannel,
        qml-module-qt-labs-platform,
        qml-module-qtwebengine,
        qml-module-qtquick-dialogs,
        qml-module-qtquick-controls,
        qml-module-qt-labs-settings,
        qml-module-qt-labs-folderlistmodel,
        libmpv-dev,
        libssl-dev,
        nodejs,
        npm,
        pkg-kde-tools
    Standards-Version: 4.6.2
    Homepage: https://www.stremio.com/
    Vcs-Git: https://salsa.debian.org/mendezr/stremio.git
    Vcs-Browser: https://salsa.debian.org/mendezr/stremio
    
    Package: stremio
    Architecture: amd64
    Depends: ${shlibs:Depends}, ${misc:Depends},
             nodejs,
             mpv,
             librsvg2-2,
             qml-module-qtwebengine,
             qml-module-qtwebchannel,
             qml-module-qt-labs-platform,
             qml-module-qtquick-controls,
             qml-module-qtquick-dialogs,
             qml-module-qt-labs-settings,
             qml-module-qt-labs-folderlistmodel,
             qtbase5-dev-tools
    Description: Modern media center for streaming video content
     Stremio is a video streaming application that aggregates content from
     various sources. It features a modern Qt5/QML interface with support
     for add-ons, local playback via MPV, and integration with streaming
     services.
     .
     This package provides the desktop client with GPL-licensed components.

    Build process:

    # Development build
    QT_DEFAULT_MAJOR_VERSION=5 dpkg-buildpackage -us -uc
    
    # Package build with signature
    QT_DEFAULT_MAJOR_VERSION=5 dpkg-buildpackage -sa
    
    # Clean environment build
    sudo pbuilder build ../stremio_4.4.169+dfsg-1.dsc

    stremio-server Package (Independent Versioning)

    Critical Decision: Server uses independent version number tracking its upstream:

    Source: stremio-server
    Section: non-free/video
    Version: 4.20.12-1
    
    Package: stremio-server
    Architecture: all
    Depends: ${misc:Depends}, nodejs (>= 12)
    Description: BitTorrent streaming server for Stremio (proprietary)
     Proprietary streaming server component providing BitTorrent support,
     HLS transcoding, and casting functionality for Stremio.
     .
     Version 4.20.12 corresponds to upstream server.js release.

    Why independent versioning?

    • Server has different release cycle than client
    • Upstream server.js updates independently (v4.20.x)
    • Client updates independently (v4.4.x)
    • Follows industry practice: VS Code, Docker Desktop, Firefox ESR

    debian/copyright documents source:

    Format: https://www.debian.org/doc/packaging-manuals/copyright-format/1.0/
    Upstream-Name: stremio-server
    Source: https://dl.strem.io/server/v4.20.12/desktop/server.js
    Comment: Pre-downloaded server.js included in source package to comply
     with Debian Policy prohibiting network access during builds.

    Beyond Debian: The Wolfi Contribution

    While working on Debian packaging, I also contributed Stremio packages to Wolfi Linux, the security-focused distribution used by Chainguard. This involved:

    • Melange build files: Cloud-native package format
    • Security hardening: ASLR, stack protection, RELRO
    • OSI license compliance: GPL components only (no proprietary server, the same server.js we separated in a non-free package for Debian)
    • Reproducible builds: Hermetic build environment

    Melange configuration example:

    package:
      name: stremio
      version: 4.4.169
      epoch: 0
      description: Modern media center for video streaming
      license: GPL-3.0-or-later
    
    environment:
      contents:
        packages:
          - qt5-qtbase-dev
          - qt5-qtdeclarative-dev
          - qt5-qtwebengine-dev
          - mpv-dev
          - openssl-dev
    
    pipeline:
      - uses: cmake/configure
      - uses: cmake/build
      - uses: cmake/install
    
    subpackages:
      - name: stremio-doc
        description: Documentation for stremio

    I used this parallel effort as an exercise to learn how different distributions do proper packaging across different distribution ecosystems.

    Pull Request:
    https://github.com/wolfi-dev/os/pull/69098
    GitHub Gists with examples of usage:
    https://gist.github.com/vejeta/859f100ef74b87eadf7f7541ead2a2b1


    The Distribution Challenge: GitHub-Powered APT Repository

    Official Debian inclusion takes time—months or years of review, testing, and refinement. Meanwhile, users needed a solution now. Traditional approaches like hosting packages on a personal server would create bandwidth and maintenance problems.

    The solution: Modern APT repository hosting using GitHub infrastructure.

    Architecture Overview

    ┌─────────────────────────────────────────────────────────┐
    │              Canonical Sources (Salsa)                  │
    │  https://salsa.debian.org/mendezr/stremio               │
    │  https://salsa.debian.org/mendezr/stremio-server        │
    └────────────────────┬────────────────────────────────────┘
                         │
                         │ Instant Webhook + Weekly Cron
                         ▼
    ┌─────────────────────────────────────────────────────────┐
    │          GitHub Repository (Build System)               │
    │      https://github.com/vejeta/stremio-debian           │
    │                                                          │
    │  • stremio-client/ (git submodule → Salsa)             │
    │  • stremio-server/ (git submodule → Salsa)             │
    │  • .github/workflows/                                   │
    │      - build-and-release.yml                            │
    │      - deploy-repository.yml                            │
    │      - sync-from-salsa.yml                              │
    │  • repository-scripts/                                  │
    │      - generate-apt-repo.sh                             │
    │      - sign-repository.sh                               │
    └────────────────────┬────────────────────────────────────┘
                         │
           ┌─────────────┴─────────────┐
           │                           │
           ▼                           ▼
    ┌──────────────┐          ┌────────────────┐
    │GitHub Releases│         │ GitHub Pages   │
    │              │          │                │
    │ Binary .debs │          │ APT Repository │
    │ Source files │          │ Signed metadata│
    │ Build logs   │          │ Global CDN     │
    └──────────────┘          └────────────────┘
                                       │
                                       ▼
                              ┌────────────────┐
                              │ Custom Domain  │
                              │ debian.vejeta  │
                              │     .com       │
                              └────────────────┘

    Multi-Distribution Strategy: Matrix Builds

    The Critical Discovery: Packages built on one Debian release don’t work on others due to ABI dependencies.

    Problem Example:

    # Package built on Debian Bookworm:
    $ dpkg -I stremio_4.4.169+dfsg-1_amd64.deb | grep Depends
    Depends: qtdeclarative-abi-5-15-8
    
    # But Debian Sid/Kali have:
    $ apt-cache show qtdeclarative5-dev | grep Provides
    Provides: qtdeclarative-abi-5-15-15
    
    # Result: Installation fails on Sid/Kali

    Solution: Build packages in native containers for each distribution:

    # .github/workflows/build-and-release.yml
    jobs:
      build-stremio-client:
        name: Build stremio (main/free) - ${{ matrix.distro }}
        runs-on: ubuntu-latest
        strategy:
          matrix:
            distro: [trixie, bookworm, sid, noble]
            include:
              - distro: trixie
                suite: stable
                os_type: debian
              - distro: bookworm
                suite: oldstable
                os_type: debian
              - distro: sid
                suite: unstable
                os_type: debian
              - distro: noble
                suite: lts
                os_type: ubuntu
        container:
          image: ${{ matrix.os_type }}:${{ matrix.distro }}
          options: --privileged
    
        steps:
          - name: Install build dependencies
            run: |
              apt-get update
              apt-get install -y \
                git git-buildpackage pristine-tar \
                debhelper-compat cmake \
                qtbase5-dev qt5-qmake qt5-qmake-bin \
                qtdeclarative5-dev qtwebengine5-dev qttools5-dev \
                qml-module-qtwebchannel qml-module-qt-labs-platform \
                qml-module-qtwebengine qml-module-qtquick-dialogs \
                qml-module-qtquick-controls qml-module-qt-labs-settings \
                qml-module-qt-labs-folderlistmodel \
                libmpv-dev libssl-dev nodejs npm pkg-kde-tools \
                devscripts lintian dpkg-dev fakeroot librsvg2-bin
    
          - name: Checkout repository with submodules
            uses: actions/checkout@v4
            with:
              fetch-depth: 0
              submodules: recursive
    
          - name: Configure git for gbp
            run: |
              git config --global user.email "vejeta@gmail.com"
              git config --global user.name "Juan Manuel Méndez Rey"
              git config --global --add safe.directory '*'
    
          - name: Create upstream tarball
            working-directory: stremio-client
            run: |
              VERSION=$(dpkg-parsechangelog -S Version | cut -d- -f1)
    
              # Try pristine-tar first
              if git rev-parse --verify pristine-tar >/dev/null 2>&1; then
                pristine-tar checkout ../stremio_${VERSION}.orig.tar.xz 2>/dev/null || \
                pristine-tar checkout ../stremio_${VERSION}.orig.tar.gz 2>/dev/null
              fi
    
              # Fallback to upstream tag
              if [ ! -f ../stremio_${VERSION}.orig.tar.* ]; then
                UPSTREAM_TAG=$(git tag -l "upstream/*" | grep -E "${VERSION%+*}" | tail -1)
                git archive --format=tar --prefix=stremio-${VERSION%+*}/ $UPSTREAM_TAG | \
                  xz > ../stremio_${VERSION}.orig.tar.xz
              fi
    
          - name: Build packages (source + binary)
            working-directory: stremio-client
            run: |
              QT_DEFAULT_MAJOR_VERSION=5 dpkg-buildpackage -us -uc -sa
    
          - name: Run lintian checks
            continue-on-error: true
            run: |
              lintian --info --display-info --pedantic stremio-client/../*.deb || true
    
          - name: Smoke test package (Ubuntu only)
            if: matrix.os_type == 'ubuntu'
            continue-on-error: true
            run: |
              echo "=== Ubuntu Package Smoke Test ==="
              apt install -y ./stremio-client/../*.deb || true
              which stremio && echo "✓ Binary found" || echo "✗ Binary not found"
              ldd /usr/bin/stremio | grep -E "(libQt5|libmpv|libcrypto)" || true
              export QT_QPA_PLATFORM=offscreen
              export QTWEBENGINE_DISABLE_SANDBOX=1
              timeout 10s stremio 2>&1 || echo "✓ GUI test completed"
    
          - name: Collect build artifacts
            run: |
              mkdir -p artifacts/stremio-client-${{ matrix.distro }}
    
              # Rename .deb with distro suffix
              for deb in stremio-client/../*.deb; do
                if [ -f "$deb" ]; then
                  filename=$(basename "$deb")
                  newname="${filename%.deb}-${{ matrix.distro }}.deb"
                  mv "$deb" "artifacts/stremio-client-${{ matrix.distro }}/$newname"
                fi
              done
    
              # Move other files
              mv stremio-client/../*.dsc artifacts/stremio-client-${{ matrix.distro }}/ 2>/dev/null || true
              mv stremio-client/../*.tar.* artifacts/stremio-client-${{ matrix.distro }}/ 2>/dev/null || true
              mv stremio-client/../*.buildinfo artifacts/stremio-client-${{ matrix.distro }}/ 2>/dev/null || true
              mv stremio-client/../*.changes artifacts/stremio-client-${{ matrix.distro }}/ 2>/dev/null || true
    
          - name: Upload build artifacts
            uses: actions/upload-artifact@v4
            with:
              name: stremio-client-packages-${{ matrix.distro }}
              path: artifacts/stremio-client-${{ matrix.distro }}/*.deb
              retention-days: 30

    Result: Each distribution gets packages with correct native dependencies:

    • debian:trixieqtdeclarative-abi-5-15-15
    • debian:bookwormqtdeclarable-abi-5-15-8
    • debian:sidqtdeclarable-abi-5-15-17
    • ubuntu:noble → Ubuntu-specific Qt5 dependencies

    APT Repository Generation

    Script: repository-scripts/generate-apt-repo.sh

    #!/bin/bash
    set -e
    
    PACKAGE_DIR="$1"    # packages/trixie/main
    REPO_DIR="$2"       # debian-repo
    SUITE="$3"          # trixie
    COMPONENT="$4"      # main
    
    echo "Generating APT repository for $SUITE/$COMPONENT"
    
    # Create directory structure
    mkdir -p "$REPO_DIR/dists/$SUITE/$COMPONENT/binary-amd64"
    mkdir -p "$REPO_DIR/pool/$SUITE/$COMPONENT"
    
    # Copy packages to pool
    if [ -d "$PACKAGE_DIR" ] && [ "$(ls -A $PACKAGE_DIR/*.deb 2>/dev/null)" ]; then
        cp "$PACKAGE_DIR"/*.deb "$REPO_DIR/pool/$SUITE/$COMPONENT/"
    fi
    
    # Generate Packages file
    cd "$REPO_DIR"
    dpkg-scanpackages --arch amd64 "pool/$SUITE/$COMPONENT" /dev/null > \
        "dists/$SUITE/$COMPONENT/binary-amd64/Packages"
    
    # Compress Packages file
    gzip -9 -k "dists/$SUITE/$COMPONENT/binary-amd64/Packages"
    
    echo "✓ Repository generated for $SUITE/$COMPONENT"

    APT Repository Structure:

    debian-repo/
    ├── dists/
    │   ├── trixie/
    │   │   ├── main/
    │   │   │   └── binary-amd64/
    │   │   │       ├── Packages
    │   │   │       └── Packages.gz
    │   │   ├── non-free/
    │   │   │   └── binary-amd64/
    │   │   │       ├── Packages
    │   │   │       └── Packages.gz
    │   │   ├── Release
    │   │   └── InRelease (GPG signed)
    │   ├── bookworm/
    │   │   └── [same structure]
    │   ├── sid/
    │   │   └── [same structure]
    │   └── noble/
    │       └── [same structure]
    ├── pool/
    │   ├── trixie/
    │   │   ├── main/
    │   │   │   └── stremio_4.4.169+dfsg-1_amd64.deb
    │   │   └── non-free/
    │   │       └── stremio-server_4.20.12-1_all.deb
    │   ├── bookworm/
    │   │   └── [same structure]
    │   ├── sid/
    │   │   └── [same structure]
    │   └── noble/
    │       └── [same structure]
    └── key.gpg

    Release File Generation with Checksums

    Workflow excerpt (.github/workflows/deploy-repository.yml):

    - name: Update Release files for all distributions
      run: |
        cd debian-repo
    
        update_release() {
          local SUITE=$1
    
          cat > dists/$SUITE/Release << EOF
        Origin: Stremio Debian Repository
        Label: Stremio
        Suite: $SUITE
        Codename: $SUITE
        Components: main non-free
        Architectures: amd64
        Description: Unofficial Debian packages for Stremio media center ($SUITE)
        Date: $(date -R -u)
        EOF
    
          # Add MD5Sum checksums
          echo "MD5Sum:" >> dists/$SUITE/Release
          find dists/$SUITE -type f ! -name "Release*" | while read file; do
              relative_path="${file#dists/$SUITE/}"
              md5=$(md5sum "$file" | awk '{print $1}')
              size=$(stat -c%s "$file")
              printf " %s %8d %s\n" "$md5" "$size" "$relative_path" >> dists/$SUITE/Release
          done
    
          # Add SHA1 checksums
          echo "SHA1:" >> dists/$SUITE/Release
          find dists/$SUITE -type f ! -name "Release*" | while read file; do
              relative_path="${file#dists/$SUITE/}"
              sha1=$(sha1sum "$file" | awk '{print $1}')
              size=$(stat -c%s "$file")
              printf " %s %8d %s\n" "$sha1" "$size" "$relative_path" >> dists/$SUITE/Release
          done
    
          # Add SHA256 checksums
          echo "SHA256:" >> dists/$SUITE/Release
          find dists/$SUITE -type f ! -name "Release*" | while read file; do
              relative_path="${file#dists/$SUITE/}"
              sha256=$(sha256sum "$file" | awk '{print $1}')
              size=$(stat -c%s "$file")
              printf " %s %8d %s\n" "$sha256" "$size" "$relative_path" >> dists/$SUITE/Release
          done
        }
    
        # Generate for all distributions
        update_release trixie
        update_release bookworm
        update_release sid
        update_release noble

    GPG Signing

    Script: repository-scripts/sign-repository.sh

    #!/bin/bash
    set -e
    
    REPO_DIR="$1"
    SUITE="$2"
    GPG_KEY_ID="$3"
    
    cd "$REPO_DIR/dists/$SUITE"
    
    # Clear sign Release file to create InRelease
    gpg --default-key "$GPG_KEY_ID" --clearsign --output InRelease Release
    
    # Detached signature for Release.gpg
    gpg --default-key "$GPG_KEY_ID" --armor --detach-sign --output Release.gpg Release
    
    echo "✓ Signed repository for $SUITE"

    GitHub Pages Deployment

    Workflow (simplified):

    - name: Setup Pages
      uses: actions/configure-pages@v4
    
    - name: Upload artifact
      uses: actions/upload-pages-artifact@v3
      with:
        path: debian-repo
    
    - name: Deploy to GitHub Pages
      uses: actions/deploy-pages@v4

    Result: APT repository served at https://debian.vejeta.com/ with:

    • ✅ Global CDN (CloudFlare)
    • ✅ HTTPS encryption
    • ✅ Unlimited bandwidth
    • ✅ Zero hosting costs
    • ✅ 99.9%+ uptime

    Critical Lessons Learned: Patch Development Best Practices

    During this project, I made significant efficiency mistakes in patch development. Here’s what I learned:

    The Inefficiency Problem

    What I did (5+ iterations of patch rework):

    1. Modified source files directly in working repository
    2. Generated patches from modified state
    3. Patches failed on clean upstream
    4. Repeated entire process multiple times

    Impact: ~70% wasted time in patch development

    The Correct Approach

    Efficient patch development workflow:

    # Step 1: Clean upstream baseline
    git clone --branch v4.4.169 https://github.com/Stremio/stremio-shell.git /tmp/patch-test
    cd /tmp/patch-test
    
    # Step 2: Analyze dependencies BEFORE making changes
    echo "=== Mapping file dependencies ==="
    grep -r "#include" *.cpp *.h | grep -v "Qt\|std"
    grep -r "class.*:" *.h
    grep -r "Q_OBJECT" *.h
    
    # Step 3: Make ONE fix at a time
    vim main.cpp  # Add QtWebEngine::initialize()
    git diff > /tmp/0007-qtwebengine-fix.patch
    
    # Step 4: Test patch application
    git checkout .
    patch -p1 < /tmp/0007-qtwebengine-fix.patch
    mkdir build && cd build && cmake .. && make
    
    # Step 5: If successful, continue to next fix
    # If failed, refine current patch before moving on

    Pre-Patch Analysis Template

    Before creating patches, ALWAYS complete this analysis:

    ## Files to Modify
    - [ ] main.cpp - QtWebEngine initialization
    - [ ] mainapplication.h - class definitions
    - [ ] CMakeLists.txt - build system
    - [ ] compatible_singleapp.h/cpp - new custom implementation
    
    ## Dependency Chain
    1. main.cpp includes → mainapplication.h
    2. mainapplication.h includes → singleapplication.h (to be replaced)
    3. CMakeLists.txt references → SingleApplication (to be removed)
    4. Qt MOC processes → Q_OBJECT classes (check for conflicts)
    
    ## Build Test Plan
    1. [ ] Clean cmake build
    2. [ ] Dependency verification (ldd)
    3. [ ] Runtime functionality test
    4. [ ] Package build test (dpkg-buildpackage)

    Validation Before «Ready» Declaration

    NEVER declare patches ready without:

    # MANDATORY validation workflow
    mkdir /tmp/patch-validation
    cd /tmp/patch-validation
    git clone --branch v4.4.169 <upstream-url> .
    
    # Apply ALL patches
    export QUILT_PATCHES=debian/patches
    quilt push -a || { echo "FAIL: Patch application"; exit 1; }
    
    # Complete build test
    mkdir build && cd build
    cmake .. && make || { echo "FAIL: Build"; exit 1; }
    
    # Package build test
    cd .. && dpkg-buildpackage -us -uc || { echo "FAIL: Package"; exit 1; }
    
    # Dependency check
    ldd build/stremio | grep -E "(libQt5|libmpv|libcrypto)"
    
    # ONLY NOW declare "patches ready"
    echo "✅ Validated and ready for production"

    This workflow prevents the «ready → fails → rework» cycle that wastes development time.


    Production Validation: Comprehensive Testing

    Isolated Environment Validation

    Test setup:

    # Create pristine environment
    mkdir /tmp/stremio-patch-validation
    cd /tmp/stremio-patch-validation
    git clone --branch v4.4.169 https://github.com/Stremio/stremio-shell.git .
    cp -r /path/to/debian .
    
    # Apply all patches
    export QUILT_PATCHES=debian/patches
    quilt push -a
    # Result: All 6 patches applied successfully
    
    # Test CMake build
    mkdir build && cd build
    cmake .. -DQT_DEFAULT_MAJOR_VERSION=5
    make -j$(nproc)
    # Result: 293KB binary with 100% system libraries
    
    # Test release.makefile
    cd .. && QT_DEFAULT_MAJOR_VERSION=5 make -f release.makefile
    # Result: Complete success including icon generation
    
    # Verify dependencies
    ldd build/stremio | head -5
    # Output:
    #   libQt5WebEngine.so.5 => /lib/x86_64-linux-gnu/libQt5WebEngine.so.5
    #   libQt5DBus.so.5 => /lib/x86_64-linux-gnu/libQt5DBus.so.5
    #   libcrypto.so.3 => /lib/x86_64-linux-gnu/libcrypto.so.3
    #   libmpv.so.2 => /lib/x86_64-linux-gnu/libmpv.so.2

    Verification results:

    • ✅ Binary builds successfully (293KB)
    • ✅ GUI loads and displays
    • ✅ Single-instance behavior works
    • ✅ Streaming server starts (port 11470 responds)
    • ✅ System library integration complete
    • ✅ No crashes or threading issues

    Runtime Validation

    Complete functionality test:

    # Launch application
    ./build/stremio 2>&1 | tee /tmp/stremio-runtime.log
    
    # Verify server startup (first 15 seconds)
    timeout 15s ./build/stremio 2>&1 | grep -E "(server|streaming|port)"
    # Output:
    #   hls executables located -> { ffmpeg: '/usr/bin/ffmpeg', ffsplit: null }
    #   Using app path -> /home/user/.stremio-server
    #   Enabling casting...
    #   EngineFS server started at http://127.0.0.1:11470
    
    # Test server endpoint
    curl -s http://127.0.0.1:11470 && echo "✓ Server responding"
    
    # Test single-instance behavior
    ./build/stremio &
    PID1=$!
    sleep 2
    ./build/stremio   # Should detect first instance and exit
    wait $PID1

    User Experience: Installation Simplified

    I wanted other Debian users to have the chance to install these packages built with the highest standards as soon as possible while the package is still being reviewed by Debian Developers. My solution was to create a repository and through GitHub Actions, pull the sources of the packages from salsa.debian.org, build them automatically, make a release and provide a Debian repository built with GitHub Pages, so Debian users will have 99% of availability to fetch them.

    The end result is a one-command installation for users:

    For Debian Trixie (13 – current stable)

    wget -qO - https://debian.vejeta.com/key.gpg | sudo gpg --dearmor -o /usr/share/keyrings/stremio-debian.gpg
    echo "deb [signed-by=/usr/share/keyrings/stremio-debian.gpg] https://debian.vejeta.com trixie main non-free" | sudo tee /etc/apt/sources.list.d/stremio.list
    sudo apt update
    sudo apt install stremio stremio-server

    For Debian Sid / Kali Linux

    wget -qO - https://debian.vejeta.com/key.gpg | sudo gpg --dearmor -o /usr/share/keyrings/stremio-debian.gpg
    echo "deb [signed-by=/usr/share/keyrings/stremio-debian.gpg] https://debian.vejeta.com sid main non-free" | sudo tee /etc/apt/sources.list.d/stremio.list
    sudo apt update
    sudo apt install stremio stremio-server

    For Ubuntu 24.04 LTS (Noble) – EXPERIMENTAL

    wget -qO - https://debian.vejeta.com/key.gpg | sudo gpg --dearmor -o /usr/share/keyrings/stremio-debian.gpg
    echo "deb [signed-by=/usr/share/keyrings/stremio-debian.gpg] https://debian.vejeta.com noble main non-free" | sudo tee /etc/apt/sources.list.d/stremio.list
    sudo apt update
    sudo apt install stremio stremio-server

    Note: Ubuntu support is experimental with automated builds but limited manual testing. Community feedback welcome.


    Closing the Loop: Updating Documentation

    With a working solution deployed, I returned to where it all started—the documentation. I submitted a comprehensive pull request to update the original DEBIAN.md file I had contributed years earlier.

    The PR adds:

    • ✅ APT repository installation (new recommended method)
    • ✅ Complete dependency lists
    • ✅ Modern security practices (proper GPG key management)
    • ✅ Multi-distribution support (Debian + derivatives)
    • ✅ Maintained build instructions (preserved for developers)

    Community Impact

    Within hours of submitting the PR, I commented on 10+ existing GitHub issues where users had reported installation problems. The response was immediate and positive—users could finally install Stremio without compilation headaches.


    Technical Achievements Summary

    Packaging Excellence

    • Zero bundled dependencies: 100% Debian system libraries
    • FHS compliance: Proper /usr installation paths
    • License separation: GPL client (main) + proprietary server (non-free)
    • Policy compliance: Lintian-clean packaging
    • Independent versioning: Client v4.4.169 + Server v4.20.12

    Technical Solutions

    • QtWebEngine initialization fix: Single line prevents all QML crashes
    • CompatibleSingleApp: Custom thread-safe single-instance implementation
    • QProcess environment: Proper Node.js environment setup for streaming server
    • Dual build systems: CMake (293KB) and qmake (278KB) both working
    • System library integration: MPV, Qt5, OpenSSL, all QML modules

    Infrastructure

    • Multi-distribution builds: Trixie, Bookworm, Sid, Noble (experimental)
    • Automated CI/CD: GitHub Actions with matrix strategy
    • APT repository: GitHub Pages with global CDN
    • GPG signing: Cryptographically signed packages and metadata
    • Zero hosting costs: Unlimited bandwidth via GitHub
    • Download statistics: Built-in analytics via GitHub Releases

    Build Statistics

    • Binary size: 293KB optimized (vs 424KB debug)
    • Build time: ~10 minutes per distribution
    • Total distributions: 4 (3 Debian + 1 Ubuntu experimental)
    • Packages per release: 8 .deb files (4 distros × 2 packages)
    • Repository size: ~21 MB per release

    Looking Forward

    Immediate Goals

    Debian Submission Progress (ITP #943703):

    • [x] Source packages created following Debian Policy
    • [x] Lintian-clean packaging
    • [x] 100% system libraries
    • [x] FHS compliance
    • [x] Copyright file with complete licensing
    • [x] Watch files for upstream monitoring
    • [x] git-buildpackage workflow
    • [x] Packages hosted on Salsa
    • [x] ITP bug filed
    • [x] Preliminary Debian Developer review
    • [ ] Sponsorship obtained
    • [ ] Upload to Debian NEW queue

    Timeline: Submission planned for Q1 2025

    Professional Applications

    This work directly supports my goal of becoming an official Debian Package Maintainer. This could also serve as a guide for others to get experience with:

    • Packaging expertise: Modern Debian packaging workflows with complex applications
    • DevOps proficiency: CI/CD pipeline design and GitHub Actions automation
    • Problem-solving skills: Deep debugging (QtWebEngine, threading, environment issues)
    • Community engagement: Solving real user problems at scale
    • Infrastructure design: Scalable, cost-effective distribution systems
    • Documentation: Comprehensive technical writing for diverse audiences

    Future Evolution

    The architecture proved so successful that I’m considering replicating it for other packaging projects. The pattern of using GitHub infrastructure for APT repository hosting could benefit many projects struggling with distribution challenges.

    Potential applications:

    • Personal package repository for experimental Debian packages
    • Other media applications requiring complex Qt5/WebEngine setups
    • Cross-distribution packaging (Debian + Ubuntu + derivatives)

    Key Principles Reinforced

    This journey reinforced several fundamental principles:

    1. Documentation is Infrastructure

    Good documentation isn’t just text—it’s the foundation that enables user adoption and community growth. The original DEBIAN.md file evolved into a complete packaging and distribution solution.

    2. Packaging is Product Design

    How users install and maintain software is part of the user experience. Poor packaging creates friction; good packaging eliminates it. The difference between:

    • ❌ «Download, extract, install 15 dependencies, compile, copy files manually»
    • ✅ «apt install stremio»

    3. Modern Infrastructure Enables Scale

    By leveraging GitHub’s infrastructure (Actions, Pages, Releases), a single developer can provide enterprise-grade distribution infrastructure with zero operational overhead. This democratizes software distribution.

    4. Standards Enable Ecosystems

    Following Debian packaging standards meant the same packages work across multiple distributions (Debian, Ubuntu, Kali) and can integrate with the official Debian archive.

    5. Deep Technical Understanding Pays Off

    The critical fixes (QtWebEngine initialization, threading compatibility, environment variables) required deep understanding of:

    • Qt5 initialization order
    • QML engine threading model
    • QProcess environment inheritance
    • Node.js runtime requirements

    Surface-level knowledge wouldn’t have solved these problems.

    6. Proper Testing Prevents Rework

    The patch development lessons learned (70% time wasted on rework) demonstrate that upfront validation investment prevents significant downstream waste. Test against clean upstream early and often.

    7. Independent Versioning Respects Reality

    Using independent version numbers for stremio (4.4.169) and stremio-server (4.20.12) follows industry practice and accurately represents upstream development. Convenience versioning creates confusion.


    Acknowledgments

    • Stremio Team: For creating an excellent media center application
    • Debian Community: For packaging standards and infrastructure (Salsa)
    • GitHub: For free hosting, CI/CD, and unlimited bandwidth
    • Qt Project: For excellent cross-platform framework
    • Debian Developers (Arturo): For preliminary review and guidance on ITP #943703

    Technical Resources

    Source Repositories

    Upstream Projects

    Distribution Statistics

    • Repository Bandwidth: Unlimited (GitHub CDN)
    • Total Downloads: Tracked via GitHub Releases API
    • Uptime: 99.9%+ (GitHub SLA)
    • Build Success Rate: 100% (after fixes applied)

    Conclusion

    What started as a simple documentation contribution evolved into a comprehensive packaging and distribution solution. By combining traditional Debian packaging principles with modern CI/CD infrastructure, it’s possible to deliver professional-grade software distribution that scales globally.

    The journey from «how do I install this?» to «apt install stremio» represents more than technical progress—it’s about removing friction between great software and the people who want to use it.

    Sometimes the best solutions come full circle. Years after contributing installation documentation, I’ve returned to ensure that documentation describes a process that actually works reliably for everyone.

    The technical challenges (QtWebEngine initialization, threading compatibility, environment variables) required deep problem-solving and systematic debugging. The infrastructure challenges (multi-distribution builds, APT repository hosting, CI/CD automation) required modern DevOps practices and cloud-native thinking.

    But ultimately, this project is about enabling users. Every technical decision, every patch, every workflow optimization serves the goal of making Stremio accessible to Debian and Ubuntu users through a simple, reliable installation process.


    Part of ongoing contribution to become a Debian Package Maintainer

    If you found this article helpful, please consider:

    Last updated: October 30, 2025


    Appendix: Complete Command Reference

    Building from Source (Debian/Ubuntu)

    # Install build dependencies
    sudo apt install \
        git git-buildpackage pristine-tar \
        debhelper-compat cmake \
        qtbase5-dev qt5-qmake qt5-qmake-bin \
        qtdeclarative5-dev qtwebengine5-dev qttools5-dev \
        qml-module-qtwebchannel qml-module-qt-labs-platform \
        qml-module-qtwebengine qml-module-qtquick-dialogs \
        qml-module-qtquick-controls qml-module-qt-labs-settings \
        qml-module-qt-labs-folderlistmodel \
        libmpv-dev libssl-dev nodejs npm pkg-kde-tools \
        devscripts lintian dpkg-dev fakeroot librsvg2-bin
    
    # Clone repository
    git clone --recursive https://salsa.debian.org/mendezr/stremio.git
    cd stremio
    
    # Build with CMake
    mkdir build && cd build
    QT_DEFAULT_MAJOR_VERSION=5 cmake ..
    make -j$(nproc)
    
    # Or build with qmake
    QT_SELECT=5 qmake
    QT_SELECT=5 make -j$(nproc)
    
    # Or build package
    QT_DEFAULT_MAJOR_VERSION=5 dpkg-buildpackage -us -uc

    Testing Package Installation

    # Install package
    sudo dpkg -i ../stremio_*.deb
    
    # Fix dependencies if needed
    sudo apt install -f
    
    # Test binary
    stremio --version
    which stremio
    
    # Check dependencies
    ldd /usr/bin/stremio | grep -E "(libQt5|libmpv|libcrypto)"
    
    # Run application
    stremio

    Repository Management

    # Add GPG key
    wget -qO - https://debian.vejeta.com/key.gpg | \
        sudo gpg --dearmor -o /usr/share/keyrings/stremio-debian.gpg
    
    # Add repository (choose your distribution)
    echo "deb [signed-by=/usr/share/keyrings/stremio-debian.gpg] https://debian.vejeta.com trixie main non-free" | \
        sudo tee /etc/apt/sources.list.d/stremio.list
    
    # Update and install
    sudo apt update
    sudo apt install stremio stremio-server
    
    # Verify installation
    dpkg -L stremio
    systemctl --user status stremio-server  # If systemd service installed

    Debugging Runtime Issues

    # Run with debug output
    QT_DEBUG_PLUGINS=1 stremio
    
    # Run in headless mode (for testing)
    QT_QPA_PLATFORM=offscreen stremio
    
    # Disable WebEngine sandbox (for containers)
    QTWEBENGINE_DISABLE_SANDBOX=1 stremio
    
    # Check server process
    ps aux | grep server.js
    lsof -i :11470
    
    # Manual server test
    /usr/bin/node /usr/share/stremio/server.js
    
    # Test with gdb
    gdb --args stremio
    (gdb) run
    (gdb) bt  # If crash occurs

    End of Article


    Technical Depth: Production-grade implementation details
    Target Audience: Advanced developers, system administrators, Debian maintainers

  • Guía Completa: Cómo usar Bluetooth Tethering en Linux (en 2025)

    No solo de wifi vive el computador

    Una solución paso a paso basada en experiencia real con mi Xiaomi Redmi Note 13 Pro + Debian GNU/Linux

    El Problema Original

    Necesitábamos internet para reinstalar un driver WiFi, pero:

    • USB tethering estaba deshabilitado en el teléfono
    • Sin acceso Ethernet
    • Driver WiFi no funcionaba

    Solución: Bluetooth Tethering

    Paso 1: Preparar el sistema Linux

    bash

    # Instalar herramientas Bluetooth
    sudo apt install bluetooth bluez-tools net-tools
    
    # Iniciar y habilitar el servicio
    sudo systemctl start bluetooth
    sudo systemctl enable bluetooth

    Paso 2: Configurar el teléfono Redmi

    Descubrimientos clave:

    1. Activar datos móviles – El tethering Bluetooth requiere datos activos
    2. Ir a: Ajustes > Conexión y uso compartido > Anclaje a red y zona Wi-Fi
    3. Activar «Anclaje a red Bluetooth»ANTES de emparejar
    4. Cambiar nombre del dispositivo a algo identificable ayuda

    Paso 3: Emparejamiento desde Linux

    bash

    # Iniciar bluetoothctl
    bluetoothctl
    
    # Dentro de bluetoothctl:
    power on
    agent on
    scan on
    # Esperar a ver el dispositivo...
    
    devices
    # Buscar tu teléfono en la lista
    
    pair [MAC_ADDRESS]
    trust [MAC_ADDRESS]  
    connect [MAC_ADDRESS]

    Paso 4: El truco crucial – bt-network

    Problema común: Bluetooth se conecta pero no crea interfaz de red.

    bash

    # Mientras está conectado en bluetoothctl, en otra terminal:
    sudo bt-network -c [MAC_ADDRESS] nap
    
    # Verificar interfaz
    ip link show
    # Deberías ver bnep0 o similar
    
    # Configurar DHCP
    sudo dhclient bnep0

    Paso 5: Verificar conexión

    bash

    ip addr show bnep0
    ping -c 3 8.8.8.8

    Problemas Comunes y Soluciones

    1. «Network service is connected, and then disconnected»

    • Causa: Anclaje Bluetooth no activado en el teléfono
    • Solución: Activar antes de conectar

    2. No se crea interfaz bnep0

    • Causa: Falta servicio PAN
    • Solución: Usar bt-network o pand

    3. No se puede identificar el dispositivo

    • Truco: Apagar/encender Bluetooth del teléfono durante scan on
    • Identificar por MAC: Ver en ajustes del teléfono

    4. Conexión muy lenta

    • Normal: Bluetooth 2.1-3.0 ~ 3 Mbps
    • Solución: Paciencia para updates pequeños

    Comandos Útiles para Diagnóstico

    bash

    # Ver estado Bluetooth
    sudo systemctl status bluetooth
    rfkill list all
    
    # Ver dispositivos emparejados
    bluetoothctl devices
    
    # Ver información de conexión
    bluetoothctl info [MAC]
    
    # Forzar reconexión
    sudo systemctl restart bluetooth

    Flujo de Trabajo Optimizado

    1. Teléfono: Activar datos + anclaje Bluetooth
    2. Linux: bluetoothctl → pair → trust → connect
    3. Linux: bt-network -c [MAC] nap
    4. Linux: dhclient bnep0
    5. Verificar: ping 8.8.8.8

    Conclusión

    El Bluetooth tethering es una herramienta de rescate que es como oro en paño cuando fallan otros métodos de conexión. La clave está en:

    • Pre-configurar el teléfono correctamente
    • Usar bt-network en lugar de confiar solo en bluetoothctl
    • Tener paciencia con la velocidad limitada

    Esta solución nos permitió descargar paquetes críticos y resolver el problema real del driver WiFi, demostrando que incluso conexiones lentas pueden ser suficientes para tareas administrativas esenciales.

  • Debian GNU/Linux en MacBook Pro 2013. Por 140€ en 3-5 años más de vida para mi MacBook Pro 2013

    Debian GNU/Linux en MacBook Pro 2013. Por 140€ en 3-5 años más de vida para mi MacBook Pro 2013

    Un MacBook Pro de 11 años puede seguir siendo útil en 2025, pero requiere cuidados específicos y decisiones técnicas informadas. Esta es la historia de cómo convertí 140€ en varios años más de vida útil, con lecciones técnicas importantes sobre las diferencias entre generaciones de hardware Apple.

    El problema: batería hinchada y decisión crítica

    Mi MacBook Pro 11,1 (Late 2013) tenía la bateria inutil desde hace años, pero el problema real se hizo evidente al decidir abrirlo para inspección: batería visiblemente hinchada.

    La batería había expandido lo suficiente para deformar el chasis interno, un problema común en MacBooks de esta generación después de años de uso. Este descubrimiento cambió completamente el diagnóstico de «batería gastada» a «riesgo de seguridad que requiere acción inmediata».

    Decisión crítica: Detener el uso inmediatamente hasta resolver el problema. Una batería hinchada no es solo un inconveniente, es un riesgo de seguridad real que puede dañar componentes internos o crear situaciones peligrosas.

    Análisis económico: ¿renovar o reemplazar?

    Alternativas consideradas:

    • ThinkPad E14 nuevo: ~350€
    • Renovación MacBook 2013: ~140€
    • Mantener como equipo fijo: 0€ (pero limitado)

    Factores decisivos:

    • Uso previsto: equipo secundario para desarrollo ocasional
    • Portabilidad necesaria: sí, para trabajar en diferentes ubicaciones
    • Presupuesto disponible: preferencia por inversión mínima efectiva

    La renovación ofreció la mejor relación costo-beneficio para mis necesidades específicas.

    Proceso de renovación técnica

    Reemplazo de batería: investigación y compra

    Opción elegida: Batería iFixit (119€ + herramientas)

    Alternativas descartadas:

    • Baterías genéricas de AliExpress: ~40€ (calidad dudosa, historiales de hinchazón temprana)
    • Servicio técnico oficial: >200€ (precio prohibitivo para equipo de 11 años)

    Instalación: Siguiendo la guía iFixit paso a paso, incluyendo limpieza interna completa con aire comprimido y alcohol isopropílico para remover años de acumulación de polvo.

    Resultado: Batería con 104.2% de capacidad (6669 mAh vs 6400 mAh de diseño), superando las especificaciones originales gracias a mejoras en la tecnología de celdas Li-ion.

    Cargador de repuesto

    Problema del cargador original: Conector T-pin excesivamente caliente tras años de uso, indicando posible degradación de contactos internos.

    Solución: Cargador compatible Ywcking (20€) como reemplazo principal, manteniendo el original como respaldo de emergencia.

    Optimizaciones de sistema críticas

    Gestión de memoria: zram como salvavidas

    Con solo 8GB de RAM física, implementé zram para expansión de memoria virtual comprimida:

    # Configuración zram implementada
    /dev/zram0: 3.8GB comprimidos
    Ratio compresión: ~3:1
    Resultado efectivo: ~10-12GB memoria utilizable

    Impacto medido: Firefox puede mantener 15-20 pestañas abiertas sin degradación perceptible del sistema.

    Optimización Firefox para RAM limitada

    # Configuraciones clave en about:config
    browser.cache.memory.capacity: 51200 (50MB)
    browser.sessionhistory.max_total_viewers: 0
    browser.tabs.unloadOnLowMemory: true

    Extensiones esenciales:

    • uBlock Origin: Bloqueo de contenido pesado
    • Auto Tab Discard: Suspensión automática de pestañas inactivas

    Gestión energética inteligente

    Limitaciones críticas del MacBook Pro 2013

    Realidad técnica: A diferencia de laptops más modernos, el MacBook Pro 11,1 bajo Linux NO soporta control automático de umbrales de carga de batería:

    # Verificación en mi sistema
    sudo tlp-stat -b
    # Resultado: "Supported features: none available"
    # charge_control_start_threshold = (not available)
    # charge_control_end_threshold = (not available)

    Esta limitación requiere estrategias manuales de protección.

    Sistema de monitorización automática

    Desarrollé scripts de protección que compensan las limitaciones del hardware:

    #!/bin/bash
    # Script de monitorización cada 5 minutos vía cron
    # Alertas por temperatura >42°C
    # Warnings por tiempo prolongado al 100%
    # Modo nocturno estricto 22:00-08:00

    Configuración TLP funcional (sin umbrales automáticos):

    # Configuraciones que SÍ funcionan en MacBook Pro 2013
    TLP_ENABLE=1
    CPU_SCALING_GOVERNOR_ON_AC=ondemand
    CPU_SCALING_GOVERNOR_ON_BAT=powersave
    CPU_BOOST_ON_BAT=0
    PLATFORM_PROFILE_ON_BAT=low-power
    WIFI_PWR_ON_BAT=on

    Estrategias diferenciadas por hardware

    MacBook Pro 2013: Rutina manual estricta

    Limitaciones técnicas:

    • Sin gestión automática de batería
    • Tecnología de carga de 2013
    • Mayor susceptibilidad a degradación térmica

    Rutina diaria implementada:

    • Rango óptimo: 20-85% (manual)
    • Desconexión nocturna obligatoria
    • Monitorización cada 5 minutos via cron
    • Hibernación inteligente configurada

    Rutina mensual para calibración:

    1. Desactivar protección automática
    2. Descarga controlada hasta 5% (NO 0%)
    3. Carga completa al 100%
    4. Reactivar protección

    Diferenciación importante: Mac M1

    ADVERTENCIA CRÍTICA: Las estrategias para MacBook 2013 NO se aplican a Mac M1.

    Mac M1 + Folding@Home:

    • Optimización automática de batería nativa
    • Conectado 24/7 durante Folding es aceptable
    • Rutina mensual 30% (NO semanal, NO 0%)
    • Gestión térmica superior

    Hibernación a disco: configuración avanzada

    Diagnóstico inicial

    # Estado original del sistema
    cat /sys/power/state
    # Output: "freeze mem" (hibernación no disponible)
    
    # Configuración kernel
    grep CONFIG_HIBERNATION /boot/config-$(uname -r)
    # Output: CONFIG_HIBERNATION=y (soporte disponible)

    Configuración paso a paso

    Requisitos cumplidos:

    • RAM: 7.7GB
    • Swap disponible: 15GB (11.2GB disco + 3.8GB zram)
    • UUID swap: a13628e9-f161-4315-afea-4d06e704d09d

    Implementación:

    # 1. Configurar GRUB
    sudo nano /etc/default/grub
    # Añadir: resume=UUID=a13628e9-f161-4315-afea-4d06e704d09d
    sudo update-grub
    
    # 2. Configurar initramfs
    echo "RESUME=UUID=a13628e9-f161-4315-afea-4d06e704d09d" | sudo tee /etc/initramfs-tools/conf.d/resume
    sudo update-initramfs -u
    
    # 3. Reiniciar y verificar
    sudo reboot
    cat /sys/power/state
    # Resultado esperado: "freeze mem disk"

    Sistema de hibernación inteligente

    Script automatizado que:

    • Crea snapshots de trabajo antes de hibernar
    • Hibernación automática al 15% de batería
    • Countdown cancelable de 60 segundos
    • Modo «descarga completa» para calibración
    • Restauración de sesión post-hibernación

    Resultados medibles

    Rendimiento del sistema

    Antes de optimizaciones:

    • RAM efectiva: 8GB
    • Multitarea limitada: 5-8 pestañas Firefox
    • Autonomía: ~2 horas
    • Temperaturas: CPU >80°C frecuente

    Después de optimizaciones:

    • RAM efectiva: ~12GB (con zram)
    • Multitarea mejorada: 15-20 pestañas estables
    • Autonomía: 5-7 horas uso real
    • Temperaturas: CPU <75°C normal

    Longevidad de batería

    Datos actuales (3 meses post-instalación):

    # Estado verificado
    Manufacturer: ifixit
    Model: bq20z451 (Texas Instruments - premium)
    Cycle Count: 4 (prácticamente nueva)
    Capacity: 104.2% (superior a original)
    Charge Full: 6669 mAh (vs 6400 mAh diseño)

    Lecciones técnicas importantes

    Inversión inteligente vs reemplazo

    Total invertido: 140€ (batería 120€ + cargador 20€)
    Alternativa evitada: 350€ ThinkPad nuevo
    Ahorro neto: 210€
    Vida útil proyectada: 3-5 años adicionales

    Diferencias generacionales críticas

    Error común: Aplicar estrategias modernas a hardware legacy. Las capacidades de gestión energética han evolucionado significativamente entre 2013 y 2020+.

    Realidad técnica: Hardware de 2013 requiere supervisión manual donde hardware moderno tiene automatización.

    Importancia de la monitorización

    Sin capacidades automáticas de protección, la implementación de sistemas de alertas y scripts de monitorización se vuelve esencial para prevenir degradación acelerada.

    Conclusión: viabilidad a largo plazo

    Un MacBook Pro de 2013 puede seguir siendo funcional en 2025 con:

    1. Hardware renovado: Batería premium + limpieza interna
    2. Optimizaciones específicas: zram, TLP, Firefox tuning
    3. Protección automatizada: Scripts de monitorización
    4. Rutinas disciplinadas: Carga manual inteligente
    5. Hibernación configurada: Protección total del trabajo

    Casos de uso viables:

    • Desarrollo ligero y scripting
    • Navegación web optimizada
    • Tareas de productividad básica
    • Equipo secundario/respaldo

    No recomendado para:

    • Edición de video pesada
    • Gaming moderno
    • Compilación de proyectos grandes
    • Uso como equipo principal

    La clave está en entender las limitaciones del hardware y trabajar dentro de ellas, no contra ellas. Con las optimizaciones correctas y expectativas realistas, la inversión de 140€ puede proporcionar varios años más de utilidad de un equipo que de otro modo sería descartado.

    Recursos técnicos:

  • Cómo darle nueva vida a un MacBook Pro 2013: Batería hinchada, optimizaciones Linux y decisiones inteligentes

    El problema inicial

    Mi MacBook Pro Retina 13″ de 2013 llevaba años funcionando solo con corriente. La batería había dejado de cargar hace tiempo, pero como lo usaba principalmente en casa, no me preocupé demasiado.

    Llegué a plantearme seriamente sustituirlo por una tablet Android con «6GB + 28GB expandidos» (spoiler: esa RAM expandida es básicamente almacenamiento lento disfrazado de memoria). Pero antes de tomar esa decisión, decidí investigar si mi viejo Mac tenía solución.

    Descubriendo el peligro oculto

    Cuando finalmente conseguí el destornillador Pentalobe P5 adecuado y abrí la carcasa inferior, me encontré con una sorpresa desagradable: uno de los módulos de la batería estaba hinchado.

    Esto es peligroso. Las baterías de litio hinchadas pueden:

    • Romper componentes internos (especialmente el trackpad, que está justo encima)
    • Liberar gases tóxicos
    • En casos extremos, incendiarse o explotar

    Si tu portátil tiene una batería vieja y notas que el trackpad está elevado, la carcasa no cierra perfectamente o hay separaciones visibles, revísalo inmediatamente.

    Manejo seguro de baterías hinchadas:

    1. NO la perfores, dobles o presiones
    2. Retírala del dispositivo inmediatamente
    3. Colócala en superficie no inflamable (metal, cerámica)
    4. Mantenla lejos de materiales inflamables
    5. Llévala a un punto limpio o tienda de electrónica cuanto antes
    6. NUNCA la tires a la basura normal

    La solución: inversión inteligente vs reemplazo

    Tenía dos opciones claras:

    Opción A: Comprar un portátil usado (ThinkPad T480 con 16GB RAM) → ~300-350€

    Opción B: Reparar el Mac → Batería + cargador → ~140€

    ¿Por qué reparar?

    Contexto importante: tengo un Slimbook Pro (2019) con 32GB RAM como equipo principal. El MacBook es mi portátil secundario para:

    • Desarrollo ligero en cafeterías
    • Movilidad sin preocuparme por golpes
    • Situaciones donde necesito algo compacto y resistente

    Para este uso ocasional, 8GB optimizados son suficientes. No necesitaba gastar el doble en otro equipo cuando el problema era solucionable.

    El proceso de reparación

    1. Batería nueva de iFixit (120€)

    Pedí el kit completo que incluye:

    • Batería A1493 (compatible con MacBook Pro 13″ Retina Late 2013 – modelo A1502)
    • Todas las herramientas necesarias (Pentalobe P5, Torx T5, spudger, pinzas)
    • Kit de adhesivos
    • Removedor de pegamento viejo

    Ventaja de iFixit: No tienes que comprar nada más. Otros vendedores solo dan la batería y luego descubres que necesitas herramientas especiales.

    2. Limpieza interna

    Aprovechando que tenía el Mac abierto, limpié el polvo acumulado:

    Materiales:

    • Aire comprimido en lata
    • Brocha suave
    • Paño de microfibra
    • Alcohol isopropílico 90%+

    Zonas críticas:

    • Ventiladores (sujetando las aspas para evitar que giren)
    • Disipador de calor
    • Conectores y puertos

    NO uses:

    • Aspiradora (carga estática)
    • Agua
    • Trapo húmedo normal

    3. Cargador de repuesto (20€)

    Mi cable MagSafe 2 original de 2013 estaba reparado con cinta aislante desde hacía años. Aunque funcionaba, con una batería nueva de 120€ no quería arriesgarme a dañarla con un cargador deteriorado.

    Después de investigar, compré un SCOVEE 60W T-Tip en Amazon (19,99€):

    • Compatible con A1502
    • 4.8/5 estrellas con 81 reseñas
    • Certificaciones CE/FCC/RoHS
    • Reseñas positivas sobre temperatura («no se calienta»)

    No es una marca premium como Green Cell, pero para uso ocasional y con las buenas valoraciones, era una opción sensata. El cable original queda como backup de emergencia.

    Optimizaciones de software: TLP para gestión de energía

    Además de la batería nueva, instalé TLP para optimizar automáticamente el consumo de energía.

    TLP optimiza el consumo de batería automáticamente sin configuración manual.

    # Instalación
    sudo apt install tlp tlp-rdw
    
    # Activar
    sudo systemctl enable tlp
    sudo systemctl start tlp
    
    # Ver estado de batería
    sudo tlp-stat -b
    

    Lo mejor de TLP: funciona completamente en segundo plano. Una vez instalado, se olvida.

    Calibración de la batería: crítico pero sencillo

    Las baterías nuevas deben calibrarse para que el indicador de porcentaje sea preciso. Sin calibración, el sistema no sabe la capacidad real y puede apagarse al 50% o seguir funcionando «al 1%» durante horas.

    Proceso correcto según iFixit/Apple:

    Para portátiles:

    1. Carga inicial:
      • Cargar hasta 100%
      • Mantener conectado 2 horas más (crítico para balanceo de celdas)
      • Puede estar apagado o encendido
    2. Descarga completa:
      • Desconectar y usar normalmente
      • Cuando aparezca advertencia de batería baja → guardar trabajo
      • Dejar que se apague solo (no apagarlo manualmente)
      • Esto establece el «ancla» inferior de calibración
    3. Espera:
      • Dejar 5 horas apagado y desconectado
      • Esto asegura que el sistema de gestión registre correctamente la descarga
    4. Carga final:
      • Cargar de forma ininterrumpida hasta 100%
      • ✅ Batería calibrada

    ¿Por qué dejar que se apague solo y no parar al 5-10%?

    El sistema de gestión mantiene una reserva de seguridad invisible. Cuando muestra «0%», todavía hay carga química real para proteger la batería de daños. Solo dejando que el sistema se apague por sí mismo se establece correctamente el punto de «descarga completa» que el controlador necesita.

    Resultados

    Estado de la batería después de la instalación:

    sudo tlp-stat -b
    
    manufacturer = ifixit
    model_name = bq20z451
    cycle_count = 1
    charge_full_design = 6400 mAh
    charge_full = 6661 mAh
    Capacity = 104.1%
    

    ¡La batería tiene 104.1% de capacidad! iFixit envió una batería mejor que las especificaciones originales.

    Mejoras del sistema:

    Antes:

    • ❌ Sin portabilidad (batería muerta)
    • ❌ Cable de carga deteriorado
    • ❌ Batería hinchada (peligro)

    Después:

    • ✅ Autonomía 5-7 horas
    • ✅ Cargador nuevo y seguro
    • ✅ Batería con 104% de capacidad
    • ✅ Sistema limpio internamente
    • ✅ TLP optimizando consumo automáticamente

    Conclusiones y aprendizajes

    1. Las baterías hinchadas son peligrosas

    No ignores las señales: trackpad elevado, carcasa que no cierra bien, separaciones visibles. Revísalo cuanto antes.

    2. Reparar puede ser más inteligente que reemplazar

    Contexto importa:

    • Equipo principal potente → reparar el secundario tiene sentido
    • Solo uso ocasional → 8GB optimizados son suficientes
    • Inversión: 140€ vs 300-350€ → ahorro de 160-210€

    3. iFixit vale cada euro

    Calidad garantizada, herramientas incluidas, guías detalladas, garantía sólida. Para reparaciones importantes, no escatimes en la batería.

    4. La calibración NO es opcional

    Dos horas extras al 100% + descarga completa + espera 5 horas. Parece tedioso pero es la diferencia entre un indicador preciso y uno errático.

    Mi setup final

    Equipo principal (oficina/casa):

    • Slimbook Pro 2019 con 32GB RAM
    • Backend pesado, Docker, IDEs, múltiples proyectos

    Portátil ocasional (movilidad):

    • MacBook Pro 2013 renovado
    • Desarrollo ligero, resistente, compacto
    • Autonomía real de 5-7 horas

    Total invertido en renovación: 140€

    • Batería iFixit: 120€
    • Cargador SCOVEE: 20€

    Vida útil esperada: 3-5 años más para uso ocasional

    Recursos útiles

    Para recordar

    Si tienes un portátil viejo y la batería está muerta o hinchada:

    1. Revisa la batería (ábrelo y comprueba hinchazón – es peligroso)
    2. iFixit para repuestos (calidad garantizada, incluye herramientas)
    3. Limpia el interior (aire comprimido, aprovecha que está abierto)
    4. Instala TLP (gestión automática de energía en Linux)
    5. Calibra después de batería nueva (proceso completo, no atajos)

    Un portátil de 2013 con batería nueva y bien mantenido puede seguir siendo perfectamente usable en 2025 para desarrollo ligero y uso diario. No todo necesita ser reemplazado.


    Hardware: MacBook Pro Retina 13″ 2013 (A1502) | Software: Debian GNU/Linux con XFCE

  • Packaging Stremio for Debian: A Journey to 100% System Library Integration

    Packaging Stremio for Debian: A Journey to 100% System Library Integration

    Stremio for Debian: A Journey to 100% System Library Integration

    How I replaced every bundled dependency in a complex Qt5 application—and what I learned about patch development, threading bugs, and the art of debugging runtime crashes

    By Juan Manuel Méndez Rey

    Last Updated: October 3, 2025

    Tags: #debian #packaging #qt5 #technical-writing #system-libraries #debugging #free-software


    TL;DR

    I packaged Stremio for Debian by replacing 100% of its bundled dependencies (libmpv, Qt libraries, OpenSSL) with system libraries. Along the way, I debugged five critical issues: QtWebEngine initialization order, threading conflicts with SingleApplication, missing QML modules, Node.js environment variables in QProcess, and debhelper install file pitfalls. The real lesson? I repeated patch creation 5+ times because I tested against modified sources instead of clean upstream. This article shares both the technical solutions and the meta-lesson about efficient patch development workflow that could have saved me 70% of development time.

    Key Takeaway: When packaging complex applications, test your patches against pristine upstream at each step, not at the end.


    Package Status (October 2025)

    This article documents the technical work behind packaging Stremio for Debian. The package has achieved 100% system library integration and is currently:

    • Technical work: Complete and validated
    • ITP submitted: Under review by Debian Developer sponsor
    • Status: Awaiting upload approval
    • Repository: salsa.debian.org/mendezr/stremio

    This is a technical deep-dive into the challenges and solutions, not an announcement of package availability. The work continues through the Debian review process.


    Introduction

    When I set out to package Stremio—a popular media center application—for Debian, I had one clear goal: achieve 100% system library integration. No bundled dependencies, no git submodules, just clean integration with Debian’s ecosystem. What seemed like a straightforward build system migration turned into a deep dive into Qt5 threading models, runtime initialization order, and the subtle art of creating minimal, maintainable patches.

    This is the story of that journey, the technical challenges I faced, and—perhaps most importantly—the lessons I learned about efficient patch development that could have saved me days of rework.

    The Challenge: System Libraries or Bust

    Stremio’s upstream repository arrived with several bundled dependencies as git submodules:

    • libmpv for video playback
    • qthelper for Qt utilities
    • singleapplication for single-instance behavior
    • OpenSSL libraries

    The Debian way is clear: use system-provided libraries. This isn’t just philosophical purity—it’s about security updates, dependency management, and integration with the broader ecosystem.

    The goal: Replace every bundled dependency with its Debian system library equivalent.

    The result: A working .deb package with a 293KB optimized binary using 100% system libraries.

    The journey: Five major technical hurdles, each revealing deeper insights into Qt5 application architecture.

    The First Victory (That Wasn’t)

    Initial packaging seemed straightforward. I modified CMakeLists.txt to use system libraries:

    find_package(PkgConfig REQUIRED)
    pkg_check_modules(MPV REQUIRED mpv)
    find_package(Qt5 REQUIRED COMPONENTS Core Gui Qml Quick WebEngine)
    find_package(OpenSSL REQUIRED)

    The build succeeded. Dependencies looked perfect:

    $ ldd build/stremio | head -5
        libQt5WebEngine.so.5 => /lib/x86_64-linux-gnu/libQt5WebEngine.so.5
        libQt5DBus.so.5 => /lib/x86_64-linux-gnu/libQt5DBus.so.5
        libcrypto.so.3 => /lib/x86_64-linux-gnu/libcrypto.so.3
        libmpv.so.2 => /lib/x86_64-linux-gnu/libmpv.so.2

    Perfect! Ship it, right?

    Wrong. When I actually ran the application:

    Segmentation fault (core dumped)

    Thus began the real work.

    Challenge 1: The QtWebEngine Initialization Bug

    Symptom: Immediate segmentation fault when launching the application.

    First debugging attempt: Run with gdb, examine the stack trace:

    Program received signal SIGSEGV, Segmentation fault.
    0x00007ffff5a2b3c4 in QQmlApplicationEngine::QQmlApplicationEngine() ()

    The crash occurred during QQmlApplicationEngine construction. But why? The same code worked fine with bundled libraries.

    The investigation: After examining Qt5 WebEngine documentation and several failed attempts to reorganize the code, I discovered a critical initialization requirement buried in the QtWebEngine documentation:

    QtWebEngine::initialize() must be called before the QApplication constructor when using QML.

    The bundled library setup happened to satisfy this ordering by accident. With system libraries, the default main() function violated it:

    // WRONG - causes crashes
    int main(int argc, char *argv[]) {
        QApplication app(argc, argv);  // QApplication created first
        // QtWebEngine::initialize() never called!
        QQmlApplicationEngine engine;  // CRASH
    }

    The fix (patch 0007-add-qtwebengine-initialize-fix.patch):

    // CORRECT - initialize QtWebEngine before QApplication
    int main(int argc, char *argv[]) {
        QtWebEngine::initialize();     // CRITICAL: Must be first!
        QApplication app(argc, argv);
        QQmlApplicationEngine engine;  // Now works
    }

    Lesson: When replacing bundled libraries with system ones, initialization order assumptions may change. Always verify startup sequence requirements.

    Challenge 2: The SingleApplication Threading Nightmare

    Symptom: After fixing QtWebEngine initialization, the application launched but immediately crashed with:

    QObject: Cannot create children for a parent that is in a different thread.

    The culprit: System library libsingleapplication-dev version 3.3.4.

    Stremio needs single-instance behavior—when you launch it a second time, it should activate the existing window rather than start a new process. The upstream code used a bundled singleapplication library. The Debian system provides libsingleapplication-dev. Perfect replacement, right?

    Wrong again.

    The investigation: The system SingleApplication library sets up a threading context that conflicts with QQmlApplicationEngine. Specifically:

    1. System SingleApplication creates its IPC mechanism in a worker thread
    2. QQmlApplicationEngine expects to be created in the main thread
    3. Qt5’s threading model doesn’t allow cross-thread parent-child relationships for certain QML objects

    The bundled version used a different threading approach that happened to work with QML.

    The false starts: I tried:

    • Patching SingleApplication to use main thread (broke IPC)
    • Deferring QML engine creation (broke startup sequence)
    • Various Qt thread affinity hacks (broke other things)

    The solution: Write a custom CompatibleSingleApp class that provides identical functionality without threading conflicts:

    // compatible_singleapp.h
    class CompatibleSingleApp : public QApplication {
        Q_OBJECT
    public:
        CompatibleSingleApp(int &argc, char **argv);
        bool isPrimary() const;
        bool isSecondary() const;
    
    signals:
        void instanceStarted();
    
    private:
        QLocalServer *m_server;
        QString m_serverName;
        bool m_isPrimary;
    };

    Implementation highlights (patch 0008-add-compatible-singleapp-implementation.patch):

    CompatibleSingleApp::CompatibleSingleApp(int &argc, char **argv)
        : QApplication(argc, argv), m_isPrimary(false) {
    
        m_serverName = "stremio-" + QString(qgetenv("USER"));
    
        // Try to connect to existing instance
        QLocalSocket socket;
        socket.connectToServer(m_serverName);
    
        if (socket.waitForConnected(500)) {
            // Secondary instance - notify primary and exit
            m_isPrimary = false;
            socket.write("ACTIVATE");
            socket.waitForBytesWritten();
            return;
        }
    
        // Primary instance - create server
        m_isPrimary = true;
        m_server = new QLocalServer(this);
        m_server->listen(m_serverName);
    
        connect(m_server, &QLocalServer::newConnection, this, [this]() {
            QLocalSocket *client = m_server->nextPendingConnection();
            connect(client, &QLocalSocket::readyRead, [this, client]() {
                QByteArray data = client->readAll();
                if (data == "ACTIVATE") {
                    emit instanceStarted();
                }
                client->deleteLater();
            });
        });
    }

    Result: Perfect single-instance behavior using pure QApplication (no threading conflicts) with QLocalSocket/QLocalServer for IPC.

    Binary size: 424KB debug vs 293KB release—both using 100% system libraries.

    Key lesson: System libraries may have different implementation details (like threading models) even when providing the same API. Sometimes a custom minimal implementation is cleaner than patching around incompatibilities.

    Challenge 3: The Missing QML Modules

    Symptom: After fixing both initialization and threading issues, the application launched but showed a black screen with console errors:

    module "QtWebEngine" is not installed
    module "QtWebChannel" is not installed
    module "Qt.labs.platform" is not installed

    The problem: Qt5 QML modules are separate runtime packages in Debian, not automatically pulled in by qtdeclarative5-dev.

    The investigation: Stremio’s QML code imports numerous Qt modules:

    import QtQuick 2.12
    import QtQuick.Controls 2.12
    import QtWebEngine 1.10
    import QtWebChannel 1.0
    import Qt.labs.platform 1.1
    import Qt.labs.settings 1.0

    Each requires a separate Debian package.

    The solution: Comprehensive dependency mapping in debian/control:

    Depends: ${shlibs:Depends}, ${misc:Depends},
             qml-module-qtwebengine,
             qml-module-qtwebchannel,
             qml-module-qt-labs-platform,
             qml-module-qtquick-controls,
             qml-module-qtquick-dialogs,
             qml-module-qt-labs-settings,
             qml-module-qt-labs-folderlistmodel,
             qtbase5-dev-tools

    Lesson: When packaging Qt QML applications, trace every QML import statement to its corresponding Debian package. apt-file search is your friend:

    $ apt-file search QtWebEngine.qml
    qml-module-qtwebengine: /usr/lib/x86_64-linux-gnu/qt5/qml/QtWebEngine/...

    Challenge 4: The Streaming Server Mystery

    Symptom: GUI loads perfectly, but when trying to play media:

    Error while starting streaming server
    tcp: Connection to tcp://127.0.0.1:11470 failed: Connection refused

    The investigation: Stremio includes a Node.js server component (server.js) for streaming. The shell process log showed:

    TypeError [ERR_INVALID_ARG_TYPE]: The "path" argument must be of type string. Received undefined
        at Object.join (node:path:1292:7)

    The root cause: Qt’s QProcess doesn’t inherit environment variables by default. The Node.js server expected HOME, USER, and PWD to be available, but they weren’t.

    The fix (patch 0011-fix-qprocess-environment-for-server-launch.patch):

    // stremioprocess.cpp
    void Process::start() {
        // Set up environment variables for Node.js server
        QProcessEnvironment env = QProcessEnvironment::systemEnvironment();
    
        if (!env.contains("HOME")) {
            env.insert("HOME",
                QStandardPaths::writableLocation(QStandardPaths::HomeLocation));
        }
        if (!env.contains("USER")) {
            env.insert("USER", qgetenv("USER"));
        }
        if (!env.contains("PWD")) {
            env.insert("PWD", QDir::currentPath());
        }
    
        this->setProcessEnvironment(env);
        QProcess::start();
    }

    Result: Server starts successfully:

    hls executables located -> { ffmpeg: '/usr/bin/ffmpeg', ffsplit: null }
    Using app path -> /home/user/.stremio-server
    EngineFS server started at http://127.0.0.1:11470

    Lesson: When spawning processes from Qt applications, explicitly configure the environment. Don’t assume child processes inherit the parent’s environment variables.

    Challenge 5: Debian Packaging Structure Pitfalls

    Symptom: Package builds successfully, but files install to wrong locations or with wrong names.

    The problem: Misunderstanding debhelper’s .install file behavior.

    What I thought:

    # debian/stremio.install
    build/stremio usr/bin/stremio-bin    # Install as /usr/bin/stremio-bin

    What actually happened:

    /usr/bin/stremio-bin/stremio    # Created DIRECTORY, file inside!

    The revelation: In debhelper .install files:

    • Path ending with / → Install files INTO that directory using original names
    • Path WITHOUT / → Create directory with that name and install files inside

    The correct solution (actual implementation):

    # debian/stremio.install
    # Binary installed to /usr/libexec (FHS 3.0 compliance for helper executables)
    build/stremio usr/libexec/stremio/
    
    # Wrapper script becomes the primary user-facing command
    debian/stremio-wrapper usr/bin/
    
    # Desktop file for application menu integration
    debian/stremio.desktop usr/share/applications/
    
    # Application icons (multiple resolutions for different contexts)
    icons/smartcode-stremio_16.png usr/share/icons/hicolor/16x16/apps/
    icons/smartcode-stremio_64.png usr/share/icons/hicolor/64x64/apps/
    # ... (additional icon sizes)

    Why this structure?

    1. /usr/libexec/stremio/: Modern FHS 3.0 location for internal executables not meant to be called directly by users
    2. Wrapper script at /usr/bin/stremio: Sets environment variables (like QTWEBENGINE_DISABLE_SANDBOX=1) before launching the actual binary
    3. Trailing slashes: Install files INTO directories using original filenames—critical for correct placement

    Lesson: Read debhelper documentation carefully. Small syntax details (trailing slashes!) have big consequences. Modern Debian packaging also follows FHS 3.0 standards, placing helper binaries in /usr/libexec/ rather than /usr/bin/.

    The Meta-Lesson: Efficient Patch Development

    The technical challenges were difficult, but I made them harder through inefficient workflow. I created patches, tested them, found they failed on clean upstream, then reworked them—five times.

    The problem: I was testing patches against already-modified sources, not pristine upstream.

    Build System Strategy: Patch CMakeLists.txt First

    Critical principle: Always prioritize build system patches over source code modifications.

    When replacing bundled dependencies with system libraries, the first patches should target CMakeLists.txt:

    # Patch 0005-cmake-system-libraries-v4.4.169.patch
    find_package(PkgConfig REQUIRED)
    pkg_check_modules(MPV REQUIRED mpv)
    find_package(Qt5 REQUIRED COMPONENTS Core Gui Qml Quick WebEngine DBus)
    find_package(OpenSSL REQUIRED)

    Why this matters: Smaller, focused patches that address build system integration separately from source code changes are easier to maintain and review.

    Build system preference: We used qmake to generate makefiles first (Stremio’s traditional build system), then ensured CMake compatibility. The stremio.pro file and release.makefile workflow took precedence for package builds.

    The Anti-Pattern

    1. Modify source files directly to fix issue
    2. Generate patches from modified state
    3. Try to apply patches to clean upstream
    4. Patches fail (missing context, wrong line numbers, missing dependencies)
    5. Repeat

    The Efficient Workflow I Should Have Used

    # 1. Start with clean upstream
    git checkout v4.4.169
    
    # 2. Create isolated test environment
    cp -r . /tmp/patch-test/
    cd /tmp/patch-test/
    
    # 3. Fix ONE issue, test, generate patch
    # (fix QtWebEngine initialization)
    mkdir build && cd build && cmake .. && make    # Test build
    cd .. && git diff > 0001-qtwebengine-init.patch
    
    # 4. Apply patch to clean upstream, fix next issue
    git checkout v4.4.169
    patch -p1 < 0001-qtwebengine-init.patch
    # (fix next issue)
    git diff > 0002-next-fix.patch
    
    # 5. Final validation: apply all patches to clean upstream
    git checkout v4.4.169
    for patch in *.patch; do
        patch -p1 < $patch || exit 1
    done
    mkdir build && cd build && cmake .. && make

    Dependency analysis checklist I wish I’d used from the start:

    ## Pre-Patch Analysis Template
    
    ### Files to Modify:
    - [ ] main.cpp - entry point changes
    - [ ] mainapplication.h - class definitions, includes
    - [ ] CMakeLists.txt - build system
    - [ ] compatible_singleapp.h/cpp - new files
    
    ### Dependency Chain:
    1. main.cpp includes → mainapplication.h
    2. mainapplication.h includes → singleapplication.h (to replace)
    3. CMakeLists.txt references → SingleApplication library
    4. Qt MOC will process → Q_OBJECT classes (check conflicts!)
    
    ### Build Test Plan:
    - [ ] Clean cmake build
    - [ ] ldd dependency verification
    - [ ] Runtime basic functionality

    Time saved if I’d done this from the start: ~70% reduction in patch development time.

    Key insight: Understand file dependencies and build system BEFORE making changes. Test patches against clean upstream at each step, not just at the end.

    The Complete Patch Set

    The final working solution consists of 11 patches:

    1. 0001-Fix-server.js-path-for-FHS-compliance.patch – Server location
    2. 0002-disable-server-download.patch – Use system Node.js
    3. 0004-minimal-qthelper-integration.patch – System Qt utilities
    4. 0005-cmake-system-libraries-v4.4.169.patch – MPV, OpenSSL integration
    5. 0007-add-qtwebengine-initialize-fix.patchCritical: QtWebEngine initialization
    6. 0008-add-compatible-singleapp-implementation.patchCritical: Custom single-instance
    7. 0009-remove-system-singleapplication-add-compatible.patch – Build integration
    8. 0010-fix-qmake-install-paths.patch – Install location fixes
    9. 0011-fix-qprocess-environment-for-server-launch.patchCritical: Server environment

    Validation Workflow

    The final validation workflow ensures patches work on clean upstream, using the GBP (git-buildpackage) import workflow for proper Debian package building:

    # Step 1: Create pristine test environment with GBP structure
    git clone --branch v4.4.169 https://github.com/Stremio/stremio-shell.git /tmp/validation
    cd /tmp/validation
    cp -r /path/to/debian .
    
    # Step 2: Apply all patches using quilt
    export QUILT_PATCHES=debian/patches
    quilt push -a
    
    # Step 3: Test local build first (fastest iteration)
    QT_DEFAULT_MAJOR_VERSION=5 dpkg-buildpackage -us -uc
    
    # Step 4: Verify dependencies
    ldd debian/stremio/usr/libexec/stremio/stremio | head -5
    # Should show: libQt5WebEngine.so.5, libcrypto.so.3, libmpv.so.2
    
    # Step 5: Test with pbuilder (clean chroot environment)
    sudo pbuilder update
    sudo pbuilder build ../*.dsc
    
    # Step 6: Test with sbuild (production-grade build)
    # WARNING: Qt5/WebEngine packages consume significant space
    # Typical requirement: 4-6GB build space (overlayfs in tmpfs)
    # Solution: Use machine with 16GB+ RAM or configure sbuild on disk
    
    sbuild -d unstable ../*.dsc
    # If sbuild fails with "No space left on device":
    # - Switch to larger machine (16GB+ RAM recommended)
    # - Or configure sbuild to use disk instead of tmpfs

    Build Environment Considerations

    Memory requirements for Qt5 applications:

    • dpkg-buildpackage: ~2GB RAM
    • pbuilder: ~4GB RAM
    • sbuild with overlayfs in tmpfs: 6-8GB RAM (Qt5WebEngine is memory-intensive)

    Our solution: After encountering space exhaustion on 8GB machines during sbuild, we migrated to a 32GB machine. This is typical for Qt5/WebEngine applications—always test sbuild capacity before committing to build infrastructure.

    Result: 293KB optimized binary, 100% system libraries, full functionality including streaming.

    Lessons for Other Packagers

    Technical Takeaways

    1. Initialization order matters: System libraries may have different startup requirements than bundled ones. Always verify initialization sequences.
    2. Threading models vary: Even libraries with identical APIs may use different threading approaches. Watch for cross-thread object creation errors.
    3. Environment variables aren’t automatic: QProcess and similar mechanisms need explicit environment setup.
    4. QML modules are separate packages: Trace every QML import to its Debian package dependency.
    5. Custom implementations beat complex patches: Sometimes writing 100 lines of clean code is better than a 500-line patch to an incompatible library.

    Process Takeaways

    1. Always test patches against clean upstream: Never generate patches from already-modified sources.
    2. Map dependencies before coding: Understand file relationships and build system before making changes.
    3. One fix, one patch, one test: Incremental development prevents cascading failures.
    4. Document assumptions: What works «by accident» with bundled libraries may fail with system ones.
    5. Validate completely: Test patches in isolated environments before declaring them «ready».

    Conclusion

    Packaging Stremio for Debian taught me far more than Qt5 internals and build system integration. It revealed how easily we fall into inefficient workflows when we don’t step back to examine our process.

    The technical achievement: A fully functional Debian package using 100% system libraries where the upstream used bundled dependencies—293KB binary, zero submodules, complete feature parity.

    The real achievement: Learning that the how of problem-solving matters as much as the what. Efficient patch development isn’t just about technical skill—it’s about disciplined workflow, systematic thinking, and honest self-assessment.

    Would I do anything differently? Absolutely. I’d use the validation workflow from day one, map dependencies before coding, and test each patch against clean upstream immediately.

    But would I have learned these lessons without making the mistakes? Probably not.

    Acknowledgments

    Thanks to the Stremio team for creating great software, the Debian community for maintaining high standards, my friend Arturo (a Debian Developer) that knowing my passion for Debian encouraged me to start working as a Debian Maintainer, and to every packager who has documented their struggles—your war stories make ours easier.


    Project Status (as of October 3, 2025)

    Note: This article documents the technical process and challenges. Package acceptance is pending Debian review. Status updates will be posted as the review process continues.


    This article is part of my journey toward becoming a Debian Developer. If you’re interested in Debian packaging or have questions about the technical details, feel free to reach out.

Creative Commons License
Except where otherwise noted, the content on this site is licensed under a Creative Commons Attribution-NonCommercial-ShareAlike 4.0 International License.